On a hot summer day, it is difficult to deny yourself the pleasure of refreshing yourself in a cool pond. Not everyone has a country house on the banks of a river or lake, and the construction of a stationary pool requires space, time, and material costs.
Is there an alternative to capital expensive construction? Fortunately, the people's ingenuity has not bypassed this question either. We have selected not only the most interesting and simple ideas, but also the most viable ones that can be really implemented on summer cottage without special skills.
The presented structures are not designed for 10-year use, they do not comply with all norms for the construction of swimming pools. But the authors set completely different goals: cheap, fast, seasonal. Nevertheless, certain rules must be observed with such construction, so first, let's get acquainted with the general recommendations.
Important points when planning and building a homemade pool
Regardless of the choice of material for the construction of a seasonal pool, we recommend that you pay attention to the following points:
- the place for the pool should be in direct sunlight, and not in the partial shade of the garden: the water will heat up faster and less debris in the form of falling leaves and insects;
- the site must be leveled and tamped;
- the bottom and walls of a homemade bowl should not have sharp protrusions and a hard surface;
- you need to immediately think about how and where the water will drain with regular replacement (especially if the installation of filters is not provided);
- the frame must be strengthened so that the structure does not fall apart under water pressure;
- when buying a waterproofing film (tarpaulin), take into account the size of the container with a margin of 50 cm around the entire perimeter.
When arranging a budget pool, do not forget about the arrangement of the area around it. Along the perimeter, you can make an embankment of pebbles or river sand, arrange approaches with a terrace board, or simply knock down the wooden flooring from old pallets. It is also advisable to consider a towel rack for comfort.
Just dig a hole and cover with plastic
The first step is the most time consuming - digging a hole of suitable size and depth. When the pit is ready: the bottom is leveled and rammed, the walls are perpendicular to the bottom and do not crumble, proceed to the second stage - surface preparation.

Cut cardboard boxes are laid on the bottom so that you step gently. The walls are covered with bags so that the film does not tear over irregularities and plant roots.
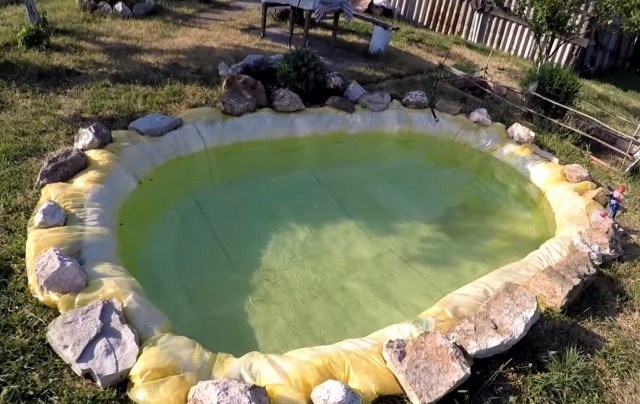
At the third stage, the pit is covered with a waterproofing film. The upper edge is pressed with stones, which additionally plays the role of decoration.

In the soil, you can bury a bowl made of scrap materials, covered with a film inside. This will require a lot of effort, but it will be possible to increase the depth of the pool. Since the edges of the bowl protrude above the surface of the soil, the earth will not wash out into the water.
We are confident that you will love the idea of having a pool. And by next season, you won't want to build temporary structures. The best solution would be to organize a pleasant vacation spot for many years to come. For the construction of a private pool, it is best to turn to professionals who will help at all stages of its construction. Already a lot good reviews received by the POSEIDONSTROY company. They will be able to make a pool according to your wishes or offer standard projects for implementation.
Frame pool made of pallets
To begin with, choose a flat area and cover it with a thick tarpaulin (perhaps an old banner or canopy). Then they take 9 pallets and fasten them with self-tapping screws and slats. Pallets are placed on the edge, connected by a ring. When the round frame is ready, it is secured with tension straps for added rigidity.
At the next stage, the inner surface of the "bowl" is covered with a dense greenhouse film, and old towels, bedspreads or blankets are placed on top at the junction of the pallets and on the bottom. This is done to soften the surface so that while swimming it is comfortable to snuggle against the stacks and walk along the bottom.
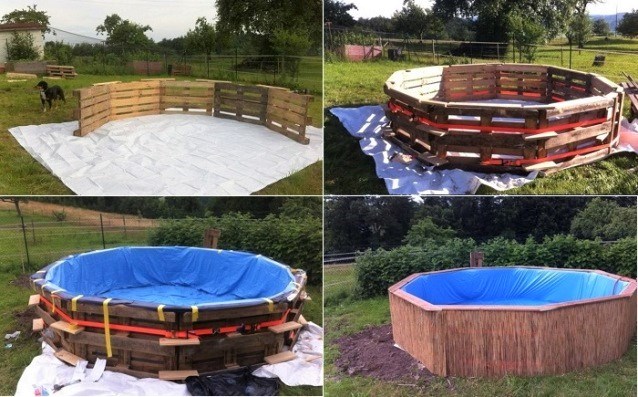
The final layer is a waterproofing film. If it is blue or blue, the water in the pool will always be bright. Some people advise using black film to improve water heating. It is important that under the film there are no open sharp corners, protruding boards and a rough surface, against which the film will quickly tear.
The film is fixed to the upper edge of the pallets using a special adhesive tape. For decorative finishing outside basins you can use reeds or bamboo. Narrow boards are nailed from above to hide the pallets.
The frame can also be made rectangular by connecting the pallets at right angles. The bottom can also be lined with pallets.
To create the most comfortable area, you can fix the lighting stand at the corner and make steps from the pallets.
Fill such a pool with tap water from a garden hose, and drain it manually or using a low-power pump. If chemistry was not used for disinfection, then vegetable beds and flower beds are boldly watered with water.
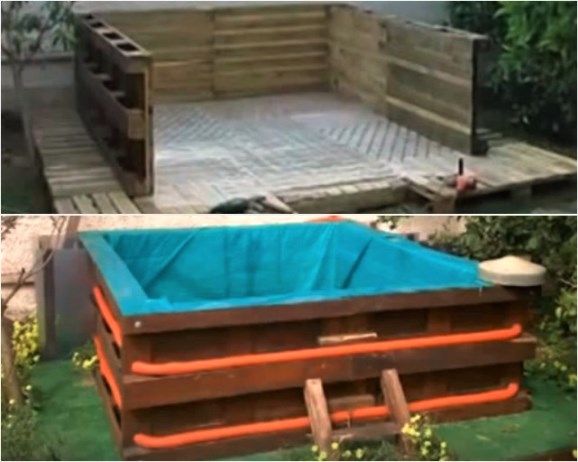
Pool from old boxes
The pool frame can be made from old wooden or plastic boxes. A rectangular box is made of them, each is fastened together and additionally wrapped around the perimeter with plastic tape.
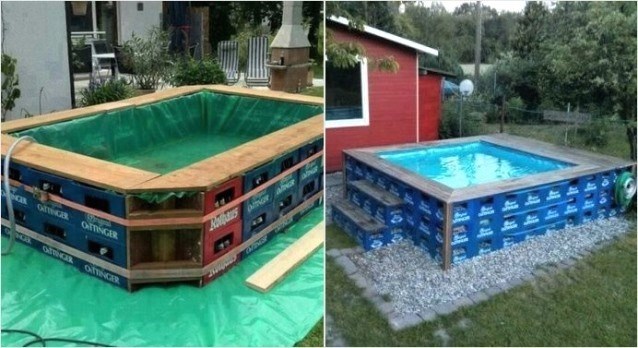
The structure is assembled on a tarpaulin. Inside, the box is covered with a dense waterproofing film, pressing the upper edge with wooden boards.
Hay pond - simple and cool

While looking for materials at hand for the construction of a swimming reservoir in the dacha sector, enthusiasts drew attention to hay, which is an indispensable attribute of agricultural land.

It is spread on a prepared site, and sides are built from rectangular compressed bales. Further, everything is according to the already shown scheme: a dense film is covered in the resulting bowl, the structure is pulled together with belts. To protect the waterproofing film from damage, the first layer on the hay can be put cardboard or thick tarpaulin.

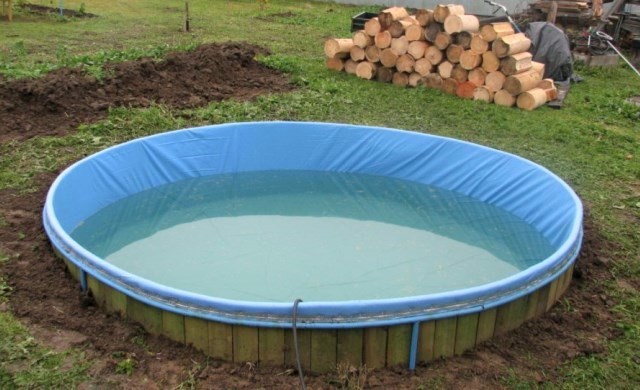
Swimming pool on a metal frame
For those who are friends with welding, it will not be difficult to make a simple do-it-yourself pool from metal.
Each wall is made separately from a profile pipe and galvanized sheet. You can assemble the structure by welding or make it collapsible on bolts.
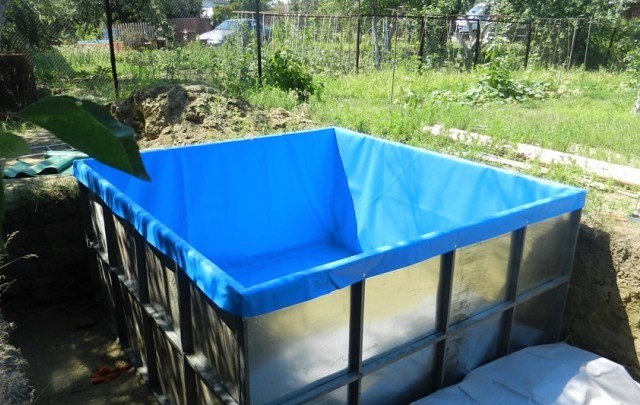
An insert made of a waterproofing film is installed inside, which, if desired, can be made to order according to the dimensions of the resulting structure. You can refine such a pool using pallet flooring, and also make a cover.

To improve ease of use, it is recommended to install a pump with a filter and use disinfectants with regular use. Thanks to this, your pool will not turn into a muddy swamp in a few days, the water from which will need to be completely pumped out on a regular basis and replaced with a new one.
Large tire mini-pool
Our selection will be completed with a very simple idea for making a reservoir from a large-diameter tire from heavy machinery.

To expand the future pool, the first step is to cut the sidewalls of the tire. The resulting workpiece is placed on a pre-prepared concrete platform and poured with concrete. Thus, the tire and the concrete form a bowl, which, after the concrete has dried, must be painted inside with a special paint.
As a result, you will get, albeit small, but not requiring much effort in maintenance and a very cozy pond that will help you to freshen up on hot days.
Mini pool for: which one to choose, installation, recommendations Unfortunately, not everyone can afford to relax on the seashore in the summer and bask in the sun on the clean sand.
The main reason for this is lack of funds or time. But those of us who have a plot, even a small one, can make a mini-pool for decorating a summer cottage with our own hands. The only thing left is to choose the pool that you want.
Having a swimming pool in a summer cottage, even if it is small, is the dream of any summer resident. There are several types of different pools that differ in their miniature size.
Among them, you can most often find the following types:

Small-sized pools, which are most often made in the country, can be of various shapes:
- Rectangular... Such buildings will be a wonderful decoration for any, even the most luxurious suburban area. In addition, the shape in the form of a rectangle makes it possible to decently save on the usable area, which is very important if the site is not the most large sizes... But do not forget that such pools require additional reinforcement design.
- Round... It is thanks to the round shape that the pools are able to withstand high water pressure. The round frame of such structures does not need reinforcement and additional support. As a rule, they are small in size, and are great for children's fun, since they have no sharp corners, which becomes a guarantee of safety.
- Oval... This type of structure combines the properties of a rectangular and circular shape. So, the rounded corners provide resistance to pressure, the depth does not exceed 1.5 meters, and in such a pool you can not only cool off on a hot summer day, but also swim comfortably.
In addition to the forms presented above, mini-pools for a summer cottage made of plastic can be in the form of a polygon, figure eight, and so on. The choice of form depends only on the wishes and size of the site.
Pools are also distinguished by the type of water circulation:
- Superficial. In such pools, water filtration is provided only on the surface. These are small-sized buildings that are preferable in small suburban areas.
- Overflow. In such pools, water is filtered over the entire area and surface. Mostly they are used in summer cottages with a large area.
But how to make a mini pool for a summer residence with your own hands? Different kinds pools may require an individual construction technology. Let's, for example, consider the features of the construction of brick and frame pools, since it is these types of structures that are used for home construction by handymen. You can do this by watching the video tutorial.
We create a pool for a summer residence with our own hands
Stationary mini pools
Stage one. Instruments
After you have chosen the shape and type of the pool, you should prepare all the tools and materials that you will need during your work:
- Construction tape.
- Hydraulic level.
- Shovel and bayonet shovel.
- Insulation material, for example, polystyrene foam.
- Crushed stone.
- , in thickness should be no more than 1-1.2 cm.
- A board with a thickness of 2.5 to 3 cm - we will use it to create the formwork.
- Wire.
These are the main materials that will be required in the construction of a stationary pool in the country.
Stage two. Process description
The construction process consists of the following steps:

When installing the walls, you should already have a ready-made formwork. To do this, use boards, the thickness of which will not exceed 0.25 m. The formwork should be mounted so that the width of the wall is 10 cm.
Note, that when following the steps outlined, you should leave extra space for installing the filter and draining the water. The inside of the cavity should be filled with pre-prepared concrete. It should dry out for about two weeks. After that, the formwork must be removed and installation can begin.
Now you can start decorating a mini-pool for a summer residence. You can use various materials for this purpose, for example, a tile that can be laid out on the bottom as well as on the walls.
Brick mini pools for summer cottages
This type of pool is chosen by summer residents for construction with their own hands, and quite often. To build a brick pool with your own hands, you will need the following materials and fixtures:
- Construction level.
- Bayonet shovel.
- Brick.
- Wooden pegs.
- Drain pipe.
- Gravel (crushed stone).
- Wire.
- Hammer / nails.
- Boards.
During the construction of this pool, it will be necessary to use a certain type of concrete, namely hydraulic concrete. His distinctive feature is that it contains a hydrophobic additive.
First you need to decide on the location of the future pool. At this place, dig a pit, ideally it should be 15 * 20 m 2. The boundaries of the pit can be distinguished using wooden pegs and a rope stretched over them.
 Fill the bottom with a layer of sand, the thickness should be about 0.3 m. Now you can start creating a pit and a drainage ditch, at the bottom of which you will need to fill a layer of crushed stone or gravel. The ditch should be connected to the pool with a pipe.
Reinforcement should be installed around the perimeter of the pit; there should be a distance of about 0.3-0.35 m between the rods.When all the rods are installed, they should be tied together with a special wire.
When creating the formwork, you can take boards with a thickness of up to 2.5 cm or lumber. It is mounted at a distance of 0.15-0.18 m from the soil. The inner part the formwork should be filled with hydro-concrete. After that, it leaves everything to dry for 35-40 days. After the expiration of the term, the formwork can be removed.
When finishing with bricks, the walls will need to be reported to the desired height. And at the end of the wall we finish with a tile, for laying which you will also need to use hydro-concrete.
Features of creating a heated pool
If you want to create a mini heated pool in the country, then this good idea, since you can swim in it at any time. Although the air temperature will not always please with high rates, if necessary, you can swim at any time. So, what is the peculiarity of such buildings?
For the construction of such pools, certain equipment is used:

Outcomes
When choosing a particular type of equipment for heating water in a mini pool in the country, you should take into account a huge number of factors: the power and type of electrical network that is in the summer cottage, the dimensions of the pool, the planned temperature level to which you want to heat the water, etc.
Proper care should be taken to prolong the life of the equipment. For example, you should constantly disassemble it and remove the plaque from the internal elements, which are formed due to direct contact with water.
It will take you a lot of time and effort, but your efforts will not be wasted - you can swim and swim at any time convenient for you.
The pool located in the courtyard of a country house or summer cottage is associated with luxury life. This is true because construction work and materials require a significant investment. What if there is a great desire to have a pool in the yard, but the funds are not enough? In this case, having shown ingenuity and creativity, you can organize a place for swimming in the yard with your own hands from scrap materials.
Tire pool: advantages and disadvantages, characteristics
An old tire from a tractor, combine or large truck can be used as a building material for the construction of the pool.
Its width and diameter are quite suitable for these purposes. Finding this material will not be difficult if you contact auto repair shops, where they will sell you an old tire for a small amount. With the help of it, without spending a lot of time and effort, you can build a compact pool. You just have to wait until the concrete base for this container has hardened. The use of a tire as a material for building a pool has its pros and cons. The positive aspects include the following:
- the width of the tire is convenient in that it will not be necessary to look for materials for the construction of the walls of the pool;
- the round and one-piece shape of the tire is an almost ready-made container for water;
- a thick layer of rubber will reliably keep water;
- the tire is not afraid of temperature changes, so it will last for many years;
- a pool made of such material is easy to decorate. You can simply paint it in different colors, and it will be difficult to guess that this is an ordinary tire from a tractor.
The disadvantages of this material are:
- small size. There is no possibility to swim or dive in this pool;
- due to the small diameter, which is slightly more than one and a half meters, more than two people cannot be accommodated inside;
Carrying out material calculations for a tire structure
To create a pool from a tire, you need to pick up a large model.
If you need a large enough place for swimming, then the best option for this would be a tire from a Belaz truck.
The wheel diameter of this car ranges from 1620 to 3575 mm, and the tire width is from 498 to 1140 mm. The following table will help you choose the right tire size.
To calculate the volume of the pool, you need to remember the school curriculum for the geometry course. To make these calculations, you need to use the appropriate formula: V = π · r 2 · h, where V is the volume of a cylindrical pool; π - constant mathematical value equal to 3.14; r - radius of the circle (base of the figure); h is the height (in our case, the width) of the tire. According to this formula, you need to know the radius of the circle. To do this, you need to halve the diameter value: 3.575: 2 = 1.7875 mm.
We substitute the values, as a result of which we get the volume of the structure in cubic meters: 3.14 · 1.7875 2 · 1.140 = 11.4371m 3, round up to 11.438 m 3.
For the foundation of the future pool, you will need sand and concrete. It is known that the sand bed and the concrete base will each be 15 cm thick. This data is enough to calculate the volumes of materials.
We make a calculation for the sand: 3.14 · 3.1951 · 0.15 = 1.504 m 3. You will need a little more concrete mix, since two more buckets need to be added for the bottom of the pool.
The finishing material is selected individually, taking into account design solution on the design of the place for swimming.
Required tools
To install a pool from a tire, you will need the following tools:
- Sharp strong knife.
- Shovel and bayonet.
- Tanks for sand, concrete mix and water.
- Concrete mixer.
- Building level.
- Yardstick.
Step-by-step instruction
The construction of a pool from a large tire is carried out in the following order:
- Using a sharp, sturdy knife, you need to make a cutout on one side. To get a straight edge, you need to cut along the marked circumferences of the tread. For these actions, you should not use a grinder, since when cutting out, part of the material will turn into small crumbs, which will stick to the tool.
- Then you need to choose a flat piece of land, clear it. Fill up with a layer of sand, which must be tamped. In order for the sand to keep its shape and better compressed, it must be moistened. The result should be a uniform layer 15 cm thick. It should be noted that the area with the sand cushion should be slightly larger than the diameter of the tire.
- On top of the tamped surface, you need to pour concrete mixture to get a layer of 15 cm. Install a tire on it. Pour two buckets of concrete inside it.
- All that remains is to decorate the pool and wait for the concrete to harden. To do this, you need to wait about a week.
- The side surface of the tire can be painted with different paints. If you show your imagination, you can hide the tread relief with decorative stones or plants.
- After carrying out these works, you can take water procedures.
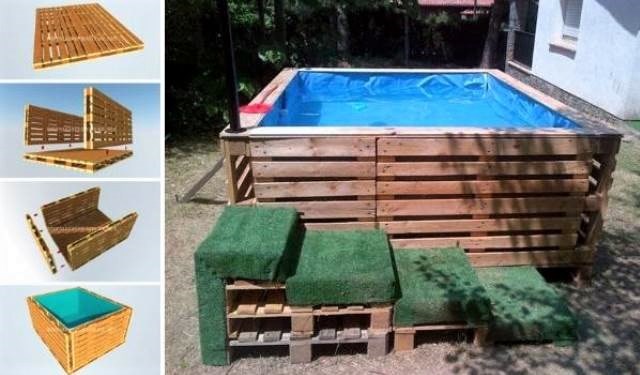
Do-it-yourself wooden pallet pool
Wooden pallets can be used as an improvised material for the manufacture of the pool. Due to their size and shape, it is convenient to build pool walls from them. The larger the number of pallets, the rounder the structure will be. Their optimal amount- 9 pieces. In this case, a frame is made, in which it will be convenient for 1 to 6 people.
A pallet bathing area has several advantages:
- the height of the sides of the pool allows you to fill it with a large volume of water;
- it is convenient to install a ladder and a slide to it;
- no need to dig a deep pit for the construction;
- if necessary, it is easy to dismantle and carry it;
- wood is an environmentally friendly material;
- replacing any section is not difficult, you just need to drain the water.
The disadvantages of using pallets for building a pool include the following points:
- a wooden structure requires mandatory reinforcement, which is used as a textile lashing strap or stops;
- the structure must be covered with a finishing material;
- wood must be treated with antifungal impregnations;
each time, before filling with water, it is necessary to tighten the belts and check the integrity of the structure.
Calculations during construction
To calculate the volume of a pool made of wooden pallets, it is necessary to use the computational method of "truncating a square" and the formula: S = A 2 -a 2, where "A" is the side of the square in which the octagonal figure is inscribed, and "a" is side of the octagon. From this it follows that "a" will become the length of the side part of the pallet, which is 1.2 m.
First you need to find the value capital letter"A" by the formula:
The value from the root is 1.41421356. Now, using this formula, we find the next value of the fraction, the result of which is the number 0.8485281. Then it is necessary to substitute the obtained results into the formula to find the value "A" (the side of the square in which the octagon is inscribed): 1.2 + 2 ∙ 0.8485281 = 2.8970562 m.
Now you have all the necessary values for calculating the volume of an octagonal basin. One more formula will help with this: V = S base · h, where “h” is the height of the pool, equal to 0.9 m. As a result: V = 6.95 · 0.9 = 6.255 m 3
Required tools
To build a pool from wooden pallets, the following tools are required:
- Shovel and bayonet shovels.
- Hammer.
- Screwdriver.
- Concrete mixing machine.
- Electric jigsaw.
- Sander or sandpaper.
- Yardstick.
- Cord and stakes.
- Large square.
- Building level and plumb line.
- Pencil.
- Pliers.
- Plane.
- Self-tapping screws and nails.
Step-by-step construction of a pool from wooden pallets
To erect a pool structure from wooden pallets, it is necessary to carry out the following construction work:
- Since the main material for construction is wood, it must be treated with special antifungal impregnations.
- Wooden pallets measuring 120x90 cm were used as sections to create an octagonal structure.
- Then, you need to dig a round hole with a diameter slightly wider than the future pool.
- Level the bottom of the pit and fill in gravel so that a uniform layer of at least 20 cm is obtained.
- Inside the pit, assemble a frame of eight pallets. They must be mounted with a solid surface inside the structure. Connect the wooden elements with planks, which must be fastened along the side of the pool. Strengthen the joints of the structure with wooden bars using self-tapping screws.
- Cut holes in the frame for installing the drainage system.
- When the structure is assembled, it must be additionally fastened to two tie-down belts.
- Install pipes for water supply and discharge into the prepared holes.
- It is necessary to drive wooden wedges into the space between the pallet sections and the pit wall. This will further strengthen the frame.
- Pour the bottom of the pool with a 10 cm layer of concrete, which will harden in 5–7 days.
- When the pool is ready, proceed with the waterproofing material. Use PVC film as such.
- Attach OSB boards to the front side of the frame. They will hide ugly areas and frame connectors.
- Decorate the pool to your liking. The fastest and most beautiful way is to cover the sides with reed rolls.
How to make a pool using plastic bottles
Even plastic bottles are used to build a homemade pool. This polyethylene product has established itself as a practical and convenient building material. Lined with cement in several rows and filled with sand, they form a fairly solid wall.
The construction of a pool from this material at hand has its advantages, expressed in the following:
- plastic bottles are widely used in Everyday life, therefore, it will not be difficult to acquire them;
- the material has a low cost;
- plastic does not lend itself to moisture, therefore it is a waterproofing material;
- a pool using plastic will last a very long time;
- the material allows you to build a pool of any shape.
The disadvantage of this material is as follows:
- during laying, a large amount of sand is needed to fill each bottle, and concrete for vertical and horizontal joints.
Material calculation
Plastic bottles are a convenient building material. From them, you can build a structure of various shapes and heights. To determine how many bottles are needed to build a pool with parameters 4000x2000x1500 mm, you need to know the parameters of one bottle. This material is made in various sizes, but a regular 1.5 liter bottle measures 345x85 mm.
Since the bottles will be stacked on the side, so that the neck is directed inward, it is necessary to divide the total length of the future pool by the width of the bottle: 4000: 85 = 47 pieces, it is necessary for one row. Now you need to calculate how many bottles are required for the width: 2000: 85 = 23.5 pcs. Next, you need to double the obtained values, the pool will be rectangular: (47 + 23.5) 2 = 141 bottles. This is the amount of material required for the perimeter of the first row.
The pool height is 1500 mm, so the number of rows can be calculated: 1500: 85 = 17.6. A total of 17.6 rows of bottles are needed to build the sides of the bathing area. Now you need to calculate how much material is needed to build the entire pool. To do this, multiply the number of bottles in the first clutch by the total value of the rows: 141 17.6 = 2481.6 - round up to 245 bottles.
This method of building a pool involves filling each bottle with sand. Therefore, it will not be difficult to calculate the total volume of sand required for filling inside a 1.5-liter container. You need to multiply the total number of bottles by one and a half: 2481.6 1.5 = 3722 kg of sand.
In addition, sand is needed to create a 15 cm layer under the concrete base. We calculate the total volume of bulk material. To do this, multiply the values of the width, length and height of the sand pillow: 4 · 2 · 0.15 = 1.2 m 3 or 120 kg. Now you need to add up all the indicators for sand: 3722 + 120 = 3842 kg of sand.
The concrete base will have a thickness of 15 cm and will repeat the parameters of the compacted sand. Therefore, its total volume is 120 kg.
List of instruments
To create a pool from scrap materials, you will need the following tools:
- Shovel and bayonet shovels (for a large pool - a mini-excavator).
- Screwdriver.
- Concrete mixing machine.
- Containers for rubbish, water and concrete mix.
- Yardstick.
- Cord and stakes.
- Large square.
- Building level and plumb line.
- Pencil.
- Self-tapping screws and nails.
Step-by-step instructions for construction
Pool structure made of plastic bottles implies the implementation of the following construction activities:
- First of all, you need to select a flat piece of land and clear it. It is best to install a slab foundation for this pool.
- Dig a pit 400x200 cm in size, 15 cm deep.
- Smooth and compact the bottom of the pit. Pour wet sand on top, distribute it evenly over the entire surface and press until a layer of 15 cm is obtained.In addition, the bottom can be covered with a layer of gravel.
- From wooden boards, 20–25 cm wide, make a formwork for pouring concrete. To prevent the wooden frame from falling apart under the pressure of the mixture, wedges must be driven into the ground from its outer side.
- From reinforcing rods with a diameter of 8 mm, make a lattice, which will strengthen the concrete base. Secure the crossings of the reinforcement with wire. The mesh of the lattice should be 10x10 cm, and the area should be 8 m 2.
- This metal frame must be laid on the bottom so that it does not touch the sand. To do this, in a checkerboard pattern, you need to install a small hill of halves of bricks.
- Install the reinforcement cage on top.
- Do not forget about laying pipes and other communications.
- Pour concrete, leveling it with a rule or a long, even board.
- Leave the base for the concrete to harden. The mixture will harden in about 6-8 days.
- Now you can proceed to the construction of the pool walls from plastic bottles.
- First you need to mark out the shape of the future pool.
- Fill each polyethylene container with sand and close the lid.
- Apply a strip of cement in a width equal to the length of the bottle.
- Make a frame from metal rods with a diameter of 0.3 mm. It is needed as a link between the rows of bottles. The length and width of the frame must correspond to the dimensions of the wall strip.
- Place the bottles filled with sand on the cement, tightly to each other. Fill the gaps between them with the mixture. When the first row of bottles is stacked, they need to be poured over with cement and a metal frame should be laid.
- Remove the formwork from the boards.
- Likewise, lay PET bottles to the desired height.
- Wait until the concrete hardens.
- When the walls are ready, they need to be plastered.
- To create a reliable waterproofing layer, the inner surface of the pool can be closed with bitumen.
- When everything is ready, you can start finishing work. This requires a PVC film, which is designed to cover the inside of the pool. Excess film fragments must be cut off, and the joints must be welded and treated with a sealant.
- Decorate the area around the pool.
Who wouldn't want to splash and cool off in their own pool on a hot summer day? How much joy and endless pleasure an artificial reservoir would bring to adult cottage owners and the restless younger generation. Imagine, this seemingly "rainbow" dream is quite feasible.
For those wishing to build a pool in the country with their own hands, we offer a number of proven methods of organizing it. Here you will learn how to make a temporary and stationary option. You can compare which of the methods is easier for you to implement personally, which is more acceptable in terms of price and device method.
The presented article has clear answers to all your questions. Construction technologies are thoroughly analyzed. Valuable recommendations are given for determining better place under the pool, the choice of the optimal type of material for the construction of the bowl, for the implementation of waterproofing and finishing.
Even an inexperienced master is able to carry out the construction of a summer cottage pool. It is only necessary to follow the construction technology of the selected structure.
But first you need to choose a suitable place for the swimming facility and its type. Not at every site it will be possible to arrange a large reservoir for swimming on long distances or jumping from a three-meter springboard.
To build a warm structure with a roof for swimming for the pool in the country all year round costly and difficult, however, an option with a light cover made of polycarbonate is possible
Structurally, the baths of the pools can be made:
- Buried in the ground. A bowl of pools is installed in a pit; it can be ceramic, fiberglass, monolithic concrete, built of foam blocks or bricks.
- Surface mounted. These are structures for temporary use, there are frame (collapsible) or inflatable. To install them, you will need a flat, rammed or concrete-filled platform.
Their bowl shape can be round, rectangular, oval or complex geometry. The simplest option is a large barrel-shaped bath near the bathhouse. But it is difficult to call such a structure a full-fledged pool.
For a device in the country, an outdoor pool in a stationary or mobile version is most often chosen.
Both options, due to the lack of a roof, will only be able to be used for their intended purpose in the summer, but these structures will be quite enough for a summer vacation at the weekend. Their device does not require too serious investments and is quite simple when done independently.
It is much more difficult to build an indoor pool with your own hands. For him, he will have to order a project of a full-fledged building in the form of an extension to a country house with laying pipelines, installing equipment, and heating.
If the site is not guarded, and in winter the owners visit the dacha occasionally, then it is irrational to build such a structure.

Inflatable structures are inexpensive and quickly assembled, but any sharp object can quickly turn them into worthless rags.
To finish the walls and bottom of the bowl of a stationary pool from the inside, use:
- Fiberglass.
- Polypropylene.
- PVC film.
- Mosaic or tile.
A thick film of polyvinyl chloride is used in both frame and monolithic structures. And the rest of the materials are only for the construction of stationary structures with partial or full burial into the ground.
If the sides are uneven, then they will have to be plastered using a reinforcing mesh. It can be metal, but it is better to take a more expensive composite made of polymer materials. The latter will cost more, but it will definitely not rust from exposure to moisture.
Without a grid, the leveling layer of plaster in the structure under construction will not last long. The energy of the shock waves from a passing person will inevitably and quickly destroy him.
You can decorate the formed bowl of the country pool:
- mosaic;
- PVC film;
- tiles.
The decorative layer should not only decorate the pool structure, but also reliably protect the concrete from the effects of water.
If at this stage you cheat and make mistakes, then concrete pool will soon have to be overhauled. In some cases, it will be necessary to completely disassemble the spoiled structure, and then re-fill everything.

The sides and bottom of a monolithic pool can be made without the use of formwork by spraying concrete, but this requires certain skills and special equipment
The easiest way is to decorate the bowl with PVC foil. You just need to spread it out and straighten it, and then solder the individual flaps into a single sealed canvas. Use ribbed foil on the steps, otherwise they will be too slippery.
The use of tiled decorative materials allows you to create a suburban pool of a more attractive look. But it is much more difficult to carry out such a cladding with your own hands. And it is extremely important to take glue only of waterproof brands, and grout only with antifungal additives.
Option # 3 - made of wooden shields
For the manufacture of a wooden pool in the country, you will need 60x60 mm bars and planed boards with a thickness of 30 mm or more. The structure will be in the shape of an octagon. First you need to knock down eight shields deep into the bowl.
All wood must be treated with antiseptics, otherwise the lumber pool will have to be re-done several times over the summer
A wooden pool structure can be partially buried in the soil or simply placed on the ground. In the first case, the bottom is best done according to the classical scheme with digging a shallow pit, laying reinforcement and pouring concrete. And in the second, it will be possible to get by with thick boards knocked down tightly to each other.
After assembling all the panels into a single structure, the necessary technological holes should be made in them. Then a PVC film is placed in the thicket for waterproofing. At the end of the work, it remains only to install the ladder and refine the upper edge of the sides.
In addition to the three options given above, a summer cottage pool can be built from bricks or expanded polystyrene blocks with concrete pouring inside them, as well as from plastic bottles or large-sized tires. There are a lot of ways, the choice here depends on the wishes of the owner of the dacha and his financial capabilities.
How to improve the area around the pool?
The main thing in the design of the pool structure in the country is the shape and color of the bowl. Intricate shapes with curves are always eye-catching.
And in order for the pool to visually look deeper than it actually is, its inner surface should be made white. In this case, the adjacent area must, on the contrary, be performed in dark brown shades.
A frame pool towering above the ground with a small area next to it, surrounded by a garden, does not look as cumbersome as alone in an open area
To decorate the area adjacent to the bath, it is enough to place garden figurines and flower pots next to it. It is strictly forbidden to plant any ornamental plants directly into the pool, as is the case with an artificial pond.
To date, several types of pools have been developed, with the arrangement of most of which you can handle on your own. The best option is a full-fledged monolithic concrete pool. This design is characterized by the highest indicators of reliability and durability.
Read the provisions of the presented manual and get started.

Set for work
- Level.
- Roulette.
- Stones.
- Rope.
- Steel knitting wire.
- Reinforcing mesh.
- Small pegs.
- Armature.
- Shut-off valve.
- Wooden boards or boards.
- Anti-corrosion agent for metal processing.
- Self-tapping screws.
- Cement.
- Sifted sand.
- Waterproofing material.
- A block for compaction of backfill layers.
- Shovels.
Preparatory activities

Decide on the desired shape and required dimensions equipped artificial reservoir.
When determining the optimal pool size, consider how many people will be swimming in the pool. For a large family, it is better to immediately equip a spacious container.
In accordance with practical experience, the optimal depth of the reservoir is 1.5-1.8 m, in width and length 4 m is most often enough.
For the rest, be guided by your requests and requirements. For example, if you plan to use the pool for full workouts, consider this point when determining the required length and width of the reservoir.


Choose a convenient location to build your pool.
The main thing is that the space is not blocked by trees. Due to the trees, the water in the pool will not be able to warm up normally and, in addition to this, will be constantly polluted by fallen leaves.
Also, low-lying areas are not suitable for arranging pools, because with such an arrangement, the water will be constantly polluted by rain streams.
Marking and digging a pit

Armed with a tape measure, stakes and a cord, proceed to marking the construction site.
The dimensions of the construction site should exceed the dimensions of the future pool by 0.5 m on each side. To mark the boundaries, drive the pegs into the ground and pull a cord between them.

Completely remove the top fertile soil ball.
Dig a pit of the required dimensions, while the bottom of the pit should be approximately 25-30 cm below the desired depth of the pool.
Line up the pit walls carefully. The bottom of the pit must be given a slight slope.
Monolithic pool construction
Proceed directly to the construction of a monolithic pool.
Place a 20-30 cm layer of sand on the bottom of the pit. Thoroughly compact the laid material and cover it with waterproofing.
A fairly large assortment of effective ones is presented on the modern market. To ensure high-quality moisture protection, roofing material is well suited. It is a practical, reliable and inexpensive material.
Lay roofing material. You can use molten bitumen to fix the material.
Line the waterproofed surface with stones. Lay a finished reinforcing mesh on top of a layer of stones, or make it yourself from metal bars.
Set up a drainage pit. Its depth should slightly exceed the depth of the main reservoir. Install a water drain pipe in the pit. The end of this pipe must be introduced into the reservoir. Equip the pipe with a water drain shut-off valve.
Fill the drain with a fairly thick gravel layer. Install overflow and skimmer systems to treat pool water.
Place reinforcing rods around the perimeter of the excavation in 30 cm increments. Maintain a 50 mm gap between the reinforcement and the edges of the reservoir. Fasten the reinforcement rods with wire.

Fold out of planks. Maintain a 15 cm gap between the formwork and the pit walls.

At the same stage, provide for the installation of pipes and equipment for pumping and supplying water. Or you can use external systems of pumps and hoses - whichever is more convenient for you.
Start concreting the pool. you can order or do it yourself.
Pour the concrete gradually and slowly, in a horizontal layer.


Also fill in the voids between the formwork panels and the pit walls. Give the mixture a month to build strength and start arranging the pool.
Carry out the interior design at your discretion. You can tile the bowl. Alternatively, you can lay out the bottom with a 10 cm layer of clean sand, and then the pool will look like a natural reservoir.

Other private pool options
Frame systems
Such structures are made of wood with a finishing sheathing with tin or aluminum. Aluminum sheets are attractive and superior to sheet metal in terms of reliability and durability.
The frame straps are created from pine logs. Intermediate pieces can be made from any thick quality planks. To provide additional rigidity to the structure, braces made of strong boards are used.

Among the main advantages of frame pools, it should be noted that there is no need to perform large volumes of earthworks and the possibility of dismantling the structure in the cold season.
Changing water in such a pool is carried out using a flexible garden hose, which can be conveniently fixed at the bottom of the tank. Waste water from the pool can be used to water the garden.
All joints of the frame structure are subject to mandatory sealing. To give the structure the required tightness, even ordinary plastic wrap is well suited.
Wooden elements must be treated with an antiseptic.
It usually takes less money to equip frame pools compared to the cost of building a monolithic structure, while such reservoirs have a rather solid appearance and fit well into the design of the site.
Learn How To Build With step by step instructions, from our new article.

For the arrangement of the pool, if desired, you can even use an ordinary PVC film. This material has a rather attractive appearance and acceptable performance characteristics.
The film normally transfers contacts with water, ensures proper tightness of the structure and allows you to save on waterproofing the reservoir.
Even if cracks appear in the container, a properly mounted PVC film will retain water.
PVC film can be used both in the arrangement of a new reservoir and in the repair of an old pool. At the same time, for the construction of such a structure, it is not necessary to perform voluminous earthworks: the elements of the film are simply fastened using the method of temperature welding, as a result of which a very durable bowl is created.
The pool is installed on a previously prepared base and fixed with a frame made of planks.

Swimming pools, the base of which is made of fiberglass, are very popular today. This durable material withstands even the most severe mechanical stress and does not need any additional coating.
Among the shortcomings of the design under consideration, one can single out only the need for mandatory summing up of all communications.
The bowl is placed on a solid concrete base.
Thus, there are many pool options available for the owner to choose from. Having studied the features of each considered variety artificial reservoirs, you can come to the optimal solution and build your dream pool without outside help.

Happy work!
Prices for prefabricated and inflatable pools from the manufacturer Azuro
Prefabricated and inflatable pools Azuro
Video - How to build a pool with your own hands