And dive into cold water... To make this a reality, you can make a small pool with your own hands. Certain types of structures are easily assembled on their own in the yard in the country or at home. This article will help the owner to please his family, you just need to make the most of the materials that are already available.
Pool types
In order to have plenty to choose from, you need to know about the features of various solutions and their relevance for specific conditions.
Inflatable pools. Such products are installed in less than an hour. The pool is usually a container made of PVC film. So that there are no breakouts and the pool lasts long enough, it is reinforced with additional polyester fibers. Only one part is inflatable - the upper edge. The whole scheme works according to the float principle. The water begins to collect inside, the side rises. As the level rises, the walls are leveled and a full-fledged bowl is formed. The kit usually includes a pump, filter, ladder and assembly instructions. Of the positive qualities are:
- high assembly speed;
- relatively light weight;
- affordable price;
- the ability to unfold in any conditions (the requirement will only be sufficient rigidity of the base and its evenness).
An inflatable pool usually meets all the intended requirements. But it is worth knowing about certain disadvantages: a high probability of water pollution, the relative fragility of the material (a fallen heavy branch or a sharp object can damage it so much that you will have to make a complete replacement). The price of such products cannot be called low, for some samples it will be necessary to pay 30 thousand rubles or more.

Wireframe. Among pools of this type, there are a large number of different solutions. Metal tubes can act as a support, which are assembled into a closed structure, and a PVC bag is placed inside. When it is filled with water, the walls rest against the posts and their expansion is limited. Shield skeletons are assembled from separate sheets of metal, which has an anti-corrosion coating, which prevents damage to it. The interior space is organized in the same way as in the previous version.
It usually takes a whole day to install a frame pool. At the same time, it also needs a good foundation so as not to deform it with the weight of the flooded water. Seasonal containers will have to be disassembled in the fall and re-installed closer to the summer. There are those who can easily spend the winter. Usually they have additional stiffeners mounted, and the main struts are large. This is necessary to resist the action that will occur when the water freezes. Such pleasure will cost more than inflatable counterparts.

Fiberglass. In most cases, this design is a ready-made cast container. It has preset parameters: depth and capacity. You don't need to invent anything. You only need to dig the appropriate pit, install the container and bring the required communications. One of the advantages is the high strength of the product. In some respects, it even surpasses concrete. Due to the properties of the components, the bowl is not subject to linear expansion due to temperature fluctuations. This means that the service life can be very long if properly maintained. Fiberglass lends itself well to repair. The walls are so smooth that debris simply cannot linger on them, which means that they are very easy and simple to clean. Large number available additional equipment, for example, you can buy a variety of slides or jumping jumps. This will delight not only children, but also adults. The low level of thermal conductivity prevents rapid cooling of the heated liquid.

With polypropylene bowl. By itself, this polymer material has sufficient strength. He does not need an additional layer of waterproofing, which will prevent the outflow of fluid. Most often, blanks in sheets are used for the manufacture of such options. They are blue or light blue. The assembly can be done by yourself, but this will require certain tools. Most often it is entrusted to professionals. Erection of the entire structure can take from several days to weeks. Such pools have a recessed structure, so a large-scale excavation will be required, as well as the laying of a concrete base plate. The material is resistant to ultraviolet light and chemically active substances. Thanks to this, it can be safely placed in the open air.

With a concrete base. Simply put, this is a pit of arbitrary length, width and depth that the user has chosen. It is filled with mortar. The walls and bottom can be tiled with special ceramic tiles or mosaics. Almost anyone can implement such a project in any suitable place. For such a pool, it is important to think over all the required communications so that it lasts as long as possible.

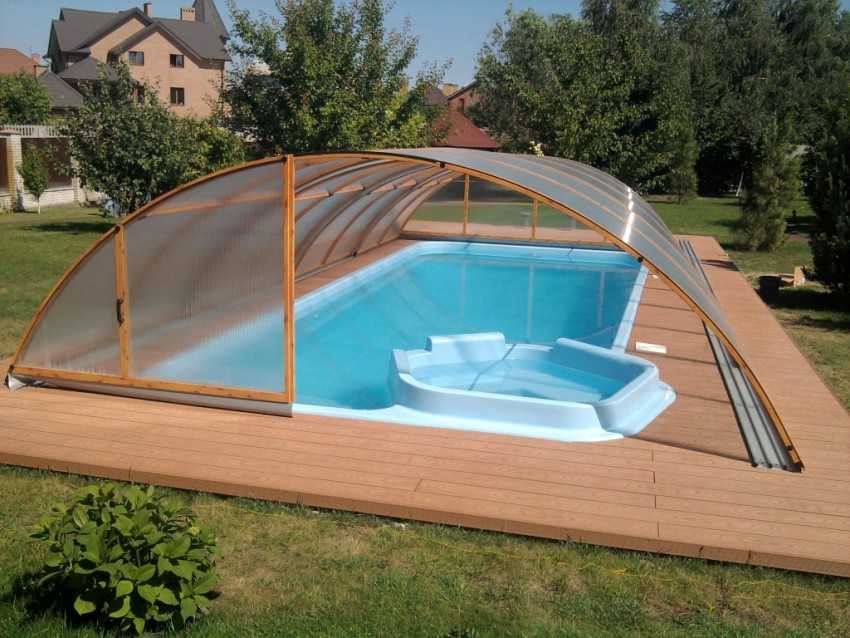
Dome. It can be any of the listed options. The peculiarity is that they all have a roof. It can be made from various materials... The main highlight is that the bowl is closed on all sides, which prevents the wind from blowing, and also contributes to the rapid heating of the water inside.
In addition to differences in the method of construction, subspecies are also distinguished according to the filtering option. It can be:
- Skimmer. In this case, the water intake from the pool is carried out through the technological holes, which are located on the side walls. Moving along the channels, it enters the filtering device. There it is cleaned, disinfected and partially heated. The return to the container is made through the nozzles.
- Overflow. This method is more effective, but it also costs a little more in construction. The water mirror reaches the very top of the pool. Water flows through the drain hole or the top board and enters a special chute, and from there into the tank. In the latter there is a pump with a water sensor, which pumps the liquid into the filter, where it is purified. The liquid flows back through the holes located at the bottom of the pool.


Seat selection
In addition to choosing a pool and even before creating its drawing, it is important to think about where to place it on your land. To make it easier to decide on this, here are a few rules to consider:


Assembling the wireframe version
This option can be very cheap to manufacture. In order to implement it, you need a beam of 100 × 100 mm, an edged board of 100 × 30 mm or 50 × 30 mm. You will also need a material that has good waterproofing and is able to withstand high burst pressure.

- A site is selected as described above.
- A pit is dug 40 cm deep. Its dimensions should be 20 cm larger than the dimensions of the planned pool.
- The bottom is well compacted.
- A slight slope is created towards the middle, where a small hole is dug with dimensions of 50 × 50 cm and a depth of 20 cm. It will serve to collect water, which may overflow over the edges.
- The entire space is covered with medium or fine crushed stone. The layer should be 20 cm.
- Sand is laid another 20 cm. It is very important to tamp it well so that the pillow is firm enough.
- The plane is displayed using beacons. This will keep the pool bowl from tilting. Metal pipes or a wooden beam, which is laid using a building level, can act as guides.
- Racks are made of a wooden beam, which was mentioned just above. Their number should be such that it can be installed every meter. The total length is equal to the height of the pool plus 50 cm to be immersed in the ground.
- The part that will be in the ground is treated with bituminous mastic or wrapped in roofing material. In addition, it is necessary to cover the tree with an antiseptic composition so that rot does not appear from constant exposure to moisture.
- At the installation site of each post, a hole is dug to a depth of 50 cm.
- Corner posts are mounted. They are aligned using a building level in the horizontal and vertical plane.
- The space around them is filled with sand and soil, which are well tamped to securely fix the element.
- Diagonals are checked to make the design symmetrical.
- Fishing lines are stretched between the posts. One should be at the bottom, the second at the top. They are necessary in order to facilitate the installation of the remaining anchor points.
- The remaining parts are assembled at the indicated pitch.
- With the help of edged boards, the supporting walls are stuffed. It is better to place the elements back to back to create a uniform plane.
- After making the frame, a material is laid inside, which will serve as a receiver for water. It can be a thick plastic wrap. It is important that it be one piece, because a leak will surely appear at the seam site, and water will seep into the ground. The edges must be wrapped over the top edge so that the material does not slip during use.
- If you wish, you can make a more durable version. To do this, you will need a PVC base, which is used for sewing tents on trailers, eyelets, a riveter, a hair dryer and a rubber roller. The workpieces are laid inside the frame and the markings are made, which bends will need to be made in the corners, how much should be left for the turn-up, where exactly the seam will be welded. The individual sheets are interconnected with hot air. They fit with a slight overlap. With the help of a hair dryer, heating is carried out until almost complete softening. By rolling the roller, a joint is formed. This should be done on a flat surface without debris and dust. The upper edge is bent by 5 cm. Eyelets are installed using a riveter. The distance between them should be 15 cm. The tarpaulin can be fixed to the inside. To do this, it is simply pressed against the wooden base with a self-tapping screw and a washer. Either the edge is bent over the upper level, then a rope is pulled through the eyelets and it clings to the prepared elements.
- The finished pool is filled with water.

To make the structure easier to fit into the surrounding exterior, it can be partially or completely immersed in the pit. In this case, the bottom is organized in the same way as described. The drainage system can be improved. To do this, a sewer pipe is brought to the pit, which is in the middle, the second end of which goes into a water collector or canal. Thus, the water will be drained away much faster.
Concrete pool fabrication

The main task for this option will be earthworks. Having decided on the place and marking the territory, a hole of the required depth is dug. The bottom is formed in accordance with the recommendations listed above.

Installation of a polypropylene pool

If you have certain skills, the installation of such a pool will not take too long. We need sheet polypropylene (wall thickness from 8 mm), material for joining, a technical hair dryer, a plane.


For the installation of such a structure, a foundation pit is being prepared, its dimensions should be 10 cm larger than the product itself on each side. The bottom must be filled with mortar and stand. The vessel sinks into the middle. Gravel is poured into the space between the walls of the vessel and the pit and is well rammed.
The technology for manufacturing a polypropylene pool is shown below:
Filtration system
The pool filter is a must-have device. Without it, it will be impossible to use water for a long period of time. It will need to be replaced frequently. The device can be installed either near the pool itself or in a specially prepared place. There are many ready-made options. For a small pool, there is no need to take an overly powerful filter. If you wish, you can assemble it yourself. To do this, you need a 100 liter plastic barrel. The main condition will be the presence of a cover that can be closed hermetically. You will need a centrifugal or drain pump, plastic pipes, fittings and a filter flask cartridge.

- A hole is drilled below the neck of the container.
- A threaded nipple is inserted into the hole. Sealing rubber bands are put on on both sides and locknuts are screwed on.
- The same exit is done 5 cm diagonally above the bottom.
- A pipe is connected to the upper adapter, which will take water from the pool.
- A filter cartridge is put on the bottom from the inside. The pump is connected externally. An outlet is drawn from the pump to the pool.
- Coarse sifted sand is poured into the barrel halfway.
- The installation must be below the pool water level. The liquid will flow by gravity into the container. Passing through the sand, clean it and pump it back into the bowl with the help of a pump.
At the right approach the pool will serve for more than one year. A concrete or polypropylene structure can be easily made in a bathhouse or in the basement of a house. But this should be planned even at the construction stage in order to avoid unpleasant consequences from uneven load.
Video
Below you will see a video instruction on construction concrete basin:
Photo


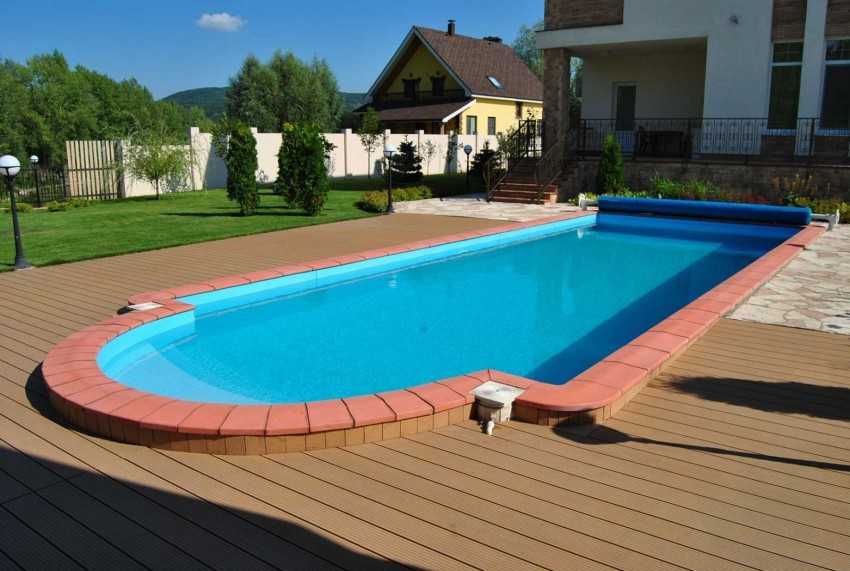
For those who dream of a pool in their summer cottage, it is worth saying - you should not immediately run and dig a hole. Better to familiarize yourself with possible options and among the huge number of offers, choose the option that suits you.
The choice is really big - from children inflatable pools up to ten-meter monolithic structures.

Concrete pool
The stationary concrete pool is solid and durable. The best option, if you have the necessary funds, time and certain skills, you can build it yourself on your site.


The concrete pool is a cast box. A metal frame is placed in a pre-dug pit, then it is poured with concrete. It is possible to build such a pool in a room suitable for this. Required condition- connection to sewerage and electricity, as well as heating and ventilation.
So, in order to build a pool on your own, you have to work a lot: dig a pit, place waterproofing, prepare the formwork along the contour, pour concrete.

When the pool bowl is ready, finishing work begins. The pool can be tiled, if desired, with tiles, polymer material, natural stone or mosaics.

What should be the pool bowl
The pool bowl should not be located in close proximity to the foundation of the house in order to eliminate the risk of soil erosion. It is impossible to fill the bowl with concrete in parts, only at once as a whole. This will serve as a better seal. Therefore, you need to think in advance where the holes for pipes, lamps, for other needs will be located.

It is undesirable to drill the finished bowl after installation. If the inside of the pool will be tiled, you need to use special glue and grout for joints, which are more elastic than usual for dry rooms.
Of course, tiles are the most durable and stable material in operation, provided that the owners can cope with a fairly considerable amount of work.


Mosaic decoration
More experienced builders can decorate the pool with mosaics. This, of course, is a laborious process, and the material is much more expensive, but the result is incomparably more beautiful. Mosaic tiles are as durable as tiles, but they look more sophisticated.

Relatively recently, they began to use such technology as finishing swimming pools with PVC film. In this case, you can do without waterproofing and place the film directly on top of the concrete.

This finishing option is much less expensive and will not take long to install. But the film has its drawbacks: it is short-lived, and the joints of the film canvases are quite noticeable.

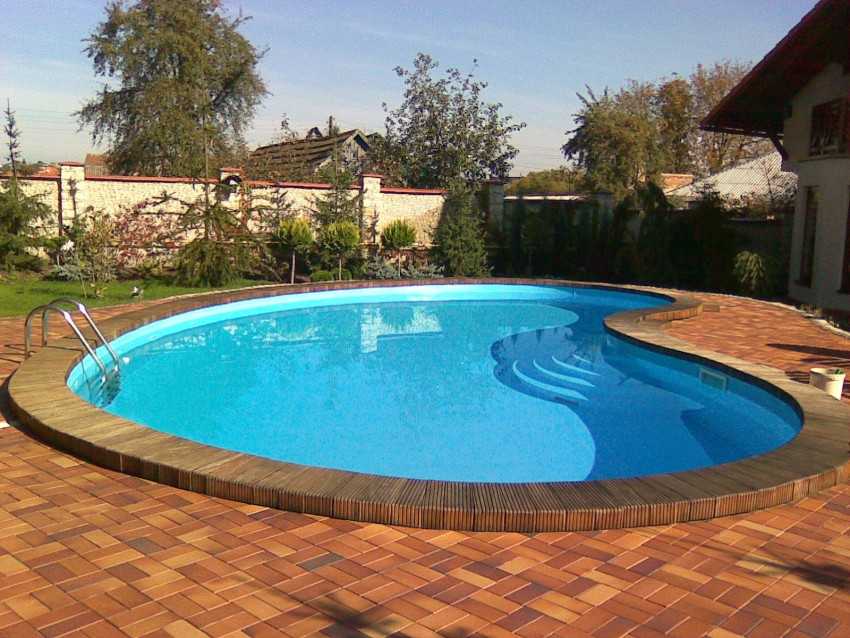
The most popular type of pool today is the pool-bath. This is a ready-made container that you just need to dig in. They are made from composite materials or fiberglass. Any owner, even an inexperienced in construction, can easily build such a pool on the site. A pit is dug, its bottom is covered with rubble, then a "bath" is installed, the gaps along the edges are covered with earth.

This amount of work can be done much faster than in the previous case.

True, there is a nuance: you need to study in advance what the lowest temperature the pool bowl is designed for. Otherwise, everything is relatively easy: such pools are immediately made with ladders;

- the water in them cools down much more slowly than in concrete pools;
- waterproofing is very reliable; they are easy enough to care for;
- resistant to fungal growth.


The disadvantages include the fact that it is almost impossible to place such a pool in a room, since a tower crane is required for installation.


Frame pool
This is the easiest and most inexpensive way to arrange a pool on the site with your own hands.

Such pools are sold in a large assortment: round, rectangular, oval. Their construction is quite simple. First, the frame is installed; it can be metal sheets in rolls or horizontal and vertical rods.

After installing the frame and placing the bowl in it, external ladders are installed, a hydraulic pump is connected, which is usually included in the kit along with the filtration unit. If you choose such a pool, you will not have to dig anything. It is easy to install in one day and easy to disassemble.

But you need to use it with care: the bowl can be mechanically damaged.

Diy pool photo


 What could be better than a wonderful summer vacation on the shore of a lake or river? It is especially pleasant when such a reservoir is located in the immediate vicinity of the house. Building a pool on your own suburban area is a fairly simple task and you can do it yourself, although at first glance it seems that this is almost impossible.
First of all, it is worth determining the ideal location for the pool. Whichever site is chosen, it is necessary to take into account the specifics of connecting the reservoir to utilities - water supply and discharge. Plus, if desired, lighting, a fountain or a small waterfall. This means that you will have to make connection to the power supply.
What to consider when choosing a location
- Will the root system of plants be damaged?
- Distance from the "source" to the pool. It is clear that it should be minimal. This will reduce the amount of work and material costs.
Determining the location is simply impossible without a preliminary calculation of the structures of the future reservoir. You can build frame pool, you can - pit or composite.
The following set of tools should also be prepared in advance:
- Roulette;
- Building level;
- Cord or rope;
- Stones of various sizes;
- Special small stakes;
- Reinforcement wire;
- Steel wire mesh;
- Boards;
- Water shut-off valve;
- Nails and self-tapping screws with a special anti-rust coating;
- Sufficient supply of sand and cement;
- Waterproofing material;
- Shovel;
- A block suitable for manual ramming.

In general terms, the instructions for building a pool in the country look like this:
Location, area and markings
The exact area is determined, as well as the shape of the future reservoir. The dimensions depend on how many people will constantly use the reservoir. A large family needs a fairly spacious design. Practice has shown that the optimal depth of the pool varies from 120 to 180 centimeters, then the length and width can be equal to 400. This is true per adult. For children - no more than 0.8 m. If it comes about a summer residence, where literally every centimeter counts, then any advice will be superfluous - with the dimensions of the reservoir, everyone is determined by himself.
 It is necessary to find the most suitable place for the pool on the site. The space must be open, with no trees nearby. Trees are the reason that the pool will always have enough cool water in which the fallen leaves float. Of course, it is impossible to locate the pool in low-lying areas, as this will lead to water pollution by rain streams.
Using a tape measure, the construction site is marked, the dimensions of which in all directions should exceed the dimensions of the future reservoir by 50 centimeters. The boundaries are clearly marked with stakes on which the rope is stretched. The fertile soil layer from the marked area must be completely removed. At the next stage, a pit of the required depth is dug under the concrete pool. It is necessary to ensure that the walls of the pit are perfectly flat, and the bottom is about 30 centimeters lower than the desired depth. At the same time, the bottom should have some slope.

Drainage pit, formwork and concreting
The construction of any pool implies that a layer is laid on the bottom, the thickness of which is from 20 to 30 centimeters. Each of the layers to be laid is carefully rammed, after which waterproofing materials are laid on top. A fairly good option can be considered a bituminous roofing material, which is distinguished not only by its reliability and practicality, but also by its low cost.
But if you think about the durability of the structure, then it is better to use special membranes. With such a canvas, you can cover the entire pit at once, which will eliminate the need to seal the joints of the strips. There are stones on the roofing material, and on top of them there are metal rods or steel (plastic) reinforcing mesh.
 There is a need not only for a pit, but also for a specialized drainage pit, the depth of which must exceed the depth of the main reservoir. A special drain pipe is placed in the pit, the end of which is located in the pool, after which it is equipped with a valve that makes it possible to close the water. The drainage pit wakes up with a rather thick gravel layer. Since only dirty water will flow into it, and not drains from the sewage system, there are no special requirements for its design. Then the skimmer and overflow systems are installed, which purify the water.
Throughout the entire perimeter of the reservoir, reinforcement rods are placed, observing a step of 0.3 meters. The indent from the edge is at the level of 5 centimeters. Rods in mandatory held together with wire. Please note that the use of a welding machine is not allowed. Overheating of the metal reduces the strength of the mesh and promotes the development of corrosion. Therefore - only knitting of rods. Planks are used to fold wooden formwork panels from them. They must be installed inside the pit, having previously measured 15 centimeters from the wall of the ground.

Although it is more efficient to use a fixed structure made of expanded polystyrene plates. In addition to the fact that the material is waterproof, it also performs the function of "mechanical" protection of the bowl, since ground movements can lead, if not to deformation of concrete, then to the appearance of cracks in it. Such foresight will rule out the likely repair of the reservoir every spring.
Pool concreting is carried out using. Taking into account the capacity and mass of water, the grade of concrete is selected as for a monolithic foundation - at least M300. Therefore, the cement is "400" or "500". The mixture is poured out as slowly as possible. The voids that are between the ground and the installed formwork are filled with mortar layers. After loading the concrete, it must be compacted by expelling air from its structure. In practice, it is enough to pierce the mass with a reinforcing pin over the entire area of the bowl.
After the concrete mixture has completely dried, you can directly engage in installation work.
Concrete, like any material, partially absorbs moisture. If it is prepared on site, then it is advisable to introduce special / additives into the mixture. If purchased, it must be categorized as "hydrophobic". Although it costs a little more, then less often you will have to repair the bowl.
In order to make the bottom of the pool as similar as possible to an ordinary reservoir, it is recommended to use clean river sand. A ten-centimeter layer will be enough.

Features of frame type pools
Frame-type pools can be built from wood, using aluminum or tin sheets for internal cladding. Of course, aluminum is a much more reliable and aesthetic option. In the process of creating the bottom and top straps, pine logs are used, while any thick board can be used for the intermediate part. Giving the structure a sufficient stiffness indicator is performed using braces, which are also based on solid boards.
The main advantage of the frame pool lies in the fact that it can be dismantled without any problems during the cold season. Replacing the water inside the pool is also straightforward. A flexible garden hose is attached to the bottom of the tank, which makes it possible to use the waste water for the purpose of watering garden plants or lawns.

During the construction of the pool, it is imperative to use a sealant, which is suitable even for an ordinary polyethylene film. Wood is necessarily treated with a component that contributes to its resistance to the aquatic environment. The price of a frame pool is minimal, but it is quite solid appearance and can fit into any landscape.
Interestingly, to create a pool with your own hands, it is quite possible to use ordinary PVC film. This is one of the most modern materials, which is characterized by significant operational and external parameters. The film is not afraid of constant operation in an aquatic environment, does not allow liquid to pass through, and therefore makes it possible to significantly reduce the cost of bowls. Surprisingly, even the presence of cracks on the bowl is not a hindrance to the film in retaining the entire volume of water. The use of the film is allowed both in the process of reconstruction of an old pool, and in the construction of a new water reservoir, which does not involve excavation.
All parts of the film are easily sealed to each other using heat sealing, which creates the most durable bowl. The pool is installed on a pre-prepared base, after which it is rigidly fixed with a frame made of planks.
A fairly popular version of a homemade summer cottage pool is a fiberglass-based pool. It is extremely difficult to break this material, no additional coating is required for it. The downside is that a fiberglass pool requires a mandatory supply of all communications. As a pedestal for installation, a concrete base is used, which is characterized by maximum strength.

If we are talking about a small-sized area, then it is better to install an industrial-made pool - an inflatable. The price for such products depends on their shape, linear dimensions, manufacturer and starts from 1,650 rubles. All construction work will be reduced only to cleaning the territory and leveling the allotted area. Filling / draining water can be done with a regular garden hose. By the way, only a "point" repair will be needed if there is a puncture. This is another "plus", since it will not take much time to repair the damage.
Paraphrasing the classic, we can say that the arrangement of a pool in a house, in a personal plot or in a country house is not a luxury, it is a necessity.
The construction of private pools on an individual site has become a standard phenomenon, like construction or.
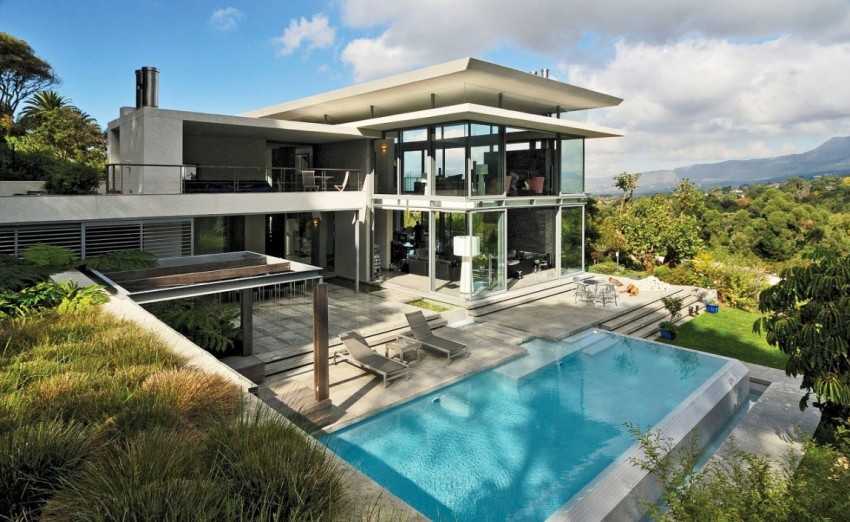
The only difference is in design and scale: a small pool in a bathhouse, a decorative pool in the yard as part of a landscape design composition or a structure large sizes and volumes - indoor and outdoor swimming pools, which are located outdoors, with all related fixtures and accessories.
Briefly about the main thing - how to get a pool
You can get what you want in two ways:
- First, buy a ready-made pool.
But consider the following before purchasing:
It's expensive;
It is impossible to buy a ready-made concrete pool. This means you have to pay for the project, for the materials and for the work. Also, VAT should be returned to the state;
- Secondly - make the pool yourself.
At first glance, this seems like a difficult task. In fact, you already have everything you need: desire, opportunity and our instructions. This means that the construction of the pool should not cause difficulties.
And physical fatigue will quickly pass when you splash in the pool, which is made with your own hands.
Which pool is better to choose for a summer residence - types and types

Requires special knowledge for the arrangement

It is cheap, easy to carry and store, but not practical and has an extremely short service life.

Sold in a ready-made bowl.

The acquisition of such a structure (especially of a significant size) entails difficulties with delivery and installation, which cannot be done without special equipment (trailer, crane, excavator).
 Plus, it is planned to dig a pit, which is also quite problematic.
Lightweight and durable. The design principle is similar to the previous version. It is difficult to transport and install.

The optimal and justified option from all of the above.
Such a pool is ideal for a summer cottage or a country house, where you will use it for the season.
 It can be made from concrete blocks, but it is better to pour a monolithic one. Despite the fact that this is the most complex and costly design, its reliability and durability is beyond doubt.
 Disadvantages of a concrete pool and how to fix them
- problems with the water supply system. As a rule, they appear as a result of errors during their laying and installation of pipeline systems. With the correct implementation of the work, difficulties do not arise;
- possible water leakage. This significant problem is eliminated with the help of several layers of good waterproofing, the use of high-quality concrete and compliance with all the rules for their installation;
- peeling off ceramic tiles or mosaics. Eliminated by using high-quality special-purpose glue;
- the spread of the fungus.
 The appearance of fungus can be easily leveled by regular cleaning and surface treatment of the bowl with special disinfection solutions.
Regular care and the implementation of the above actions is the prevention of the formation of fungus.
Swimming pool building permit
In fact, an outdoor pool on the territory of a yard or site can be built without the approval of Rostekhnadzor.According to article 51 (clause 17) of the Urban Planning Code of the Russian Federation, objects of auxiliary use do not require a documentary building permit. But there are some nuances, it all depends on the parameters of the structure, if it is a small decorative or children's pool, then no question, but if it is a capital structure for swimming, i.e. sufficient depth, length and width, it is better to arrange documents.
If the pool is not registered in the BTI, accordingly, it will not be in the certificate of ownership, and it will not be included in the technical passport. In the future, it will be possible to legalize, only it will cost more than registering immediately.
DIY concrete pool construction - instructions

Installation work - construction of a concrete basin for the pool
Site preparation
For this, standard procedures are performed: clear the area from shrubs and trees, and also cut off branches that may hang over the pool. Material from the site
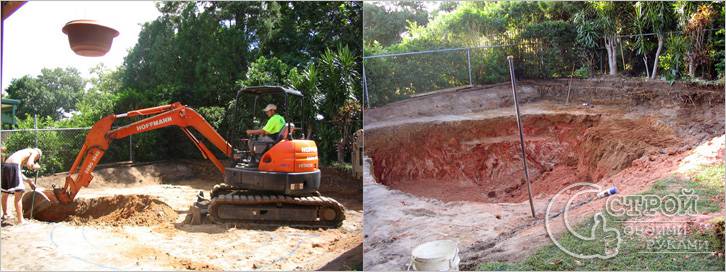
Excavation - digging a pit for the pool
 Of course, digging a pit can be done without the use of special equipment. But only in those cases, if you have a small and shallow pool, you have a lot of time, energy and helpers.
 As a rule, the cost of renting an excavator and digging services will be about the same, the difference in time.
 Pit construction for the pool
- increase the dimensions of the pit. They should be larger than the size of the future bowl. This is done in order to place technical equipment there and equip a cushion for concrete. And also for the construction of formwork.
- the presence of a corner. When digging walls, make sure that there is an angle of their deviation relative to the vertical. This method will exclude shedding of soil into an already dug pit.
- the presence of drainage systems. So that the water that splashes out of the pool does not turn into puddles and does not destroy the landscape design, you need to provide a place for its drain.
- the first step is to lay all hydraulic communications.
- provide for the possibility of draining water.
 For draining, a slope of the bottom of the pool of 5-7% is made (2-3 cm of slope per 1 meter of the bottom), which should be directed towards the drain hole.

Arrangement of a pillow
(foundation)A gravel-sand pad is needed to provide better concrete pouring. Usually it is a mixture of sand and gravel, which compresses well. The height of the pillow is 300-350 mm.

Bottom waterproofing
The more options for possible leakage we take into account and prevent, the longer the service life of the concrete pool will be.
It will come in handy.
For an oval pool, fittings no thicker than 10 mm are used. This is due to the fact that fittings of this diameter are sold in coils. And, therefore, you can independently adjust its length. The step of arranging reinforcing tracks is 200x250 mm.
 For a rectangular pool, arbitrary laying of reinforcement with strapping in a step of 200x200 cm is allowed.
Something needs to be placed under the reinforcement, for example, a brick, so that it remains in the middle of the concrete base during the pouring of the concrete solution.
 After installing the reinforcement cage, fill the bottom of the pool with a concrete solution. When pouring, try to avoid the presence of air-filled voids - this will reduce the quality of the surface.
 We are waiting for the concrete to dry and it will be possible to move on it calmly.

The reinforcement principle is identical to the previous one.
The number of tiers is determined by the height of the bowl.
Installation of formwork for the pool
A wooden board (painted or rolled) or, more conveniently, plywood (preferably moisture-resistant or laminated) is used as the material for the formwork. The use of plywood allows you to create bent shapes with a minimum of effort, which is important when building a pool with a complex or oval shape.


In order to avoid deformation of the formwork under the pressure of the weight of the concrete solution, it is recommended to install stiffeners and spacers at a distance of 500 mm. A bar with a section of 50x50 is suitable for spacers.
Installation of plywood formwork is more costly, but the surface quality of the concrete bowl is almost perfect.

Note:
the lathing for the steps is mounted separately.
Pouring the walls of the pool bowl with concrete
 We are waiting for the concrete to harden. At the same time, it is better to cover it with something to avoid destruction from exposure to temperature or moisture. And also periodically moisten with water.

If you do not plan to use a metal ladder, but want to make the immersion procedure smooth, then you need to provide for the presence of concrete steps.
The formwork for the steps is installed when the entire concrete pool bowl is ready.
For the manufacture of formwork, it is better to use plywood, because it allows you to create bent shapes and does not require additional stripping.
Concrete pool construction - video on pouring a concrete bowl
Finishing and cladding of the pool bowl
This stage involves a set of activities:
Pool wall sanding
 Grouting is done manually or using a special grinder.
Waterproofing is applied with special liquid solutions, between the layers of which a reinforcing fabric (mesh) is laid.


When performing this type of work Special attention should be given:
- seams between the bottom and walls of the structure;
- seams that appeared when pouring concrete;
- place of entry of communications;
- chips, gouges and cracks.
Finishing
Before doing this, it is important to check the quality of the waterproofing. To do this, you need to fill the pool with water. Measure the water level. Then wait 10-12 days. And again measure the water level. Changes to this parameter are an alarming sign. This means that the waterproofing is of poor quality and there is a leak somewhere.
The amount by which these two indicators differ can tell a lot. For example, a slight discrepancy would indicate that the water could have simply evaporated under the influence of heat.
For finishing, the following materials are usually used:
 facing tiles;
 mosaic;
 PVC film (the cheapest option).

The choice of material for finishing is influenced by such factors as:
Simplicity of care;
- availability;
- ease of installation;
- price;
- the possibility of replacement;
- appearance.

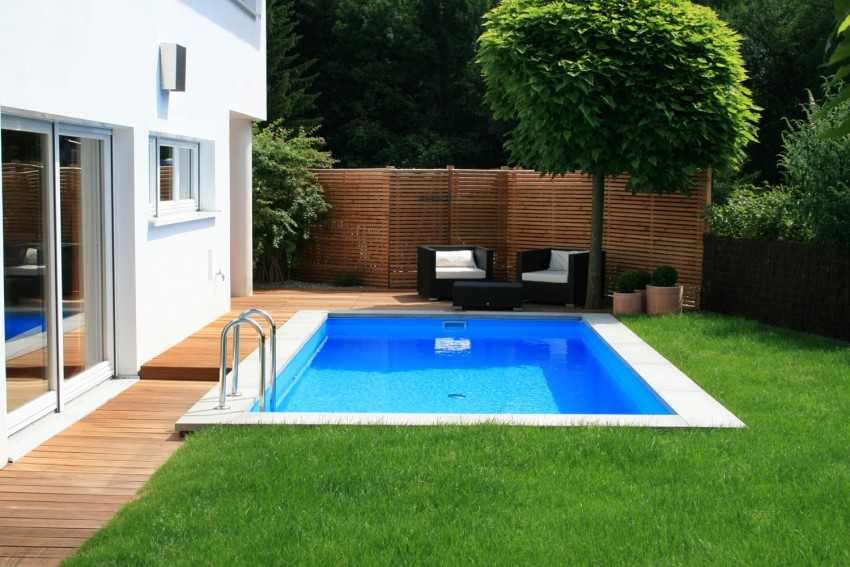
Who among the owners of summer cottages or country cottages does not dream of their own pool on the site? And one should not think that this is an extremely expensive structure that requires great efforts in construction and operation. With minimal skills in working with building materials and some expenses, you can build inexpensive pool.
In this article, we will tell you how to make a pool in the country with your own hands from various materials (concrete, frame, from film), and also demonstrate videos and photos.
Pools vary. Someone will need an inflatable container installed in a suitable place and filled with water from a hose. If you want to build a solid stationary reservoir that can serve for many years, you will have to work.
First of all, you need to choose a suitable location. It should be away from beds and trees. The less debris falls into the water, the less maintenance will be required. In addition, you need to think about the water supply and drainage. It is better to choose a simple shape of the pool, without sharp corners: in the form of an oval, circle, square or rectangle.
The simplest and cheapest way to set up a pool is to cover the recess in the ground with a special film. However, this structure cannot be called reliable and durable. Most often, owners prefer to build pools from concrete or polymer materials.
A frame pool is considered to be a fairly simple structure, quite suitable for self-erection. Its peculiarity is its construction, which consists of a frame "skeleton" of metal pipes. The bowl is lined with three layers of PVC foil. Inside, it has a special nylon mesh, which gives the material additional tensile strength. The metal frame holds the water pressure.
It is placed with some depression in the ground or just on the surface. The site for the pool must be prepared: remove all vegetation, and level the bottom of the shallow pit and fill it with sand or gravel. In some cases, even a concrete pad is poured.
Then the entire surface is lined with a heat and water insulator. Penofol or folitep is best suited here. These are modern thermal insulation materials made of foamed polyethylene coated with aluminum foil. The mats are laid end-to-end and the seams are glued with construction tape.
After that, the pool itself is assembled according to the instructions attached to the kit. The only one necessary tool for work - a screwdriver.
Concrete
When building a concrete pool, work also begins with digging a pit. In this case, the entire bowl is sunk into the ground. When calculating the size of the pit, do not forget to add about 0.4 m to the wall thickness. The shape of the pit should follow the shape of the pool itself. The optimal depth can be considered 1.4 m.In order for the deepening to be as reliable as possible, its walls must be given a slight slope to outside parties, about 5 °.

The finished pit of the desired shape must be carefully leveled, the soil should be tamped and a sand cushion about 30 cm thick should be laid on the bottom.Then the pool is waterproofed, everything is covered with a waterproofing agent (roofing material with bitumen mastic) in several layers and the formwork is installed. Liquid concrete is poured into the gap between the wooden boards and the earthen wall. Additionally, the walls are reinforced with a double metal mesh... It simultaneously counteracts the pressure of the water in the pool and the pressure of the soil.

Note! Concrete grade - at least M350.
The bottom of the future pool is also reinforced with a mesh and poured with a layer of concrete of at least 20 cm. When the mortar hardens, the formwork is removed and the entire surface is rubbed with "cement milk" - a slurry of cement and water without adding sand. This process is also called iron iron. It allows you to remove microcracks on a frozen surface and prevent their appearance in the future.

At the final stage, the walls and floor of the pool bowl are finished with a decorative coating. These are usually ceramic tiles. However, it is first necessary to install a ladder, nozzles, waterfalls and underwater lamps, equipment that facilitates the maintenance of the pool.
We offer you to see a photo report of the construction of a concrete pool:


Film pool

Due to its versatility, PVC film is widely used for the arrangement of swimming pools. It is used by:
- to create a pool in the ground;
- for arranging frame pools;
- for sealing the concrete base of the pool bowl;
- as a repair kit for an old pool.
Note! PVC film has a thickness of 0.5–2 mm. The thinnest is only suitable for small pools with minimum load... It is best to use a film not thinner than 1.5 mm with a reinforcing layer of fabric.
Swimming pool in the ground

If you want to make a pool quickly and relatively inexpensively, then in this case you can dig a pit with sloping walls, which will be the base of the pool. Remove plant roots thoroughly and compact the soil. Make sure that there are no sharp stones left anywhere, because they can damage the canvas.
The entire bottom of the pool is covered with sifted sand, with a layer of at least 3 cm and leveled. As an insulating material, you can lay a layer of mineral wool, but it is better to spread roofing material, since it is not afraid of moisture. Spread a non-woven fabric over this cake and only then a film. After that, you can weld the seams.
Note! Before you start welding the seams, you need to practice on scraps of material so as not to spoil the canvas designed to seal the pool.
In order to fix the edges of the canvas, you can use a special mounting corner, to which the film is welded. A simpler option is to drop in the edges of the film. In this case, a decorative stone edging is often made around the pool.
Concrete pool

We will not dwell on the creation of the structure of the pool itself - it must be a reinforced container. The main advantage of using PVC film is that no waterproofing is required. If the surface is not perfectly smooth, then it will be correct to use a substrate, which can be used as a geotextile or the same roofing material. Actions with the film are similar when arranging a pool in the ground.
It remains to choose a method of fixing the film on the edges of the pool (it is better if it is a special mounting corner) and you can use the product.
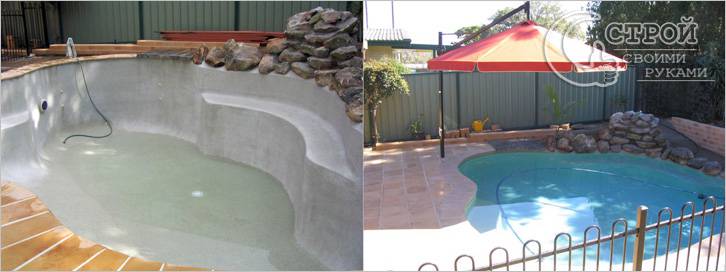
Renovation of an old pool

It is no secret that over time, a capital pool can lose its tightness or even crack. If the crack is constantly widening, then no amount of sealing, not even the application of liquid rubber, will help. In this case, you can, as well as for a concrete pool, use a PVC film, having previously repaired the cracks and leveling the base.
Polypropylene
A polypropylene pool also requires a pit and a concrete bowl to be poured. The polymer allows you to solve the main problem in the construction of pools - to provide reliable waterproofing. Polypropylene is an extremely durable material and can take any shape. Pools from it are made in two ways:
- a ready-made bowl of the desired size and shape is bought;
- sheet polypropylene is bought and a bowl is made from it.
Note! The cost of both methods is about the same.
Welding of sheets is carried out using a thermal welding machine - an extruder.

After the installation of the polypropylene bowl and the installation of all communications, concrete is again poured from above and decorative material is laid.
It is polypropylene pools that are most suitable for installation in a summer cottage. They are not afraid of temperature changes and vagaries of the weather.
Video
The full range of works for installing a polypropylene pool is presented below:
See how PVC pool films are welded:
Photo
Below in the photo you can see various options construction and decoration of the pool:


