Pain in the shoulders is associated with constant stress and fatigue experienced by residents of large cities and not only, with a sense of guilt and responsibility that we carry on our shoulders for years and even decades, unable to free ourselves from contrived clamps.
Sadly, but tightness, lack of mobility shoulder joints entails other unpleasant processes. In particular, the lungs do not receive the necessary flow of oxygen, thereby causing our body to experience a deficiency nutrients... All this leads to the onset of inflammatory processes and the development of various diseases. We are throwing our strength into the treatment of the consequences, and we do not even suspect that it all started with weak flexibility and muscle tone shoulder girdle.
Yoga will help to cope with all these difficulties. By the way, entering various inverted and semi-inverted asanas (bridges, balances on the head, forearms and arms) without a strong and mobile shoulder girdle will be very difficult.
Below is a set of exercises for strengthening the shoulders. It should be performed at least every other day. The block of the proposed exercises is perfect as morning exercises or warm up before a complex workout.
Exercise 1. Shoulder movement up and down

Photo by Natalia Grishko
Starting position - standing straight, feet shoulder-width apart, arms freely along the body.
As you inhale, sharply, without bending your elbows, stretch your shoulders to your ears. As you exhale, return your shoulders to their original position.
Number of repetitions: 10 times.
Exercise 2. Circular rotation of the shoulders
Photo by Natalia Grishko
Starting position- the same as in the previous exercise.
Roll your shoulders first forward and then backward
Number of repetitions: 8 times in each direction.
Exercise 3. Circular rotation of the shoulders with arms spread apart

Photo by Natalia Grishko
Starting position- standing straight, feet shoulder-width apart, straight arms spread apart parallel to the floor, palms clenched into fists.
first forward and then backward. Keep your arms straight and parallel to the floor.
Number of repetitions: 8 times in each direction.
Exercise 4. Shoulders right-left movement

Photo by Natalia Grishko
Starting position- the same as in the previous exercise with the only difference that the palms are unclenched.
Stretch your right shoulder to the right, tilt your body a little there. Do the same in the other direction. Keep your arms straight and parallel to the floor.
The number of repetitions is 8 times in each direction.
Exercise 5. Vertical stretch

Photo by Natalia Grishko
Starting position- standing straight, feet shoulder-width apart.
Raise your right straight hand above your head, stretch it up and at the same time with your left hand - down. Change the position of your arms and repeat the stretch.
The number of repetitions is 3 times from each hand.
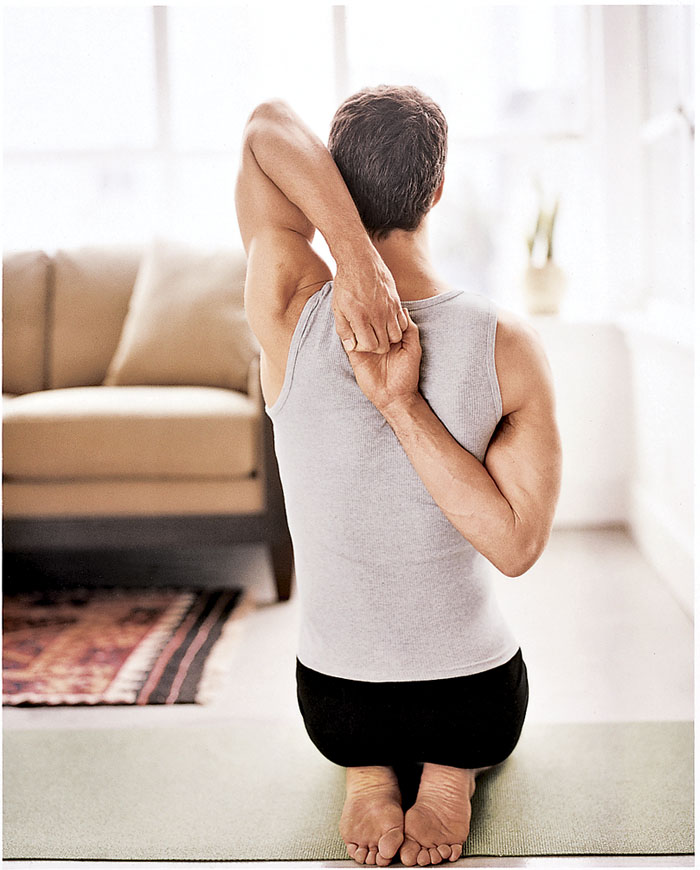
Exercise 6. Standing Cow Pose

Photo by Natalia Grishko
Starting position- standing, feet shoulder width apart.
Raise your right hand up, bend at the elbow and put her palm behind your back, bend your left hand at the elbow and put her palm behind your back through the bottom. Clasp the fingers of both hands behind your back. Fix the position for 10 breaths. Then change the position of the arms and fix the pose again.
Exercise 7. Uttanasana with hands behind his back

Photo by Natalia Grishko
Starting position- standing straight, arms straight behind the back, fingers intertwined in the lock.
Lean forward as you exhale. Pull your palms, shoulders and shoulder blades up, stretch your chest to your knees. Next, turn your shoulders forward, down, stretch your palms to the floor. Lock the position for 5 breaths.
Exercise 8. Mountain pose sitting on a chair

Photo by Natalia Grishko
Starting position- sitting on a chair, feet shoulder-width apart, palms on knees, back straight, shoulders relaxed and lowered as much as possible. Stretch the top of your head towards the ceiling.
Perform 5 rounds of complete yoga breathing.
Exercise 9. Angel Wings
At the end of the complex, get on all fours, lower your buttocks to your heels, bend forward, stretch your right shoulder to the floor, turn to the left, put your palms together. Fix the position for 5 breathing cycles, and then repeat the exercise on the other side.
Perform the proposed exercises and asanas regularly, and then the load will fall off your shoulders, you can freely spread your wings and take off towards your success and a happy life!
Many of us have come to yoga to get stronger. AND it comes not so much about physical endurance as about inner strength- fortitude. If the goal is only to build muscle, then this can be done with the help of fitness. But, you see, the relief muscles are unlikely to help maintain composure in a difficult situation or cope with psychological and emotional problems. Yoga is precisely designed to fulfill this task: practice not only strengthens our body, but instills confidence, teaches responsibility and honesty in relation to both ourselves and others.
Just like daily visits gym strengthen muscles, regular practice trains the strength of the mind. Even on the day when it seems to you that you are not in the mood and you want to postpone classes until tomorrow, you should not give in to the temptation and give up the practice. If you believe yoga is important to your health and well-being, then you shouldn't let accidents and fleeting desires become a barrier to your practice. This simple principle develops such important qualities as responsibility and mindfulness of decision-making, which are necessary for the practice of yoga and in Everyday life... To practice yoga at home regularly, and not occasionally, try to practice at the same time and set aside a certain place for it in the apartment.
This sequence is designed specifically to train arm and upper back strength and is useful for developing flexibility in the shoulder girdle - a prerequisite for getting into the Handstand. On the other hand, it also strengthens the strength of the spirit, which to one degree or another is necessary for any of us to perform inverted poses. During practice, observe which asanas are difficult for you - this way you will learn more about own body, about its strengths and weaknesses. Performing the sequence several times, you may feel that you can hold a difficult position for you for a little longer, and this will be another step on the path of your improvement - both physically and spiritually.
1. Vajrasana - Lightning Strike Pose with Arms Raised
Enter Balasana (Child Pose) by dropping your arms along your body. As you exhale, pull them forward, press your palms to the floor, lifting your forearms and elbows off the floor. Then lift your torso and sit on your heels. Take a brick, squeeze it with your palms and stretch your arms up. While squeezing the brick, make the upper arms strong. Relax the muscles at the base of your neck and continue to stretch upward. Imagine that your arms and sides of your body are one, and extend your arms from your waist. Relax your facial muscles and breathe evenly. At first glance, the pose may seem simple, but after a minute you will feel in which part of the arms you are lacking strength.2. Adho Mukha Svanasana - Face Down Dog Pose
Get on all fours, move your palms forward a few centimeters and press them against the mat, lifting your shoulders off the floor. Strengthen the upper arms and point your forearms towards each other. As you exhale, lift your pelvis and enter Adho Mukha Svanasana. Keep your head in such a position that your ears are between your shoulders (this will strengthen upper part back). Relax the muscles at the base of your neck and draw in your shoulder blades. Extend your arms and core: Move your pelvis away from your shoulders by pushing your hips back. To begin with, hold the asana for 10 breaths and gradually increase the duration of the posture to one minute.

3. Vajrasana with the position of the hands in Gomukhasana - Pose of the Lightning Strike with the position of the hands of the pose of the Head of the Cow
Sit in Vajrasana, spread your arms out to the sides and stretch them well at shoulder level. Bring your shoulders back and down. Bend right hand at the elbow, put it behind your back, moving your palm outward, up along the spine. Don't let your right shoulder lean forward. As you inhale, raise your left hand up and as you exhale, bend it at the elbow, grabbing your right hand with your left palm. If you cannot join your palms behind your back, use a strap. Stay in this position or lean forward. Before changing the position of the arms, stretch them along the body and then up to release the accumulated tension. Stay in the pose for 10 breaths to one minute.

4. Virabhadrasana III, variation - Variation of the Warrior III pose
Place your palms on the wall shoulder-width apart, and in height - at the level of the pelvis. Move away from the wall until your arms are fully extended and your feet are directly under your hips - this way the angle between your torso and legs is 90 degrees. Use your hands in the same way as in Face Down Dog. Put your feet together and retract external sides thighs. Press your feet well to the floor to tighten and strengthen the front of your thighs. Make sure that your arms remain straight and that your palms press evenly against the wall. Picking up right leg up to a position parallel to the floor, keep the sides of the pelvis in line. Don't sag on your left leg, but instead direct the outside of your left pelvis toward the centerline of your body. To right part the pelvis did not rise and the body weight did not move by left side, wrap the thigh of the right leg inward, straighten the pelvis and extend the right leg well back.

5. Adho Mukha Vrikshasana - Handstand
Place your palms on the floor at a distance of 7-10 centimeters from the wall and enter the Dog Face Down. Move your torso forward so your shoulders are over your wrists. Press your palms flat on the floor to move your shoulders away from your ears. Point your forearms towards each other and make them strong outer surfaces upper arms. Remember how you extended and twisted in your right leg in the previous position - work with the swing leg in the same way: as you exhale, step with one leg forward, swing the second and climb into Handstand with your heels on the wall. Stretch your legs up, trying to remove the feet from the pelvis. Stay in the pose for 5 breaths, or until the shoulders become tense. After coming out of the pose, rest in Uttanasana (Standing Forward Bend).

6. Dolphin Pose
Get down on your knees with your back to the wall. Roll your toes and rest your heels against the wall. Place your forearms and elbows on the floor. Make sure your elbows are shoulder-width apart and your fingers interlaced. Expand the upper arms from the inside out. Slowly raise your pelvis as you do when entering Adho Mukha Svanasana. Keep your head on the floor, relax your neck. Try not to round your back: pull the thoracic spine inward. Stay in the pose for 5 breaths to one minute. This pose will prepare you for the Headstand.

7. Shirshasana - Headstand
If you have weak shoulders, or in the previous position you are unable to draw in the upper back, or you have never done a Headstand before, then continue to work in the Dolphin position. If you're ready to move on, kneel down, place your palms as close to the wall as possible, interlace your fingers and shape your palms into a domed shape. Place your elbows shoulder-width apart, press your wrists firmly to the floor and place the crown of your head on the floor. Raise your pelvis by straightening your legs. Press your forearms firmly against the floor to raise your shoulders. Unfold the upper arms from the inside out. Inhale, lift your feet off the floor, bend your knees and enter Shirshasana. Stretch your legs up strongly. Relax your forehead and facial muscles and watch your breath. Start with a few breaths, gradually increasing the duration of the pose. Coming out of the asana, do not raise your head, rest in Balasana. Perform Adho Mukha Svanasana before continuing.

8. Viparita Dandasana - Inverted Staff Pose on the Chair
Remove the rug and place the chair 30 centimeters from the wall (back to wall). Sit facing a wall with your legs between the sides of the chair back. While holding the chair, tilt the body back so that the shoulder blades are on the front edge of the chair seat. Bend at the top of your back and release your head and neck. Rest your feet against the wall and slowly begin to straighten your legs, moving away from the wall. Keep your heels flat on the floor and curl your upper thighs inward. Grasp the back legs of the chair with your hands. Use this grip to lift and open your ribcage. To exit the pose, grab the back of a chair with your hands, bend your legs and place your feet on the floor. Inhale and lift your body. Remain seated for 10-20 breaths before continuing.

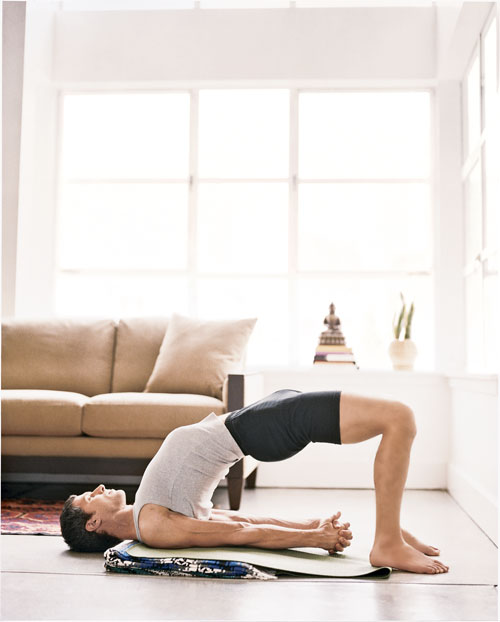
9. Setu Bandha Sarvangasana - Bridge Pose
Fold two blankets and stack them neatly on top of each other. Lie on your back with your shoulders on the support and your head and neck on the floor. Bend your knees and place your feet as close to your sit bones as possible, knees hip-width apart. Inhale and lift your pelvis. Roll your upper thighs inward. Unfold your palms so that they are facing each other and press their outer edges to the floor. Push off external parts hands off the floor to raise the area between the shoulder blades. Then interlace your fingers and lift your ribcage even higher. Keep your throat soft and your facial muscles relaxed. Remain in the pose for 3-5 breaths.
10. Sarvangasana - Shoulderstand
Lie on the blankets in the same way as in the previous asana: shoulders on a support, head on the floor. Inhale, move your legs behind your head and enter Halasana (Plow Pose). Interlace your fingers and extend your arms along the floor. Press the outer sides of your upper arms firmly to the floor to raise the area between your shoulder blades. If usually in Sarvangasana your elbows move apart, use a belt: put it on your hands, just above the elbows; the width of the loop is equal to the width of the shoulders. Then place your palms on your back (fingers pointing towards the ceiling) and lift your legs up - first one, then the second. Stretch your legs well, push up the pads under thumbs... The main body weight is on the shoulders and elbows, not on the neck. Stay in the pose for 10 to 20 breaths. Then return to Halasana and, rounding your back, slowly lower your pelvis to the floor. Lie like this for a while (several breathing cycles), then turn onto your side and slowly rise.

Photo: georgiachytiri / instagram.com
In pursuit of perfect figure we take complex care of our body from head to toe, but we rarely pay attention to our hands. At the same time, they are the ones that betray our true age and inclination to be overweight.
The thing is that, standing up straight and looking in the mirror, it is difficult to see that our hands are far from perfect. Only by raising your hand and waving goodbye to the imaginary interlocutor in the mirror, you can notice that we should pump up the triceps.
And with the onset of warm summer days, we increasingly want to wear beautiful dresses and blouses that reveal shoulders and arms.
How to sculpt your arms with yoga
Some women think what if to do physical training for the muscles of the hands, they will lose their natural femininity and charm. However, yoga will not make you a bodybuilder - never, even with daily workouts, but it will give firmness and tone to weakened muscles. Asanas designed to remove excess weight with full hands and add muscle mass thin.
The two main muscles of the shoulder that create a beautiful relief are biceps, or biceps, and triceps, or triceps... The biceps flexes the arm at the elbow and shoulder, and the triceps extends the arm in elbow joint.
Thus, elementary physical exercises, which bodybuilders use to strengthen the biceps and triceps is flexion and extension in the elbow joint of the arm with a load. This is how bodybuilders create the sculpted shoulders and forearms that we would like to see on their men.
Yoga works evenly with all the muscles of the shoulder and forearm without pumping biceps or triceps. As a result, the relief becomes smooth, and the arms remain thin.
We offer you a set of simple asanas, in which, nevertheless, the muscles of the shoulder and forearm are actively involved. If you perform the complex correctly, then after training the next day your hands should hurt when you lift them up.
4 best asanas for hands
1. Ardha chandrasana (crescent moon pose)
The crescent pose is an asana in which the hands act as a rudder - if you do not strain the muscles of the arms, we will very soon fall. One hand is firmly on the floor, while the other is pointing straight up, and fixing this position requires strong muscle work. Attention! If you are unable to maintain balance with your palm on the floor, use one or more blocks.
- Stand in the extended triangle pose (Utthita Trikonasana). To do this, spread your legs wide, spread your arms to the sides and, bending to the right, place your right palm on your right shin, and raise your left hand up.
- Place your left palm on your thigh. As you inhale, bend your knee slightly and place the fingertips of your left hand on the floor or block at a distance of 30-50 cm of the foot.
- Tear off left foot from the floor and move it to the right so that the weight of the body is transferred to the bent right leg. Breathe evenly to keep your balance.
- Place your right foot on the floor. As you exhale, straighten your right leg, and lift your left leg up. The left leg should be parallel to the floor or slightly higher. Stretch your raised leg.
- Expand your upper torso to the left. Rib cage should be parallel to the wall.
- Try to keep your balance. When you feel stable, extend your left arm up so that it forms a straight line with your right arm. Look up towards the outstretched left palm. Remain in the asana for 30 seconds to 1 minute.
- To get out of the pose, as you exhale, lower left leg on the floor. Return to triangle pose. Straightening, do Uttita Trikonasana to the left and repeat all the actions in the other direction.
Contraindications:
neck injury (if you have problems with the cervical spine, do not look up);
- migraine, headaches;
- low pressure;
- insomnia.
3 asanas for beautiful hands
2. Adho mukha svanasana (downward facing dog pose)
Downward Dog Pose is a basic asana that is included in all complexes for beginners, basic complexes for daily work. It certainly works on all muscle groups, so its benefits are obvious for the beauty of the entire figure. She demands physical activity and accuracy, so you need to be patient to get the best results.
How to do the asana step by step:
- Get on all fours with your knees hip-width apart. Place your palms on the floor at a distance of 40 cm from your shoulders.
- Spread your fingers wide. During the entire exercise, rest on the entire surface of your palm.
- As you inhale, go up, straightening your knees and spine. Keep your feet on the floor. Keep your hands and feet on the floor.
- At first, you can keep your knees bent, and put a folded blanket under your heels.
- Lengthen the spine so that the tailbone is as high as possible.
- Feel your arms tighten.
- Remain in the asana for 5 free breaths.
- To exit the asana, take a deep breath, hold your breath for a few seconds, bend your knees as you exhale and touch the floor with them. Sit on your heels, rest your head on the floor (forehead touching the floor, arms extended forward). Stay in this position for 30-60 seconds.
Contraindications:
- the last months of pregnancy;
- high pressure;
- diarrhea.
3. Purvottanasana (East)
Yoga for the strong and beautiful hands/ shutterstock.com
This position is done in conjunction with the classic Downward Dog Pose. Successively performing them one after another, we will not miss a single muscle in the hands, evenly distributing the load and creating a smooth relief.
How to do the asana step by step:
- Sit on the floor, straighten your legs. Keep your back straight.
- Place your hands with your palms on the floor near your pelvis. Throughout the exercise, the fingers should be directed towards the feet.
- Bend your knees with your feet shoulder-width apart.
- As you exhale, break away from the floor, lift your body up, straightening your arms and legs.
- Do not press your chin to your chest, head, neck and body should form a straight line and be parallel to the floor.
- Breathe freely, don't hold your breath. Tighten your knee and elbow joints.
- Fix the position and stay in the asana for 5-10 free inhalation and exhalation.
- To exit the asana, as you exhale, bend your elbows and knees and sit on the floor.
Contraindications:
- injury cervical spine;
- injury to the wrists.
4. Vasishthasana (posture of the sage)
This position is performed from the downward facing dog. When you have mastered the whole complex, you will be able to smoothly move from one asana to another so that the load on the hands is constantly maintained. The Sage Pose strengthens not only the shoulders, but also the forearms.
How to do the asana step by step:
- Perform Adho mukha svanasana.
- Distribute your weight so that most of it is on the right side of the body, right arm and leg.
- Bring your left leg to your right, and press your right foot firmly to the floor.
- Slowly turn to the left, lifting your left hand off the floor. When you find your balance point, raise your straight left hand up. The right and left hand should form one line.
- Stay in the asana for half a minute, or less if you lose your balance. Try to increase the time each time.
- To get out of the asana, lower your left hand along the body, turn to face the floor, place your left hand on the floor. Then lie on the floor to rest, or go straight to Downward Dog Pose to do the asana on the other side.
Contraindications:
- elbow joint injury;
- injury to the wrists.
The complex of asanas for beautiful, strong and embossed hands requires a lot of effort and after it it is imperative to relieve tension from the muscles. Lie in savasan at- a pose of relaxation. Lying on your back, relax and close your eyes.
Breathe evenly, watch as you inhale and exhale. After 5-10 minutes, gradually return to reality: as you inhale, raise your arms above your head and, as you exhale, throw them along your body. Then bend your knees, and, rolling over over your right side, stand on all fours. Rest your forehead on the floor and even out your breathing. Now you can get up slowly.
Any physical exercises have a cumulative effect. This means that if you wait until your hands stop hurting, and only then do the complex again, there will be no result.
To get your hands beautiful, you need to practice three times a week. Love your body, but do not over-spare yourself. Then your body will reciprocate you, and your hands will become strong and prominent.
Svetlana POLIKARPOVA
Ah, Chaturanga Dandasana ... one of the most difficult poses in yoga, which is most often done incorrectly. So why are so many yogis working hard in this pose? The key to building it is strong arms, the hips and chest do not sag, but are on the same straight line, the elbows hug the body at the sides.
This pose is called the four-leg staff pose and is difficult to do without a solid center and is good. developed muscles hands. But if Chaturanga in your practice is out of reach - here are eight preparatory postures, by practicing which you will get closer to the ideal chaturanga. Also strengthen the muscles of the arms.
Before starting any practice, warm up and warm up in Cat / Cow pose and / or Sun Salutation. Practice these poses in sequence, or on your own.
Downward-facing dog (Ardho Mukha Shavanasana)

A pose that requires strong hands, a developed center, and if everything is done correctly, then the asana develops the muscles of the back.
How to do it: Start on your hands and knees, and then lift your hips up high until your body forms an inverted "V" shape. Spread your fingers wide, use your arm muscles to hold. Bend your shoulder blades down without straining your neck. This will help shift the weight of the body towards the hips, relieving pressure on the wrists. Pull your heels down towards the mat. Do not be discouraged if you cannot reach the floor with your heels yet, the main thing in this position is to keep your back straight.
Breathe in it for 5 to 10 deep breaths.
Plank Pose

Plank pose tones the arms and shoulders, strengthens the abs and center.
How to do it: Hands and knees on the floor, shoulder-width apart. The fingers are wide apart. The wrists are strictly under the shoulders. In order to build the bar correctly, you can track the position of your hands on the mat without lifting your knees. Then just straighten your legs, the hips do not sag. Looking down, the crown stretches forward.
Cobra Pose (Bhunjangasana)

How to do it: Lying on your stomach, place your hands next to your shoulders. Inhale and slowly lift your torso up. The legs and pelvis remain on the mat.
Pull the shoulders away from the ears. Elbows are slightly bent, look up. We breathe deeply.
Upward-facing dog (Urdhva Mukha Svanasana)

The difference between Cobra Pose and Upward Dog Pose is that in the second version, the hips are lifted off the floor.
How to do it: Lying on your stomach with your arms under your shoulders. Straighten your arms and stretch your whole body up, opening the chest, stretch the top of the head up, chin forward. We hold our gaze at the top. Feel your beautiful C-shaped back how the spine is stretched. Try to bring your shoulder blades together. The fingers are spread wide.
Dolphin Pose (Makarasana)

How to do it: Begin this asana with Downward Facing Dog. Then slowly lower yourself onto your forearms, but continue to pull your hips up and back.
Point your tailbone up towards the ceiling, relax your head, and pull your shoulders away from your ears. Pull your chest towards your hips, place your arms shoulder-width apart, as an alternative, connect them in a lock while remaining on the forearms. If you feel a strong load on your shoulders, then try to activate the center, taking the load off your arms. Hold for 10 deep breaths.
Forearm Plank Pose

How to do it: Lie on your stomach, rest on your forearms. Make sure your elbows are right under your shoulders. And the wrists line up with the elbows. Take a deep breath, and as you exhale, lift your body. You should be in one straight line from the top of your head to your heels. This means that you need to lengthen the tailbone towards the knees and pull the pelvis towards the spine.
(this is the activation of the deepest transverse muscles belly). This pose smooths out any curvature of the spine. Make sure your legs are straight.
Start with 10-30 seconds a day (depending on initial training). Every two to three days, add another 15 seconds until you hold the bar on your forearms for 2 minutes.
Side Plank Pose (Vashisthasana)

How to do it: From the plank, lift your hips up slightly, then shift your weight into one hand and open up. The hips, knees and ankles are parallel to each other. Shoulders, hips and ankles should be in one straight line. If you feel stable, extend your free hand up so that it forms a line from the wrist of one hand to the fingertips of the other. To make it easier to maintain balance, do not stack your legs on top of each other, just leave your legs in the same position where they were in the plank position, turning them to the open side. This will end up with your upper foot in front of you, giving you a solid foundation. If you don't feel enough strength in your hands, place your lower knee on the floor. Hold the position for 3 to 5 breaths, then repeat on the other side.
Four-leg staff pose (Chaturanga Dandasana)

You are now ready for the most challenging pose!
How to do it: Start with a plank with your arms under your elbows and your elbows under your shoulders. Pull in your muscles abdominal and lower ribs and find your center, keep it tight. Push your hips up, then shift your weight onto your toes, farther than you think. This ensures that the elbow forms a 90 degree angle. Then move down until your arms form an angle of 90 degrees, then linger at this point. Hold your center, use your abs, pull in your stomach. Wrap your elbows around both sides of your body and pull your shoulders away from your ears.
For additional load, return to plank position, and then back to chaturanga. Repeat up to five times.
The left joint is the most mobile joint in the human body. It represents the junction of the scapula and the articular head humerus surrounded by strong muscular and ligamentous apparatus. This is a ball-shaped joint, so a wide range of movements is possible in it: flexion-extension, abduction-adduction, and rotation in and out.
High mobility of the shoulder joint is provided by its structure: the head of the humerus is adjacent to the glenoid cavity of the scapula, which is shaped like a flat plate. The head of the shoulder is much larger in size than the indentation in the scapula where it is inserted. Therefore, in this design there is the possibility of high-amplitude movements, which, however, can lead to the loss of the shoulder head from the joint. This is prevented by the rotary cuff, which acts as an elastic restraint.
Due to the special structure of the shoulder joint, high-amplitude movement is possible in it: the size of the shoulder head significantly exceeds the depression in the scapula where it is inserted
In yoga, injuries to the shoulder joint occur due to incorrect adjustment of the asanas. In asanas with an emphasis on the hands, with the wrong technique of performing the exercises, the load on the shoulder joint is unevenly distributed, which in turn leads to an overload of the joint. In yoga asanas for opening the shoulders, with excessive amplitude, overstretching of the ligaments and dislocation of the shoulder are possible.
Rehabilitation of a shoulder injury is a complex and painstaking process. So is it not better to secure yourself in advance and carefully observe correct technique doing exercise?
How to keep your shoulders safe while practicing yoga?
How to avoid injury while doing yoga? Tips for working with the shoulder joints.
Shoulder opening asanas
 Especially adjust the amplitude of the shoulder opening in leveraged asanas
 When doing yoga exercises for the shoulders, dose the intensity. Do not be overly zealous if you feel a sharp pain while performing an asana. In this case, it is better to reduce the range of motion or get out of the pose. This recommendation especially applies to asanas where leverage is present.
Examples of asanas for opening the shoulder joint:
 From left to right: Gomukhasana, Garudasana, Namaste behind, Castle behind
 Asanas with emphasis on hands
In asanas with an emphasis on the arms, it is necessary to correctly adjust the position of the shoulders. It is unacceptable to raise your shoulders up, squeezing your neck with your shoulders. On the contrary, the shoulders and shoulder blades should be taken away from the ears.
 It is unacceptable to raise your shoulders up. On the contrary, the shoulders and shoulder blades should be taken away from the ears.
 It is also important to keep your arm muscles active. Do not sag on the arms, the muscles of the arms should remain strong. Otherwise, the entire load goes to the joints, which can lead to injury or illness. How to do the asanas correctly? You should imagine that you are pushing off the floor with your hands. Active hand work is a guarantee of the safety of the shoulder, elbow and wrist joints.
 Should not sag on the joints. Active hand work is a guarantee of the safety of the shoulder, elbow and wrist joints
 Examples of arm-supported asanas:
 From left to right: Purvottanasana, Marjariasana, Vasishthasana