Fishing equipment assemblies are constantly being improved, new elements and materials are used. When connecting elements together, time-tested knots and loops are used. Any angler uses only a few proven and convenient hinges that can be successfully applied to almost any rig. Loops are often used to tie the main line to the leash.
To get started, you can familiarize yourself with the knot for tying hooks and organizing loops on the line. Simple and reliable knot.
The knot is easy to manufacture, does not require complex manipulations with the line. When knitting a loop on thick lines, there is a bend at the knot, the loop and the main line do not lie on the same straight line.
Used to connect a loop to a loop when connecting the leash with the main line or with a swivel. The loop can be used when mounting the bottom tackle. Not recommended for fly fishing rigs.
Knot knitting process
- At a distance of 7-10 cm from the end of the line, fold it in half.
- Tie a regular knot with the double end of the line, but do not tighten it.
- Thread the end of the double line through the loop of the regular knot again.
- Tighten the knot to form the desired loop at the end of the double line.
- Moisten the knot and tighten.
- Remove the sticking out end of the line near the knot.


Leash loop on main line
When fishing with a float, sometimes you may want to organize a couple of side leads on the main line with additional hooks. This can be done by tying the leashes to the loops on the main line.
The video below clearly shows the process of organizing the connection of the leashes and the main line using loops.
You can also watch. The manual provides instructions with the most reliable components for a particular case.
Self-tightening hinges
Self-tightening hinges are very diverse in fishing assemblies. Used when connecting fishing line with wobblers, spinners, swivels, hooks, carabiners and other accessories other than soft elements (lines, braided cords). Many self-tightening hinges are known to anglers as Arbor knot, Clinch, and others.
The advantage of sliding loops is that they can be tightened and loosened, since the main line slides inside the knot.
The simplest example of a self-tightening loop is a running knot. This loop can be tied anywhere on the line.
Self-tightening loop knitting process
- A loop is made on the line by the usual crossing of the main line.
- From the bottom of the formed loop, pass the main line, which was on top of the crosshair.
- Pull on the loop formed, but do not tighten the knot. The result is an ordinary knot, inside the loop of which is the other part of the main line.
- Moisten and tighten.
It is recommended to use this unit when mounting fishing elements in non-critical areas where there are no significant loads (attaching the fishing line to the spool). An improved simple running knot with an additional knot at the end of the line is called the Arbor knot.
For more critical nodes, it is recommended to use the Clinch node.
- The end of the line is threaded into the eyelet of the required piece of equipment (swivel, hook). It will be enough to thread 10-15 cm of fishing line into the eyelet.
- Wrap the end of the line around the main line 5-6 times.
- Thread the end of the line through the first loop near the eyelet.
- Thread the end of the line through the large loop formed between the first and last turns.
- Moisten the knot and tighten the loop.


For 7 years of active fishing enthusiasm, I have found dozens of ways to improve the bite. Here are the most effective ones:
- Bite activator... This pheromone supplement attracts fish most strongly in cold and warm water. ...
- Enhancement the sensitivity of the tackle. Read the appropriate manuals for your specific tackle type.
- Baits based on pheromones.


The loop is simple and reliable, but it requires some line manipulation, which at first glance seems difficult. Ideal for connecting a leash with a shock leader that lies in line and does not bend at the knot.
They are used in fly fishing tackle when connecting a conical undergrowth and a leash. It is also successfully used in any other rig assemblies when connecting the leash and the main line, a loop into a loop or a line to a swivel.
Knitting process
- At a distance of 10-15 cm from the end of the line, form a loop without a knot (overlap) so that the main line lies on top of the end part.
Form another loop on top of the first loop so that the end of the line goes under the main line.
Thread the ends of the fishing line between two loops: upper and lower. - Thread the top loop through the bottom loop and pull on it while holding the end of the line.
- Moisten and tighten the loop.
- Remove the end of the line after the knot.
The name of this node is logically derived from the specifics of its application. The scaffold knot was specially designed and used on medieval gallows. Also, this node has a well-known name "Lynch node" Such a node was known to people since ancient times and quite often it can be seen in historical films. But, without looking at the gloomy nature of this site, it can be widely used in other areas or for other purposes.
How to tie a lynch knot?
Hanging knot, or lynch's loop, is a derivative of the usual noose. The only exception is the higher number of turns. Due to this, the vertebrae of the neck are fractured, leading to the rapid death of the hanged man. Due to this quality of the gallows rope, strangulation was considered more humane.
| The running end of the rope is laid in a zigzag, two loops should be obtained. |  |
| The undercarriage turns 5-7 times from bottom to top (the number of turns must be odd). |  |
| The remainder of the running tip is wound through the top loop. The knot is tightened by pulling up the main horses of the rope and the loop itself. |
The story of the gallows knot
The ability to tie knots has been known to man since ancient times. The most ancient types of such human activities were discovered by Finnish archaeologists during excavations on the territory of their country.
A new impetus to knotting technologies was given by the development of sailing shipbuilding. This was dictated by the need to have reliable, easy-to-use fastening equipment. Nodes appeared:
- Used to connect the individual parts of the cable to each other
- Special application
- For holding any objects at the end of the rope or fixing them together. It is to this group that the knots for the gallows belong.
From the middle of the seventeenth century, in Europe, for executions, the scaffold - a rope gallows - began to be used.
This type of execution owes its appearance to the famous executioner Jack Kech, who served the English crown. It was thanks to this man that the marine self-tightening knot got its name - Jack Kech's hanging stranglehold or scaffold knot.
The American Civil War gave rise to the so-called lynching. The slaves freed during this war took revenge on the former slave owners. For this, the culprit who raised his hand against the "white man" was doomed to a hasty execution by hanging. Such massacres, occurring without trial and investigation, were later called - lynching courts.
The doomed were hanged using the already popular nautical knot. Now it is called the Lynch Knot. The name is associated with the name of the American judge Charles Lynch, thanks to whom the practice of hanging was cultivated during the war of the states for its independence. However, there is another version. According to her, the palm belongs to captain William Lynch. This officer introduced a law that allowed extrajudicial corporal punishment ("lynch's law"). As a result, the same knot was used when hanging.
A large proportion of executions took place in the Southern States. After the abolition of lynching, ropes with such knots were used as intimidation. By hanging such "decorations", the Ku Klux Klan reminded of itself to the black population of America. Showing the loop in public means prizes for inciting racial hatred. Some US states penalize such demonstrations with hefty fines.
Where is the scaffold assembly used?
Previously, the scaffold was used for hanging executions, but now in civilized countries it is used for a different purpose. As a rule, it is used for temporary hanging of objects, nets, bags filled with something. It is actively used in everyday life, agriculture in the production of food.
Although the node has a rather gloomy name, it is a "hard worker", a great helper. It is widely used for its intended purpose in the maritime business. A cable with such a knot serves as a fastener for various floating objects, when the fastening is thrown over coastal objects.
Found application in fishermen. Used when casting loads, tying tackle, fishing line.
Having the inability of the running end of the rope to slip out of the loop (when loosening), it is considered a more reliable noose.
Hanging is called squeezing the neck with a noose tightened by the weight of your whole body or part of it.
The trauma tool is most often a typical loop. A loop is a ring with one fixed end. Along with this, in practical work, there are atypical loops, which are forks of trees, backs of chairs, etc., on which the neck presses with the weight of the entire body that has sunk or just a tilted head.
According to the material, the loops are divided into soft (towels, ties, scarves), rigid flexible (semi-rigid belts, ropes, cords, cables), rigid inflexible (rigid), atypical (forks of trees, edge of a board, forearm).
The loop consists of a knot, ring, lead and root ends. The root end is an end fixed to the object, not used when knitting a knot, located opposite the running end. The running end is a loose free end in the hands, which starts movement when knitting a knot and forms a knot. Knot - the place where the ends of the loop are tied, or the running end is tied to the branch of the root end, or the root end is tied to some object. Semi-knot - a single overlap of the running and root ends of the same rope, etc. or two ends of different ropes. A running branch departs from the node, passing into the root, threaded into a movable or fixed node. Forming a ring, the root branch ends with a free end, attached to a firmly fixed object (Fig. 267).
Depending on the design of the knot, the loop can be movable (sliding or noose) and fixed.
Many types of loops and knots are typical for certain professions and specialties (marine, rigging, fishing, weaving, firefighters, mountaineering, used by special services, etc.). According to the loops and knots, the forensic examination establishes the personality and professional skills of the person who tied them, identify the corpse of an unknown person, solve a crime. Loops (Scheme 29) and knots (Scheme 30) encountered in practice are classified according to various criteria.


The design features of the knot already at the scene of the incident make it possible to put forward a version of the profession of the person who tied it, to narrow the circle of suspects and reduce the time of their search.
The loop device affects the appearance and severity of certain signs. In practical work, hanging in sliding loops is most common.
A slip loop is a loop whose knot allows the movement of the loop branch and the change in the diameter of the ring around the neck. It is formed by threading the free end into the hole in the knot, buckle, twist and fixing it motionlessly. Pressing on the lower part of the loop causes the branches to move, change the diameter and tighten around the neck, accompanied by full coverage of the neck. The knot of such a loop can be located on various surfaces of the neck. In this regard, a distinction is made between the typical and atypical arrangement of the node.
Such localization of the loop is considered typical, when the front part of it presses on the neck above the thyroid cartilage, the lateral parts of the loop go around the corners lower jaw and the mastoid processes, rising to the external occipital protuberance at an angle, forming a tightening knot. The atypical loop knot is located on the front of the neck under the chin. NS. Bockarius (1915) and V.V. Tomilin (1978) refers to the atypical location of the node on the lateral surface of the neck, in the area of the ear, the angle of the lower jaw, the mastoid process, and N.V. Popov (1946) and A.A. Matyshev (1985) - its localization to the side (Fig. 268).
Loops are closed and open (fig. 269).
Closedloops contact with all surfaces of the neck (Fig. 270). They can be closed sliding and closed fixed. A closed fixed hinge is a hinge whose knot does not allow a change in the diameter of the ring. In these loops, the ring is tied with a fixed knot by the running and root ends.


The sliding loop and the closed fixed loop are quickly tightened by the weight of the body and do not slip, since the chin, the angles of the lower jaw, the mastoid processes, and the external occipital protuberance interfere with this.
Open loop- this is a loop that does not contact all adjacent surfaces of the neck Open loops are typical and atypical The first ones have all the components of the loop and are a ring with ends tied in one place and strengthened by putting it on a fixing object The head passes through the lower part of the ring Lower part of the open loops press the front of the neck (larynx and trachea), and the chin and the corners of the lower jaw prevent the head and neck from sliding out of the loop. The knot of such a loop is usually attached to an object.
Atypical loops have no main design features(rings, knots, ends). Hanging is carried out by pressing the front, side or front and side surfaces of the neck to the crossbar, the edge of the board, the crossbar between the legs (prong) of the chair, in the fork of the tree.
The hinge material, method and location of attachment are extremely diverse. They can be made from various materials and attach to any object that allows you to fix the free end of the loop. The density of the material and the design of the loop affect the relief of the groove (Fig. 271), and its flexibility contributes to a better coverage of the neck with the loop.
Loops made by tying different materials are rare. Such loops and knots allow one to judge the profession of a person, and the method of tying a knot about the mechanism of hanging.
To carry out the hanging, it is necessary to fix the root end of a typical loop motionlessly, make a ring, a knot, fix the running end and put the ring on the neck, change the position of the body or articulation and go down. Posture and articulation are determined by the height of the loop attachment, the absence or presence of a fulcrum, stretching the loop material, neck, and spine. In this regard, hanging can be complete, or free (when a person hangs without touching the fulcrum with his feet), and incomplete, or not free (individual parts of the body touch surrounding objects, and the legs are in contact with the fulcrum). The presence of one or another posture affects the rate of death, the severity of certain signs.
In practical work, incomplete hovering is most often observed, which causes a variety of postures: standing, sitting, kneeling, on the buttocks, lying, etc. (fig. 272).
Loop tension with full and partial hover is always directed upwards, so the loop is displaced to the top of the neck and is positioned in an oblique direction. In those who hanged themselves in the supine position, the loop is localized in the upper third of the neck and has an oblique ascending direction, in the middle third it is horizontal, in the lower third it is oblique, which allows differentiation of hanging with strangulation by the loop.


The sequence of the loop on the neck with a typical knot location . In the vertical position of the hanging and typical localization of the node, the loop, usually sliding up to the hyoid bone, squeezes the neck between the upper edge of the thyroid cartilage, the larynx and the hyoid bone. Its large horns are pressed against the spine, displacing the root of the tongue back and up, thereby pressing it against the back of the pharynx and the soft palate, almost completely closing the lumen of the airways, and makes it difficult or completely stops the access of air to the lungs from the nose or mouth (Fig. 273 ).
Compression of the lateral surfaces of the neck by the branches of the loop causes compression of the carotid arteries, which leads to acute oxygen starvation, and compression of the jugular veins disrupts or completely stops the outflow of blood from the cranial cavity and causes venous congestion. Intracranial pressure rises rapidly, especially sharply increasing when the carotid and vertebral arteries are not fully compressed, through which blood continues to flow into the brain, squeezing the cortex and vital centers of the brain. The medulla oblongata is stretched, the brain stem or branches of the vagus nerve are irritated. Loss of consciousness quickly sets in and typical asphyxia develops. Loop compression of the neck and stretching by the descending body of the vagus and sympathetic nerves, branches of the laryngeal nerve and sometimes the carotid sinus can cause temporary respiratory arrest and primary cardiac arrest or shock. In such cases, death may occur before the development of typical signs of asphyxia.
The sequence of the hinge in the lateral position knot. The loop, squeezing the neck, shifts the larynx towards the node, and the root of the tongue, pushing back and to the side, closes the entrance to the pharynx, in contrast to the displacement of the tongue in the typical location of the node.
Loop sequence for atypical (anterior) placement knot. The top of the loop tilts the head back, resulting in top part cervical the spine bulges forward, and the posterior wall of the pharynx approaches the root of the tongue, pushed back by the loop, and blocks the path of air, which can cause asphyxiation. In addition, other tissues and organs are compressed and stretched. Depending on the location of the loop, there may be no airway closure. In these cases, death is caused by compression of the neurovascular bundles of the neck (carotid arteries, jugular veins, vagus nerves).
The greatest pressure due to the peculiarities of the loop and the surface of its coverage, the neck experiences on the side opposite to the knot. The girdle position of the loop exerts almost the same pressure on the entire neck, which is observed in cases of hanging in a tightening double or triple loops.
From the action of the loop, a trace remains on the neck, called strangulation furrow(fig. 274). It arises from pressure, sliding friction and squeezing the neck with a noose, or just squeezing, being the main sign of hanging.


Mechanogenesis of the strangulation groove is determined by the loop device, its contact surface, the sequence of movement of the whole body in the loop or its parts.
Under the influence of the gravity of the body, typical sliding and motionless closed loops with full and incomplete hovering, tightening, squeeze the neck at the place of primary contact. Moving under the influence of the weight of the body, the loop settles the skin of the neck from the place of compression to the place of the final movement of the body, where it again squeezes the skin. Compression flattens the skin, and sliding friction peels it off, as a result of which the skin becomes thinner, loses moisture and dries up. Depending on the stiffness and width of the loop, more or less deep and wide, hard or soft furrows appear.
Under the influence of the gravity of the body, open loops, unlike sliding and motionless closed ones, only squeeze the neck, as a result of which the skin flattens, loses interstitial fluid and dries up.
The strangulation groove, representing an imprint of the contacting surface of the loop, conveys its features, allows one to judge the width, relief and material of the loop.
In the strangulation groove, a bottom, edges, an intermediate roller or rollers are distinguished. They can run either parallel to each other, or at an angle to the edges, or intersect each other.
Describing the strangulation groove, it is necessary to reflect its following properties.
Location - the surface of the neck, the level of the lowest and highest position of the groove, the location of branches from fixed landmarks on both sides (the corners of the lower jaw, the attachment points of the auricles, but not the lower edge of the earlobes, since the latter can be lengthened by wearing earrings).
For hanging, the localization of the groove in the upper third of the neck is typical. However, in patients with a pronounced thyroid cartilage ("Adam's apple"), protruding goiter or packets of enlarged glands when hanging in a horizontal or close position, in an atypical open loop, it can be located below the thyroid cartilage, which must be remembered when differentiating hanging with strangulation loop.
The direction of travel of the branches is along the surfaces of the neck from the lowest to the highest position.
The level of the groove on the neck and the direction of the course of its branches make it possible to judge the position of the body both with full and incomplete hovering.
The number of individual elements of the groove is determined by the number of loop revolutions and their relative position. The strangulation furrow can be single, double, triple, multi-turn, multiple, parallel or intersecting. Sometimes a low loop in the process of hanging, during convulsions, an unsuccessful attempt to hang, as well as when strangling with a loop followed by hanging a corpse, tightening, moves upward, forming two grooves between which there is an abrasion with displaced epidermis flaps Usually the upper groove formed by the last , it goes deeper. When the upper turn of the loop is applied to the lower one, and not to the skin, one depression can be obtained.
Depending on the design features of the hinge and the number of revolutions, intermediate rollers can occur, causing pinching of the skin corresponding to the width of the contacting part of the hinge.
The closure of the groove is due to the pressure of the loop along the entire circumference of the neck, the structure and its diameter, mobility, and the size of the node. In closed furrows, both branches converge in the region of the node; in open furrows, they do not close.
The width of the furrow depends on the width and thickness of the loop, uneven pressure on the neck, and the hanging mechanism. Different furrow widths give rise to suspicion of the use of multiple loops.
The depth of the groove is determined by the thickness of the loop, the force of gravity, the material of the loop, the position and posture of the victim, the presence of soft pads under the loop.
The severity of the groove is determined by the body weight, design, loop material, location of the knot on the neck, and the time the corpse stays in the loop. The groove is most pronounced on the surface of the neck, opposite to the direction of the loop tension.
The groove relief reflects the features of the loop, knot, loop thickening, twisting, loop material.
The density of the groove is determined by the material of the loop, its size, drying and evaporation of interstitial fluid from the surface of the compressed and displaced epidermis, the type of hanging.
Rigid and semi-rigid loops form deep dense grooves with clear edges and pronounced sedimentation, and soft loops - superficial pale soft grooves with indistinct boundaries.
Double, triple, multi-turn and multiple loops leave strangulation grooves separated by intermediate ridges.
The color of the groove is determined by the material and width of the loop, the depth of compression of the skin, translucency and the degree of development of the underlying tissues. From superficial compression, the furrow turns yellow due to transillumination subcutaneous fat especially if it is quite well developed; from deep - dark brown due to the transmission of muscles and blood in the vessels.
Details of the loop leave abrasions in the circumference, punctate hemorrhages along the edges of the strangulation groove and in the intermediate ridge, single or multiple breaks, vertical branches, etc.
On the strangulation groove, it is possible to establish specific, group, and sometimes individual signs of the loop.
The specific features of the loop (sliding, motionless, closed, open) are determined by the closed or unclosed strangulation groove and the location of its branches.
Group signs of a loop are established by the length, width or depth of the furrow, the shape and topography of the bottom, and the presence of intermediate ridges. They can be used to judge the length of the trail-forming part, the width, the shape of the section, and the density of the loop material.
A twisted rope leaves oblique-parallel banded grooves on the neck, separated by ridges, on the tops of which there are punctate hemorrhages.
The hip belt causes striped sagging alternating with patches of intact skin matching the belt buckles.
Twisted soft loops display intermittent narrow elongated strips of intradermal punctate hemorrhages directed longitudinally or obliquely to the longitudinal groove.
Individual signs of a loop are macroscopically established by the presence of sediment along the edges of the furrow. They rarely appear, but it is necessary to try to determine them, always using methods of additional research. Among them, an important place is occupied by the examination of overlays, which makes it possible to establish the identity of the fibers removed from the neck and hands with the fibers of the loop. Individual signs leave knots, buckles and other features of the loop in contact with the neck, displayed by corresponding additional limited sediments along the edges of the furrow.
Running simple knot(fig. 82). This is the simplest knot to form a tightening loop. When pulling on the root end, the loop is tightened, but it can be increased in size by pulling the running end away from the loop. You can tie a knot anywhere on the rope. It can be used to tighten a bag, tie a bale, attach a cable to something, anchor a boat behind a pile.
Rice. 82. Running simple knot
Sliding eight(fig. 83). Based on the principle of the figure of eight, this knot belongs to the category of reliable, highly tightening loops. It has the property of smoothly and evenly tightening when pulling at the root end.
Rice. 83. Sliding Eight
Sliding blind loop(fig. 84). This simple and durable knot can be used in Everyday life for tightening various bales and bundles when packing them. Tying the knot is extremely simple and does not require any comments.

Rice. 84. Sliding blind loop
Running bowline(fig. 85). The running bowline is the same bowline knot with a small loop through which the root end is passed. It is based on the lasso principle. The running bowline works flawlessly. In the maritime business, it is used to catch floating logs and snags, they look for and raise the Admiralty anchors left at the bottom.

Rice. 85. Running Bowline
Silkovyknot(fig. 86). This knot is borrowed from a simple birder technique. A snare made from horsehair or the thinnest nylon line with such a knot works flawlessly. The force knot is considered one of the smoothest and most easily tightened knots.

Rice. 86. Silovy knot
Scaffold node(fig. 87). The name of the node tells about its purpose. This is one of the ancient knots developed by the centuries-old practice of the death penalty by hanging. However, despite its gloomy purpose, it can be successfully used for many other purposes, for example, for temporary fastening of a cable to various objects.

Rice. 87. Scaffold node
Lingeringstranglehold(fig. 88). Like the previous one, this node is also called scaffold, or "Gallows" knot. But despite this, it finds other uses in the maritime business. It is used for temporary fastening of a cable for objects floating in the water or for throwing and fastening a cable for any object on the shore. This knot has an advantage even over such a good knot as the noose with half-bayonets (see Fig. 65), in that the running end of the cable cannot slip out of the loop, and therefore the tightening noose is considered more reliable.
On the sailboats, this knot was used to fasten the root ends of the mars-sheets and mars-git and other gear in those cases when it was necessary to have these ends ready for recoil.
To tie this knot, the cable is laid in the form of two loops of the same size. Both loops are surrounded several times with the running end of the cable, after which this end is passed into the loop facing the root of the cable, and, pulling out the extreme loop, is clamped in it. The tightening noose can always be easily untied by pulling on the root part of the cable.
This gloomy knot can be used well in nautical affairs in two ways. Firstly, according to the scheme of its binding, it is convenient to store the cable in the form of a compact coil. By making this knot without the loop at the running end of the throwing end, you get excellent lightness. If it does not seem heavy enough to you, soak it in water before use.

Rice. 88. Lingering stranglehold
Drunk Knot(fig. 89). In this section of knots, there are knots with two tightening loops. When the running and root ends are pulled at the same time, the loops are tightened. From time immemorial, this knot in Russia was called "drunk": apparently, it was used to pacify people who went too far, putting loops on the wrists behind their backs and tying the ends on the chest.

Rice. 89. The Drunk Node
Shackle knot(fig. 90). It is very similar to a "drunken" node. Its name on English language stands for “handcuffs”. A node can serve the same purpose. Despite the external similarity, these are two different nodes (see Fig. 90 and 89). In any case, without undoing them and without removing the ends from the central loop, it is impossible to turn one knot into another. Some sailors refer to this knot as a double topside knot because it is sometimes used similarly to a topside knot (see Figure 80).

Rice. 90. Shackle Knot
Every angler who wants to fish really big booty, should know how all the most used and effective fishing knots are tied, without which no fishing can do.
The most important advantage of a good knot for a loop is not only its simplicity in its implementation, but also reliability, since the strength of the entire tackle will depend on it, and how long it can work properly without causing unnecessary trouble to the fisherman.
Performing high-quality knots requires a lot of effort and practice, since this is a rather painstaking business. Experienced fishermen recommend that beginner anglers first practice well before knitting a real knot, which will be used in practice.
There is a list of certain tips that a fisherman may need when tying a noose:
- When tying a loop, you should not save or save fishing line, since in the end the knot may come out of poor quality.
- If the loop does not work, then there is no need to get upset and give up this business. Try again, because even a little thing like tying the right knot takes practice.
- You should not use only one type of knots and loops, as this or that knot may be urgently useful in the process of fishing.
- You need to understand in what circumstances it is better to use this or that type of knot, since when fishing in different areas, a wide variety of types of knots can be useful. In addition, this also applies to the type of fish that is being “hunted”.
How to tie a leash loop on a fishing line?
In order to properly tie a loop for a leash on a fishing line, you should adhere to the following sequence of actions:
- Make a loop on the main line and hold with your finger the place where the leash compartment will be made.
- Take the line by the other end of the loop and turn around the line. Such turns need to be done seven to nine times inside the loop. The end result should be a large enough loop.
- Fold this loop in half. On the side where there is a double line, you need to separate them so that they again become one at a time.
- In the middle of a single line, make a loop through which to thread a double line, grabbing the newly formed loop with the other hand.
- After that, moisten the line and tighten it slowly, pulling both sides alternately. Do not tighten the line too tightly so that the knot is slightly relaxed. Over time, in the process of application, it itself will tighten to a sufficient level.
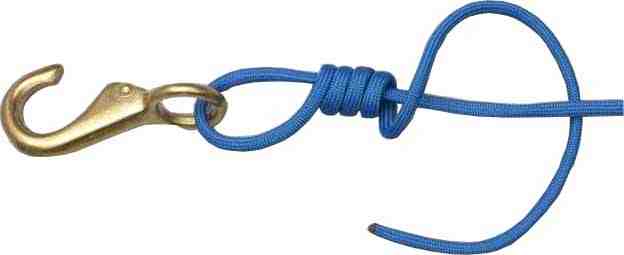
Perfect loop
 The perfect loop is one of the most well-known loops that is tied over the classic way knitting "loop to loop".
It is very convenient to tie such a knot on your hand:
- Hold the first loop with your thumb and forefinger. Around the index and thumb you need to make a turn, and then make the same turn through two loops.
- After that, you need to stretch the second loop through the first so that the loop crosses it and captures the tip of the line.
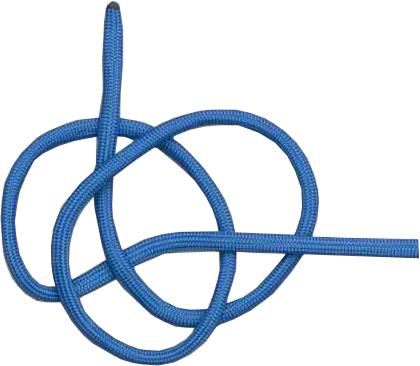
Tying the perfect loop
The perfect loop is knitted according to this principle:
- The first loop is made for fixing it to the lead line. There should be no problem with tying it.
- The second loop is tied from above along the first loop.
In order to properly tie loop number two, you need to follow these recommendations:
- Make a loop in the line and hold it in your hand, make another loop on the line itself and the place where the leash will be attached to the future.
- With the other hand, grab the loop from the back and make a small turn along the main line.
- Such turns need to be done from five to eight in order for the overall loop to be stronger. You need to wrap the fishing line inside the loop.
- After the end of all turns, a large loop should be obtained. It should be folded in half so that another loop comes out. On the side, you will get a connector for a side leash.
- If everything worked out, then the turn came to tightening the loops. In order for the knot to hold tight and not to fray over time, it must be moistened with water and only then firmly tighten both loops.
Advantages
The perfect hinge has the following advantages:
- it is more functional than conventional hinges as it can be used in different areas:
- it is one of the most reliable and durable, since it knits on the same plane with the root end;
- a perfect loop is very reliable, as the fishermen have repeatedly verified by their own experience.
How to catch more fish?
I have been active fishing for quite some time now and have found many ways to improve my bite. And here are the most effective ones:
- ... Attracts fish in cold and warm water with the help of pheromones and stimulates their appetite. It is a pity that Rosprirodnadzor wants to ban its sale.
- More sensitive gear. You can find reviews and instructions for other types of gear on the pages of my website.
- Pheromone baits.
Application
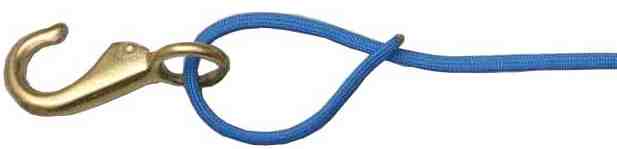
The perfect loop is used by anglers to secure hooks to the line, and to secure rubber ropes. Under a large load, such a loop tightens very tightly, and it is difficult to untie it.
Alternatives to use
The perfect knot can also be tied with a fly or spoon. To do this, the unused end of the line must be threaded into the inside of the loop. Such alternative way application is no less reliable than the classic one.
Now only me bite!
 I caught this pike with a bite activator. No more fishing without a catch and looking for excuses for your bad luck! It's time to change everything !!! The best bite activator of 2018! Made in Italy...
How to tie a loop at the end of the line?
In order to quickly make a strong loop at the end of the line, it is recommended to use a special surgical loop, which has proven to be very reliable when used in a fishing environment.
This loop is a paired "running" knot, so tying it will not be a very difficult task, but still a little training for beginners will not be superfluous.
In order to tie a surgical loop, you must:
- Form an open loop at the very tip of the line. For such a loop, you first need to tie a regular knot, then stretch the loop one more time along the same trajectory to make it stronger.
- Then tighten the loop to required size after wetting it with water.
- Trim off excess line ends.
How to tie a loop on your main line?
 A loop on the main line is needed so that later you can attach a leash to it.
You need to tie a loop on the main line in this way:
- The required length must be marked using a triple knot for this, which will act as a kind of limiter. Then the leashes should be adjusted to the line.
- In the area of the knot, which is the limiter, you need to tie another additional double knot, which is not fully tightened, to form a kind of eight.
- In this "eight" thread the end of the leash from one ring to another, then tighten everything.
How to tie a loop on a fluorocarbon line?
To properly tie a knot on a fluorocarbon line, it is best to use special type nodes, making the following scheme of execution:
- Fold the end of the line in half. Its length should be about ten cm.
- Pull this end of the line into the eye of the swivel.
- Fold the extended end of the line to the main line. All together should be no more than five cm.
- Moisten assembly with water and tighten.
How to tie a loop on a fishing line with a figure eight?
Figure 8 is one of the most commonly used types of knots used in the fishing area as it is very easy to perform and can tie the line firmly into a knot.
To tie a figure eight loop, you need to follow these instructions:
- Make a medium working loop on the double line.
- Pass a crochet hook through this loop from below and hook on a small loop.
- Pass the small loop through the large loop, then remove the hook.
- Re-do the second and third points.
- Moisten the line and then tighten firmly. After that, the G8 is ready.
How to tie a slip loop on a fishing line?
The slip loop is simply an indispensable item for problem-free ring adjustment.
A sliding loop is made according to the following principle:
- Throw the line over your index finger.
- Use your crochet hook to take the line from right to left and twist it. Then pull the loop with a hook.
Today there are a large number of types of loops and knots that can greatly help the fisherman. The latter should know well, at least the main ones, in order to apply the most suitable options on occasion.
Inexperienced fishermen, who want to catch real trophies on the go, understand at the very first fishing that without the skills of knitting the loops, the process itself will be much more difficult. To avoid such a problem, you just need to gain experience, and after that everything will go easier.
In addition, you can always ask more experienced fishermen to tie the noose, who will always be able to help.
How long have you had a really BIG CAPTURE?
When last time caught dozens of HEALTHY pike / carp / bream?

We always want to get the result from fishing - to catch not three perches, but a dozen kilogram pikes - this will be the catch! Each of us dreams of this, but not everyone knows how.
A good catch can be achieved (and we both know this) thanks to good bait.
It can be made at home or bought at fishermen's shops. But in stores it is expensive, and to prepare groundbait at home, you need to spend a lot of time, and, frankly, homemade bait does not always work well.
Do you know that disappointment when you bought groundbait or cooked it at home, and caught three or four perches?
So maybe it's time to use a really working product, the effectiveness of which has been proven both scientifically and practice on the rivers and ponds of Russia?
It gives the very result that we cannot achieve ourselves, especially since it is cheap, which distinguishes it from other means and you do not need to spend time on manufacturing - you ordered it, brought it and go!

Of course, it's better to try once than hear a thousand times. Moreover, now is the season! when ordering this is a great bonus!
Find out more about the bait!