Often, skis are sold with already installed mounts... But more often the mounts have to be bought separately and then installed. In this case, inexperienced skiers are often advised to contact a workshop or pay for the installation of a mount in a store. But their grandfathers perfectly coped with this task at home, and although the design of the mounts has changed somewhat since that time, the principle of their installation has remained the same.
Almost everything you need for installation comes with a mount. In a home workshop, you may need to find a drill and screwdriver. Sometimes it is recommended to use a screwdriver, but it can "overdo it" and ruin the ski. If the skis are wooden, you will need more glue (such as epoxy resin); for plastic skis, glue should only be used if it is included in the kit with bindings and the instruction recommends its use.

Preliminary actions
In order to properly attach the bindings to the skis, first of all, it is necessary to determine their center of gravity. The ski can be balanced according to the principle of weights on any object (the back of a chair, laid on the floor with a ruler and even on a second ski placed on the edge). You can do this even on your hands, gradually moving them. The found center of gravity must be marked with a transverse line using a pencil or marker.
Then, the clamping bracket should be removed from the mount, since it will interfere with its screwing. You will have to reinstall the bracket in place after the front of the mount is securely fixed to the ski.
Correct installation
 Usually shops offer instructions on how to attach ski bindings. If not, you should use the general rules. Many modern fasteners come with a special template plate, which marks the location of the center of gravity and screwing in the screws. Otherwise, you can determine the location approximately. On cross-country skiing, the toe of the boot should protrude slightly forward beyond the center of gravity, and on mountain skiing, it should fall exactly on it.
Next, you need to attach a fastener and mark the places where the screws are screwed. You can drill holes for them with a drill with a thin drill, but if the screws in the mounting kit are self-tapping screws, you can only mark the holes with an awl. The heel of the mount is usually offered to be fastened with a special stud, but many skiers recommend that it be put on a screw. The location of the heel is determined by applying the boot to the binding.
After installing the mounting plate, the clamping bracket is put in place. You can check the correct installation by holding the boot in the boot and lifting the ski for it. It should be slightly outweighed forward.
Some Precautions - Instructions
In order to properly install the ski bindings on your own, it is important to remember some mistakes that inexperienced skiers often make. The main one is that the ski, preparing the holes for the fastening screws, is drilled through. To avoid this, it is important to measure the required hole depth and use a stop drill. If this is not the case, you can make a temporary stop by winding several turns of electrical tape around the drill. It is even easier not to drill holes at all - self-tapping screws can be screwed in and so, and the fasteners are completed with products of a suitable length.
The second mistake is the widespread use of glue. It is poured into the holes intended for the screws. This should be done if the skis are classic, wooden. But today, plastic skis are more common. The glue may not work well on them. Therefore, in this case, it is better not to glue the fasteners or use only special glue, if it is included in the kit or recommended by the manufacturer's instructions.
The simplest ski binding is the toe strap. But such a fastening is very unreliable - after all, it is no coincidence that boys always attach elastic bands to a strap or simply tie it up with a string.
The strap attachment, equipped with a heel strap, has the advantage that it allows you to use any footwear for skiing, especially felt boots.
A tourist mount with side metal braces and an adjustable heel strap is considered more advanced. It can be used on walking skiing and does not require special ski boots.
Rigid welt fastening is much more convenient. Special ski boot put on the spikes and pressed on the welt with a bow. Such bindings quickly and reliably connect the boot to the ski, do not constrain the heel, while ensuring good ski control. They are used for cross-country and recreational skis.
For downhill skiing, you need bindings that tightly attach the boot to the ski. Athletes-skiers usually tie their boots tightly with straps. A beginner skier should not do this.
Ski bindings consist, as a rule, of metal brackets adjustable in width, equipped with welt holders. V recent times instead of fixed braces, movable toe welt holders are used, which automatically release the leg when falling.

Rice. 5. Ski bindings (top to bottom) tourist, welted, ski bindings on springs and on belts
The boot, fastened in the toe with a welt holder, is tightly fastened to the ski with a cable pulled with a toe-lock - "frog". The required tension is created by a spring located in the toe part of the cable or on the "frog" itself. It is not recommended to use a cable with a heel spring - it does not hold the leg well and spoils the boots. In order for the cable to better press the boot to the load area, it is passed through the hooks installed on the side surfaces of the ski. A pair of hooks near the front of the heel allows for a tight fit of the boot for turning. A pair of hooks at the base thumb legs, provides heel lift, which is important for a long transition on downhill skiing on level ground. If necessary, the cable is passed through the front or rear hooks.
Recently, ski bindings have become widespread, having only a toe welt holder and a heel latch. When dropped, they automatically unfold.
For young children, bindings with metal braces on the soles of old sandals are best. The entire front of the sandals is cut off and only the sole and the heel with straps are left. Any children's shoes are included in such mounts. The toe-strap brackets and the sandal-back strap hold the foot securely and reliably and allow good ski control.

Rice. 6. Children's ski bindings
Instead of sandals, you can use a material such as linoleum, cutting off a strip equal to the width of the ski and the length of children's shoes (with a margin), and sewing on the back and strap. The boot with the attachment is put on the ski. Brackets are installed between the boot and the linoleum strip, the holes for the screws are marked, then, after removing the boot, the brackets are reinforced with screws.
For older children, you can use school bindings that are sold in stores. If the child wears shoes of size 33 and above, then the bindings for adults are already suitable for him.
Now you have to decide complex issue: where to put the mounts?
First of all, you need to find the center of gravity of the ski. For this ski sliding surface put on the edge of a ruler or pencil. The place in which she will take a position of balance will be her center of gravity. It is marked with a cross line.
The mount should be installed so that the ends of the toes are shifted from the center of gravity to the heel of the skis at a distance of 1-1.5 cm.
The simplest rule, applicable to almost all skis, is that the toe of the boot should be on the line of the center of gravity. Offset is allowed only to the back of the ski. This makes it easier to insert the ski into a turn. But you should not get carried away with this, otherwise the socks of the skis will greatly delay the foot and tire the legs.

Rice. 7. Determination of the center of gravity of the ski 
Rice. 8. Marking of the sole of the boot for welded fastening
Before installing the welt fastening along the load area of the ski, you must draw a center line. The same line is drawn on the boot. It will pass between the first two toes to the middle of the heel, where, just like on the toe, light notes are made. Then the staples are put on the boot, from which the bow has been previously removed, so that the front welt coincides with the edge of the staple. If the staples are one-piece, they are pressed against the boot. A boot with braces is placed on the ski. Having aligned their midlines and accurately marking the position of the braces on the ski, the boot is removed, and the braces are placed according to the marks just received. Through the holes in the brackets on the ski, the holes for the screws are marked. Then make a hole for the screw with a drill. In order not to drill through the ski, the estimated hole depth is marked on the drill with electrical tape. The hole diameter should be about a millimeter less than the screw diameter. Then the screws are lubricated ski wax and at first carefully, and then fully wrapped up to failure. Pull the bow on the staples; insert the boot. Having moved forward from the failure, it is centered, making sure that the side welt evenly touches the walls of the staples. Closing the bow so that it completely touches the welt, press on it with force.
After performing this operation several times, the boot is removed. On the outsole, there are dents from the spikes. On these dents, holes are made in the sole with a drill or hot nail, which strictly correspond to the diameter of the spikes and in no case go right through. Putting the boot on the spikes and closing the bow, put on a comb at the end of it with a middle division and mark the holes for the screws on the ski, with which it is fixed on the ski. After attaching the comb, the boot is snapped in and an elastic band is nailed under its heel. The elastic should be the same size as the heel. It is recommended to nail it along the entire perimeter so that it bubbles slightly - then snow will not be packed under the heel.
The second ski is marked on the first. The rest of the operations are exactly the same.
If you have to install the mount for the first time, then you first need to practice on a board similar in size to the ski load area. It is necessary to do everything that was described earlier, do not just drill holes in the boot.
When installing bindings on alpine skis, the central plate of the bracket is placed so that its front edge coincides with the center of gravity line or is displaced 1-2 cm back. Holes are marked on the ski and, putting the side cheeks with a welt holder, they are fixed on the plate, adjusting the position on the boot. The boot is placed on the ski so that its toe and heel are located exactly along the axis. Having strengthened the cheeks, insert the boot into the bracket and put the cable on its heel. The cable should be fixed at the middle divisions of the front latch, called the "frog", and the "frog" itself in the half-open position is installed on the ski, in front of the boot. Having chosen the slack of the cable, they mark the place of installation of the "frog" at first only on one or two screws. Having secured the "frog" with these screws, they close it. Hook spots are marked on the side surfaces of the skis. They should be deployed in the direction of the cable. Putting the hooks and nailing or gluing an elastic band under the heel of the boot, the "frog" is snapped into place. If the cable running through the rear hooks holds the boot tightly and makes it easy to close the frog, the installation of the bindings can be considered complete. It is only necessary to strengthen the “frog” with additional screws. possible options the tension is exhausted, the "frog" is moved to a new place.
The ski mount with a front automatic welt holder is placed on the skis so that the place of the boot rest is on the center of gravity of the ski or is displaced 1-2 cm back. Otherwise, the procedure for installing the mount remains the same.
For an amateur skier, the best mount is a spring mount with an automatic head. This type of mount allows you to quickly take off and put on skis and provides safety, especially if the "frog" has a device that opens the mount when falling forward.
Many hobbyists also use belt bindings with a rotating heel and an automatic head. This attachment is safe and holds the ankle well. However, if necessary, it is inconvenient to often take off and put on skis, since it takes a lot of time to tighten the belts.
When installing on skis bindings with a rotating heel, make sure that when fastening with a heel spring of the "frog", the boot is firmly pressed against the head. Otherwise, it will jump out of the mount all the time. When winding, the belt is led through the heel to the ring opposite to the place where the belt is fastened. From there, they send it back, screw it around the Achilles tendon and wrap it around the ankle, and then again lead back through the Achilles tendon to the ring and the place where the belt is attached. From here, through the rise, the strap is directed to the buckle, after which the heel spring is closed.
When rearranging the bindings, the old holes in the ski should be sealed with wooden plugs.
When installing the mount on metal or plastic skis special screws with self-tapping threads are used. If there are no such screws, a thread is cut in the ski holes with a tap and ordinary metal screws are used.
Ski poles are chosen quite simply - their length should reach the armpits. This rule applies to all types of skis. It is recommended to use light reed sticks for walking. For skiers, duralumin or steel poles of a conical or spindle-shaped profile are better suited. They must have securely reinforced rings and comfortable leather hand loops. The pins of the sticks should be sharp enough.

Rice. 9. Ski poles
The most popular winter sport is cross-country skiing. But in order for outdoor activities to bring only positive emotions, you need to take care of sports equipment... This article will focus on ski bindings. NNN and SNS are the most modern systems fasteners, and the debate about which one is better has been going on among professional and amateur athletes for a long time.
NNN
The Norwegian company Rottofella has developed a special system for attaching boots to skis - NNN. The originality consists in the presence of two rubber flexors connecting the boot with the mount, and two longitudinal guides that do not allow the boots to move to the sides. The toe of the boot rests against these springy cuffs, and after a push, they return the leg to a horizontal position.
The NIS design used in the NNN bindings allows the mount to be installed on the platform built into the skis. This is very convenient since the ski mount does not need to be screwed into the ski, and it can be shifted to adjust the position of the boot in relation to the center of gravity. Many skiers use this opportunity to customize their skis for different snow conditions. This system also allows the athlete to supply their own harness.
SNS
The French company Salomon presented its SNS fastening system. The difference between this design lies in the presence of a central rubber flexor with one against which the boot rests. The special sole of the shoe allows the athlete to control the ski and ride in any style.

The installation of the fastener does not provide for a special platform for skiing, as with the NNN mount, but original boots are required, suitable only for the SNS construction. The usual SNS fastener has only one clip in front of the sole of the boot, but there is also a modification of the SNS Pilot, which uses two metal axles that are fastened in two different grooves, spaced 2.5 cm from each other. This allows you to limit the rise of the foot into the air and thereby increase control over the skis.
System differences
In general, the differences between NNN and SNS mounts are minor and will not be noticeable to the average hobbyist, but there are nuances that a professional will pay attention to. For example, SNS Pilot bindings are praised by many for the double engagement of the boots to the skis, this improves maneuverability, but at the same time, in not very cold weather, the snow is packed under the second bracket and compressed into an ice lump, which prevents the boot from being put on the bindings normally. It also happens that the second shackle comes off when pushed. But in cold weather, these mounts work great.
Many professionals value the NNN bindings because the ski platform and the NIS under the bindings raise the boot and make the leg seem longer. This increases the pushing force by lengthening the lever. At the same time, this effect reduces the skier's stability, which is excluded in SNS bindings. What to choose: an NNN or SNS mount, it is up to the skier in which boots and on which mounts it is more convenient for him to ride. This is an individual approach, and there is no definite answer.

Installing Mounts
After choosing and purchasing a mount, you need to install it on the skis. This must be done in the following order:
- The center of gravity of the skis is determined. This is done like this: the ski is placed flat on the edge of the ruler and shifted until it is balanced, like weights (parallel to the floor). If the mount is heavy, then you need to find the center of gravity by attaching the mount to the skis, and move until the balance line coincides with the fixing groove of the boot.
- The places where the holes are drilled are marked. For this purpose, there are paper templates included with the mount. If the template is not at hand, you can apply the markings with an awl, attaching the mounts to the skis, according to the center of gravity.
- Holes are drilled to a depth of 10 mm. The drill is pre-selected: for NNN - diameter 3.4 mm; for SNS - 3.6 mm. Drilling is done carefully, pressing lightly on the drill so as not to go right through the ski. It is advisable to put a stop on the drill. Then the sawdust is blown out, and the holes are filled with glue for a more secure fixation.
- The construction is being assembled. For this, the fasteners are applied according to the holes and screwed in with screws. After that, it is required to dry the skis for 10 hours before use.
Everything is ready, now you can go for a drive. Apparently, there is nothing difficult in choosing and installing mounts.
Cross-country skiing- a favorite type of winter recreation. Even an inveterate lover of hot summer will not refuse to breathe fresh air in a snowy forest. What can we say about those who cannot imagine their life without skis!
It should be noted that currently skiing in our country actively developing, and the stores offer the widest range of equipment for its different types. Someone prefers ski race, and some, on the contrary, like leisurely walks. There are those who find the flat relief boring and they ride from the mountains. It is worth mentioning tourists who make winter skiing trips.
For all these pursuits need different types ski, and the higher the level of the athlete, the more stringent his requirements for equipment. The smallest nuances are taken into account, which beginners and amateurs may not even suspect.
In the available variety of skis and related sports, everyone can choose the most suitable one for themselves, and for sure, ordinary cross-country skiing will win the palm.
Still, fans of alpine skiing should look for places where they can ski, and amateur ski tourism is a pleasure for an amateur. But running can be used in the nearest park or forest, and do it every weekend. Especially gamblers can even take part in some local competitions!
So, to diversify your winter leisure, it is enough to buy the necessary clothes and equipment: skis, poles and bindings. It is worth dwelling on them in more detail.
Ski bindings and their types
Mountings- this is very important element ski construction. They transfer forces from the foot to the ski, set the direction of sliding. The older generation probably remembers the models of the grandfather's model: a belt clamp was attached to the ski, which fixed the leg with an elastic band at the back. The only plus of such “inventions” is that they could be worn on any footwear, even on felt boots. And if we compare the described samples with modern ones, then the importance of the role of fasteners will be quite obvious: they provide convenience and stability at any move.
There are three main types of cross-country ski bindings:
Nordic Norm 75mm, or the so-called welted... This is an outdated model that is gradually becoming obsolete. The connoisseurs of such antiques and the extremely low price prevent it from finally saying goodbye to it.
NNN system from the Roteffella company appeared later and has two longitudinal guides that stabilize the boot. In terms of functionality, it is in no way inferior to the previous version.
 SNS system from Salomon, with one longitudinal guide. This is the modern standard for fastening very high level... The soles of the boots for such fastenings allow the foot control the ski at any move.
The last two systems are now the most in demand, but there are no obvious advantages or disadvantages compared to each other, so you can choose any. For the price, they will cost more than the NN75, but they are much more convenient and practical, and you can save on installation these mounts. Usually in the instructions it is recommended to seek help from specialists, but it is quite possible to perform such an operation on your own. You just need a little confidence and the necessary tool:
- Skis and bindings;
- Template for markup;
- Blunt cross-head screwdriver and drills;
- Ruler;
- Marker;
- PVA glue.
- Awl;
The order of installation of fasteners
 For all types of bindings, you first need to find the center of gravity of the skis. On some models, the manufacturer has already marked this place, but it is usually advised not to trust the factory brand markings. Such balancing is necessary for normal comfortable riding, when the ski does not "outweigh" in any direction. Finding the center of gravity is very simple. It is necessary to set the ski on the edge, for example, a ruler, and move it along it until the "scales" are frozen parallel to the floor. The ruler in this case will indicate the center of gravity, which will need to be marked with a marker.
So, the desired point has been found. On modern models, the center of gravity line coincides with the axis of the boot shackle attachment, so you need to attach the front part of the attachment to the ski and mark it with a marker correct position ... If it is necessary to install Nordic Norm 75, then on the marked line there should be two screws of the fastening bracket. In other words, you need to position the device so that the edge of the big toe is on the balance line.
An important step is marking holes... For him, the ideal option would be to use a special jig, which allows you to accurately find the position of the fasteners. If there is no such conductor, then a paper template is also suitable, with which mounts are usually completed. In the case when it will not be there, you will have to mark the ski with an awl through the holes in the mount attached to it. By the way, since the mount consists of elements moving relative to each other, you should use it assembled for marking, so that later there is no mismatch in size.

Self-test check... The drilled ski cannot be restored back, so an extra check will not hurt. Having measured the distance between the holes on the mount, you need to compare them with similar parameters on the finished marking.
Drilling holes according to the marks made... Usually, the instructions indicate to what depth the screws need to be drilled, and how long and diameter the drill should be. If there is no suitable length, you can take any and wrap it with electrical tape on top, leaving only the necessary millimeters. Using a drill at low speeds, drill holes in the marked places.
Filling with glue... Blow the finished holes to remove dust and fill with glue. Sometimes it can come complete with mounts, but if it is not there, then a simple PVA will do. This will help fill the cracks formed during drilling, waterproof and provides a more secure fit... Sometimes it is advised to use epoxy for this purpose, but it is better not to do this, since the solvents in the resin can damage the ski. There is, by the way, an alternative opinion, stating that glue is not needed, but everyone will decide for himself. In any case, this is not difficult to do, and the glue will not interfere.
Assembling the structure... The mount must be reattached to the ski and begin to tighten the screws, at first not completely to make sure that the installation is even, and only then finally, so that there is no backlash. For NN 75, you will first have to insert the boot and check its centering on the ski. Wait for the glue to dry. After the fasteners are installed, you need to wait another 10-12 hours for the glue to finally dry.
This video details how to install SNS mounts.
Installing ski bindings with your own hands is doable. The main thing is to have self-confidence and the right tools.
Installing ski bindings becomes easier as technology advances. Fischer, Rossignol, Madshus, Peltonen have long switched to screwless bindings, while Salomon and Atomic have already drilled holes. However, the skis that need to be drilled are still on sale. Regardless of the system, it is important to know how to properly install the bindings and how to combine bindings and skis of different systems - this will be discussed in our article.
The key to installing bindings is aligning the longitudinal axis of the ski with the transverse balance line. On skis without a platform, you can find it by placing the ski on a ruler. On the NIS and IFP platforms, the balance position is indicated by the number 0, and the numbers -1, +1, -2, etc. indicates the displacement of the mount by 0.5 cm forward and backward from the balance point. Moving the bindings forward gives more stability in the skating course and improves the hold in the classic course. Backward Bias - Improves glide, but impairs grip and stability when rolling. This is the advantage of skis with a platform - the ability to move the bindings and find the optimal position for yourself.
How to install NIS mounts
Video instruction from Madshus.
How to install Turnamic mounts on the ifp platform
How to install SNS, NNN and Prolink bindings on cross-country skis
The instruction is suitable for all screw mountings.
To install the mounts you will need:
- Screwdriver
- Drill 3.6 mm or special drill for mounting fixtures with depth gauge
- Ruler and pencil
- Joiner's glue (PVA)
- PH3 or PZ3 screwdriver
- A jig or a template for installing the mounts is not necessary, but it is more convenient with it. There are different conductors for SNS and Prolink (Salomon, Atomic) and NNN (Rottefella)!
Installation instructions for mounts:
- Find the ski balance line. To do this, you can put the ski on a ruler. Salomon recommends moving the balance line 1 cm back to install the bindings, so draw the line as recommended. Often on skis from one pair, the balance line diverges by 3-5 mm, so you need to find an average balance. To do this, lay the skis side by side parallel to each other and draw a general balance line in the middle position between the ski balances.
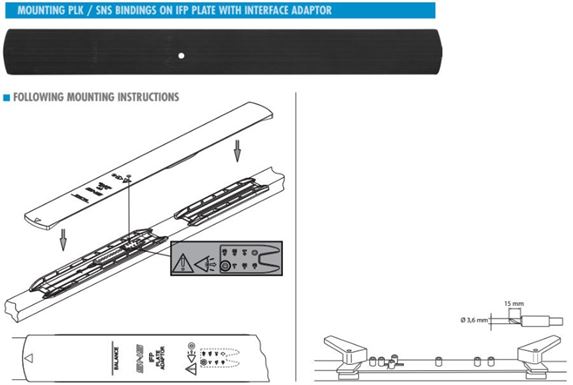
- If there is a special jig for installing bindings, then install it on the skis so that the balance lines coincide and drill the necessary holes. If there is no conductor, attach collected and closed ski mount, mark the drilling points. The line on the skis should coincide with the boot axle attachment point. Attention! The holes are drilled to a depth of 15 mm, in children's skis - 9 mm. On a drill without a stop, place a mark so that you do not drill through the ski.
- After drilling, clean the holes from dust, drip a drop of wood glue (PVA) into each and screw on the fasteners. Joiner's glue will fill in microcracks from screwing in and prevent moisture from getting inside the ski. Tighten the screws at a low speed of the screwdriver and reach with your hand so as not to twist the screws in the ski.
SNS Pilot Mount Installation Video
How to install fasteners with screws on NIS and IFP platforms
For screw mounting on NIS and IFP platforms, there are special platform leveling plates.
The adapter for the NIS platform is installed after marking and drilling. Holes fit SNS mounts.
The IFP adapter is installed before drilling the ski.
Diagrams of instructions for installing Salomon and Atomic bindings
Installing SNS Pilot Equipe Mounts
The first step of breaking off the extra length of the heel is only needed for a small foot. We recommend leaving the heel on the skis, it may come in handy in the future.

Installing SNS Pilot Sport and Combi Mounts

Installing SNS Propulse and Prolink
The installation of the Propulse and Prolink mounts is the same.

Installing SNS Propulse and Prolink
Video of replacing Propulse mounts with Prolink
Installing SNS Profil Equipe and Profil Auto Mounts


How to install the NIS platform with screws
The principle of installing the platform on screws is similar to the installation of fasteners - marking, drilling, wood glue, installation. The video shows how to change the SNS mounts to the old-style NIS platform with sealing the excess holes.
Now, for the convenience of switching from SNS to NIS, there is a special platform, for which you do not need to re-drill holes. We recommend the same platform for installation on new skis, if necessary. It has more positions for the bindings to move and requires fewer ski holes. It looks like this old platform sample for 8 screws, and so - new design platform.
