If you have a modern style mount such as NNN or SNS from Salomon, then you are terribly lucky. So, as they themselves can determine the center of gravity of the ski. It is enough to take the ski, find the thinnest part of it (like a ruler) and put it on the edge with an edge on the floor, then we take the second ski and put it across, it is very desirable to put it at a right angle. Then we observe the process of how the scales work (the front and rear ends of the ski should hang in the air at the same height). But if you purchased a mount that is heavy enough, then you should measure your center of gravity a little differently. With the first ski, everything is so accurate, but the second must be put through the boot fixing groove.
After the skis are in the desired position, you will need to mark a perpendicular line on the upper side of the ski and always above the mount itself. Repeat this procedure with the second ski. We read on and give an answer to the question of how to properly install ski mounts?
So, now we need to determine the center of gravity of the boot. It is important to understand whether it is old or modern. The first ones should be fastened at the very edge of the boot, while the second ones have the center of gravity set along the edge of the boot. But we are guided by the SNS standard mounts, do not be alarmed, there is absolutely no difference for others. Besides, it doesn't matter what style you use when running. Find a rod on the boot that will fit into a special groove in the mount, it is this groove that should be where we have the center of gravity of the ski.
By the way, under this groove, in the center, there is another groove in which the middle part of the mount is attached. Then we take the mount, apply it to our markings and in the places where the screws should be, we make small holes with an awl. Once marked, you can remove the mount and check if the center mark is aligned with the center and the back marks are equally distant from the edges. We repeat the operation with the second, so that you can install the mounts on the skis.
We take, vein and measure how deep the screw will go into the ski - this is done so that later the ski does not drill through. When measured, we take a drill with a diameter of 6-4 mm, it is possible less and drill. Important: after measuring the depth, mark it with electrical tape, or it is generally fine if there is a ruler on the drill.
Now that we have 3 holes ready in each ski, we can remove the plastic clip that releases the ski. Then we fix the mount in it with a screwdriver. You do not need to tighten it completely, about half. By the way, don't use glue. Previously, skis were wooden, but glue has a detrimental effect on modern skis.
We put in place the removed bracket. We assemble the mount and install it "end-to-end" while closing the previous screws, all the way. Do not forget to mark the holes on both skis, and then tighten the bolts (you definitely won't need glue here). After all this, we close the "heels" with plugs. That's all, I hope you did it.
How to put the mounts on cross-country skiing, as well as the quality of their performance depends on the performance of skis. The skis presented in modern stores have a special platform that ensures secure fixation. sports shoes... Even if you are perfect, improper installation can damage the structure of the skis, shortening the lifespan and durability.
What tools are needed to install the mounts?
Everyone can handle the installation of a cross-country ski mount with their own hands. To do this, you need the following set of tools:
- template for perfectly accurate drilling of holes;
- a ruler or corner to determine the center of the ski;
- drill with drills 3.4-3.5 mm;
- marker or pencil;
- special glue or simple PVA;
- screwdriver or screwdriver.
How to place the mount correctly?
For cross-country skiing today, there are several of the most popular systems for attaching boots to cross-country skis:
- SNS - produced by Salomon;
- NNN - manufactured by Rottefella;
- NIS - Produced by Madshus and others.
The methods of installing different mounting systems on skis may be different, but there are certain requirements that are always the same:
- ski boots must be securely attached to the skis;
- the system must provide high maneuverability and ease of control when driving;
- the mount should increase the strength of the ski in the place of its installation.
With a ruler, you need to measure the center of the ski and mark it with a pencil. Use a template or a special jig to mark the holes for screwing in the fastening bolts - this is very convenient and quick. Install a jig suitable for the type of attachment you have chosen - SNS or NNN. The carefully measured and marked center of gravity must match the special mark on the jig.
If there is no conductor, make a template from cardboard or thick paper (sometimes fasteners are sold with already ready-made template). If not, attach the ski mount so that the center of gravity mark on the ski aligns with the mark on the template. The same applies to the axis of attachment of the boot shackle. The holes present on the template must be marked with a pencil or pressed through with an awl. This markup option is not the most accurate, so it's best not to use it.
Modern mounts can have shifting elements, therefore, mark the holes for the screws on which the platform is held, should be when the mount is assembled and closed. Otherwise, the holes will move about a centimeter.
After the holes for ski bindings marked, we proceed to drilling them. You can make holes with a drill with speed control and special drills of a suitable diameter and with a depth gauge. The special drill has an extension that centers it in the hole of the jig and stops it when it reaches a certain depth.
The holes should be drilled at low speeds with a slight pressure. A 3.4mm hole is required for the NNN mount and 3.6mm for the SNS. In both cases, the hole depth is exactly one centimeter.
The procedure for installing mounts on cross-country skis
If you are wondering how to fit your cross-country ski bindings, remember the following information. Before installation, you need to fill the holes made with glue, which fills all the cracks, providing strength and protecting the internal structure of the skis from water. Without proper protection of the holes, moisture will seep into them and be sucked into the ski cavity, causing rotting from the inside. This usually happens with products that have a honeycomb structure or are made from natural materials.

You can buy a special branded glue, but regular PVA will work as well. Do not use epoxy resins, as the solvent can damage the structure of the ski. The mount is screwed to the ski as efficiently as possible so that there is not the slightest backlash. After that, the glue should dry within 24 hours.
NIS brand ski bindings
Every skier should know how to mount cross-country ski bindings. The use of NIS bindings greatly simplifies the work process and allows you to adjust the position of the platform for ski boots.
NIS mounts can only be installed on special skis that have a special platform. Similar models are produced by Madshus and some others. During installation, the ski carrier should be wound along the rails until a characteristic click occurs. A thrust bearing is also installed along the guides, which is fixed in a suitable position with a special key from the kit.
Mounting the thrust bearing on inexpensive ski bindings does not require any special tools. The NIS system provides the ability to select the correct ski mount location, taking into account the characteristics of the track and the weather. You can change position before every ski trip or workout.
The most popular winter sport is cross-country skiing. But so that classes on fresh air brought only positive emotions, you need to take care of sports equipment... This article will focus on ski bindings. NNN and SNS are the most modern systems fasteners, and the debate about which one is better has been going on among professional and amateur athletes for a long time.
NNN
The Norwegian company Rottofella has developed a special system for attaching boots to skis - NNN. The originality consists in the presence of two rubber flexors connecting the boot with the mount, and two longitudinal guides that do not allow the boots to move to the sides. The toe of the boot rests against these springy cuffs, and after a push, they return the leg to a horizontal position.
The NIS design used in the NNN bindings allows the mount to be installed on the platform built into the skis. This is very convenient since the ski mount does not need to be screwed into the ski, and it can be shifted to adjust the position of the boot in relation to the center of gravity. Many skiers use this opportunity to customize their skis for different snow conditions. This system also allows the athlete to supply their own harness.
SNS
The French company Salomon presented its SNS fastening system. The difference between this design lies in the presence of a central rubber flexor with one against which the boot rests. The special sole of the shoe allows the athlete to control the ski and ride in any style.

Installation of fasteners does not include dedicated platform on skis like the NNN bindings, but original boots are required, suitable only for the SNS construction. The usual SNS fastener has only one clip in front of the sole of the boot, but there is also a modification of the SNS Pilot, which uses two metal pivots that are fixed in two different grooves, spaced 2.5 cm from each other. This allows you to limit the rise of the foot in the air and thereby increase control over the skis.
System differences
In general, the differences between NNN and SNS mounts are minor and will not be noticeable to the average hobbyist, but there are nuances that a professional will pay attention to. For example, SNS Pilot bindings are praised by many for the double engagement of the boots to the skis, this improves maneuverability, but at the same time, in not very cold weather, the snow is packed under the second bracket and compressed into an ice lump, which prevents the boot from being mounted normally. It also happens that the second shackle will come off during a push. But in cold weather, these mounts work great.
Many professionals value the NNN bindings because the ski platform and the NIS under the bindings raise the boot and make the leg seem longer. This increases the pushing force by lengthening the lever. At the same time, this effect reduces the skier's stability, which is not possible with SNS bindings. What to choose: an NNN or SNS mount, it is up to the skier in which boots and on which mounts it is more convenient for him to ride. This is an individual approach, and there is no definite answer.

Installing Mounts
After choosing and purchasing a mount, you need to install it on the skis. This must be done in the following order:
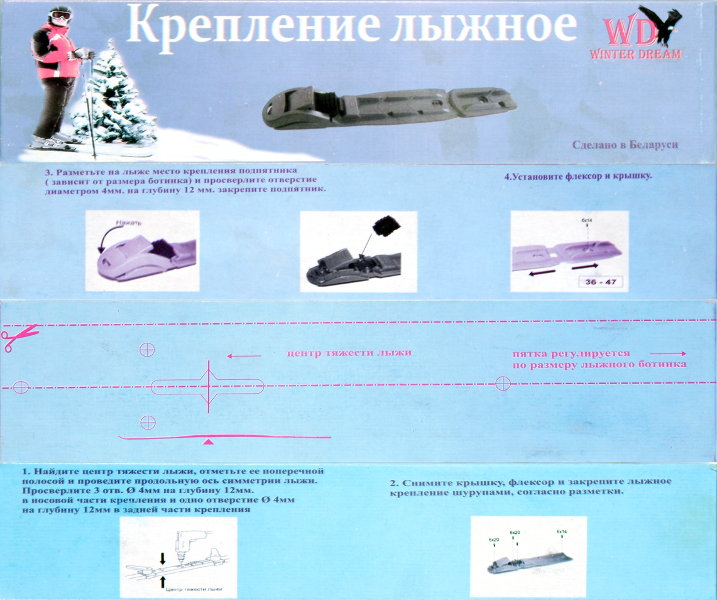
- The center of gravity of the skis is determined. This is done like this: the ski is placed flat on the edge of the ruler and shifted until it is balanced, like weights (parallel to the floor). If the mount is heavy, then you need to find the center of gravity by attaching the mount to the skis, and move until the balance line coincides with the fixing groove of the boot.
- The places where the holes are drilled are marked. For this purpose, there are paper templates included with the mount. If the template is not at hand, you can apply the markings with an awl, attaching the mounts to the skis, according to the center of gravity.
- Holes are drilled to a depth of 10 mm. The drill is pre-selected: for NNN - diameter 3.4 mm; for SNS - 3.6 mm. Drilling is done carefully, pressing lightly on the drill so as not to go right through the ski. It is advisable to put a stop on the drill. Then the sawdust is blown out and the holes are filled with glue for a more secure fixation.
- The construction is being assembled. For this, the fasteners are applied according to the holes and screwed in with screws. After that, it is required to dry the skis for 10 hours before use.
Everything is ready, now you can go for a drive. Apparently, there is nothing difficult in choosing and installing mounts.
Both on a professional and amateur level, this is perhaps one of the most popular winter pastime for a huge number of people. Someone prefers to actively relax at the nearest rental point of this sports equipment, well, but someone purposefully goes to the well-known ski resorts, in principle, for the same.
What determines the choice of fastening?
Of course, the equipment itself plays one of the main roles in high-quality and enjoyable skiing. The range of skis today is very large, and they differ both in brands of manufacturers and in their purpose (cross-country, mountain, jump). The price range is also wide, so you should immediately decide on the amount planned for the purchase.
Sometimes winter skiers are faced with a very serious problem. How to install ski bindings correctly? You can also entrust the installation process to specialists, but if you want to save some of the financial resources and just gain additional experience, you should understand the technology of this work yourself.
What is a ski carrier made of?
The design of this element, which is designed to ensure safety, includes the heel and front head, which must be adjusted in accordance with the parameters of a particular person (weight, boot size, etc.).
On the mount itself there are special pins, the function of which is to fix the boot. There are also special braces and bends that allow the leg to move freely inside, but prevent it from slipping. Usually, these elements are in the shape of a boot toe, which cannot but have a positive effect on the comfort of riding.
The heel of the attachment is designed to provide the skier with safety during falls. In modern designs, this ability is called vertical elasticity. In addition, this part of the attachment significantly reduces the level of vibrations applied to the boot.
How to ensure the installation of the retainer?
So, the correct fastening of skis is accomplished in part through proper drilling. You need to do this not by eye and not using labels. Often a special conductor can be purchased from the manufacturer, thanks to which a good result will be guaranteed.

There is a large selection of drills for making holes, each of which is suitable for a particular type of ski: a section of 4.1x9.5 mm - for metal surfaces, 3.5x9.5 - for wooden, and 3.5x7 mm will be a good solution for junior sports equipment, the thickness of which is less than that of adult models.
After drilling all the necessary holes in the ski bed, a small amount of glue is added to each of them, and then the mount itself is already mounted. The screws should fit snugly, without slipping.
This information can be helpful when thinking about how to mount your ski carrier.

Cross-country skiing - installing bindings
It is these elements that make it possible to clearly transfer forces and establish the direction of sliding when moving both in the classic style and in the skating style. It is very important to focus on how to properly install ski bindings for running, because without this knowledge, even well-chosen equipment not only cannot bring absolutely no joy from skiing, but can also put the owner in serious danger.
Cross-country ski carrier categories
Currently, there are three types of mounts for this type of equipment, so each should be disassembled separately.
One of them is the outdated Nordic Norm 75mm, called "welted" among the masses. Its main advantage is its relatively low price, but otherwise its technical characteristics leave much to be desired. It fixes the foot poorly and, despite the rigid fastening of the toe of the boot, the entire sole slips due to insufficient lateral and longitudinal stability. In this case, the skating style of running is almost impossible, and the classic one comes out a little better. This installation of the bindings will not bring the owner the pleasure of riding, so attention should be paid to the other two types of bindings.

These samples belong to models of a new, innovative generation. These include the SNS system and the NNN system.
It will be difficult to compare the two mounts as each is an extremely high performance device.
The functioning of these two systems is based on the technology of using flexors and guides, which greatly simplifies the task of how to install fasteners. On skis with such locks, the sole of the boot lays down firmly and comfortably, and additional stabilization when skiing and classic, and gives a feeling of confidence and greatly facilitates the process of movement.

Functional features of SNS and NNN fastening systems
The locking level of each of these two patterns is touring, sometimes even equipped with automatic closure. This option is perfect for recreational skiers whose skiing skills are not yet well developed.
The SNS system appeared a little earlier, and its main difference is that the fastening design includes only one longitudinal component, while the NNN type has two of them.
It's no secret that the main difference between cross-country and downhill skiing is the connection between the boots of the former with one or another model of bindings. And since the differences between the two above-mentioned systems are quite insignificant, here the emphasis should be made exclusively on the choice of shoes. Having decided on how to properly install the bindings on the skis, you should choose boots that will match the skiing style and differ in unique comfort and design, and only then figure out the standard for their fixation.
Ski bindings
This type of sports equipment is suitable, as the name implies, only for skiing on the slopes. For running, such skis are not suitable, since they have different parameters of length and width, and also differ from other samples in their technical characteristics... But, one way or another, it is extremely important to know how to put bindings on skis of this type, since descents from the peaks require an increased level of safety, which can only be ensured by reliably fixing the entire structure on the leg.
Alpine ski mounts installation procedure
In order to avoid a poor-quality work result, all actions for equipment of this type must be performed strictly according to the following instructions:

1. In the center of gravity of the ski, which you can find with your own hand, a line is drawn.
2. The mount is placed in such a way that its leading edge just reaches the drawn mark. The boot is carefully inserted into the retainer, which is adjusted so that its entire base is centered, since only in this case the installation of the mounts on skiing will be correct.
3. Then the boot is removed, and small holes are made in the place of its location through the holes in the retainer, which can be made with an awl or drill with a cross section of 1.5-2 mm in diameter. Then, using a screwdriver or screwdriver, the screws included in the kit are screwed in.
4. The boot is firmly fixed in the holes made. At the same time, it is important to observe the entire algorithm of actions so that at the end of the entire work the retainer is moderately rigid, fits comfortably around the leg and meets all the safety requirements for riding.
This guide will help you figure out how to properly install ski bindings designed for skiing on mountains and steep slopes.
Ski bindings - essential elements the athlete's equipment, on which his safety will depend. It is very important to install them correctly. This can be done either with your own hands or in a workshop. This article provides information on the main types, instructions on how to remove bindings from skis, how to put bindings on skis yourself.
By design and purpose, there are 4 types:
- Soft.
- Hard.
- Semi-rigid.
- Mountain.
Soft (simple) is a loop made of leather or fabric into which a leg is placed in ordinary shoes - a boot or felt boot. Sometimes, for a more secure fit, an additional strap is used that wraps around the heel. Such loops are usually put on skis for a child or on hunting skis.
Semi-rigid consists of metal cheeks, a sling that holds the boot on top and a strap that wraps around the heel. Before they were part winter outfit military personnel. Nowadays, they are often installed on children's models.
Semi-rigid are of three types: cable, spring, with swinging cheeks. The third type is the most convenient. Unlike the first two, they do not spoil the shoes, they are reliable, they are easy to fasten and unbutton. Well suited for long hiking trips... They do not require special footwear, while the boots are fixed much more rigidly than simple ones.
The most popular are the hard ones. There are three systems of this type:
- Nordic Norm 75 (NN 75).
- Salomon Nordic System (SNS).
- New Nordic Norm (NNN).
Nordic 75 is a welt system with a spring-loaded shackle and a locking mechanism. The shoe has 3 or 4 holes on the sole, with which it is installed on the protruding rods. Then the edging of the boot is pressed with a metal arch. The NN 75 is usually mounted on wooden cross-country skis.
Since this construction does not fix the heel at all, it cannot be used for skating.
NNN and SNS are the most common designs for plastic running and roller skis. They come in a variety of models and modifications designed to suit all levels - from amateurs to world-class athletes. Installing the SNS and NNN ski bindings on your own does not take much time. The difference between these types lies in the number of longitudinal guides for fixing the boot.
Both systems can be of three types:
- Mechanical.
- "Machine".
- "Semi-automatic".
New Nordic Norm was developed by Roteffella. The front brace is pushed back, making this design more suitable for skating.
The device is a plate with a double profile that holds the sole. Fixation is carried out using a transverse rod. The boot rests against a rubber stop. The stiffness of the stop determines the rigidity of the entire structure. The stops are painted in different colors (white, green, black, red), which determine the degree of rigidity.
There are several NNN upgrades. One of them is NIS (Nordic Integrated System). It is characterized by ease of installation and the ability to move the boot along the longitudinal axis.
The Salomon Nordic System was developed by Salomon. This device has only one rail. In the front part there is a rubber stop, the rigidity of which can also vary. There are two main types:
- SNS Profil
This type is versatile. It can be used for both ridge and classic moves. - SNS Pilot
Usually used for skating.
Alpine skiing differs from other types in that they completely fix the shoes, and are also able to unfasten when an athlete falls.
There are 4 main types:
- Alpain.
Suitable for skiing on prepared trails. - Framed.
The front is connected to the rear by a frame. Allows you to fully secure the foot on the descent and unfasten the heel for uphill climbs. - Pin.
The boot is fixed by means of 4 pins - pins. - Telemark.
Frame and pins are suitable both for skiing on prepared tracks and for freeriding.
Installation instructions
For installation, the following tools and materials will be needed: a marker, a screwdriver, drills, a ruler, glue, an awl.
Center of gravity
Installation of all structures begins with the determination of the balance line. The leading edge of the shoe should be on it. Sometimes the center of gravity is already marked by the manufacturer, but it is better to determine it yourself. To find it, you need to put the ski on a narrow object and move it until it reaches a balanced position. The balance line should be noted. This line will be the axis of the bracket for NNN and SNS devices. For NN 75 it will determine where the screws are to be installed.
Markup
The marking can be done using a special jig, and if it is not available, using a paper template.
It is imperative to check the correctness of the markings by measuring the distance between the marks. In NNN systems, the fasteners are located closer to the front end of the balance line, and in SNS systems directly on the line.
Drilling holes
It is recommended that you follow the instructions included with the kit to determine the required hole diameter and depth. For SNS and NNN systems, holes are usually drilled 10 mm. Remove dust from the finished holes, then fill them with glue. This will provide a more secure fit for the screws.
Assembly
After that, the device should be applied to the marked holes, and begin to tighten the screws evenly. Care must be taken not to displace it relative to the longitudinal axis. For NN 75, it is recommended to check the alignment accuracy before screwing. You can go out on the track after 12 hours, when the glue dries up.
If you need to install old hardware on new hardware, it should be easy to remove. Disassembly should start from the back. First you need to carefully remove the plug from the screw and unscrew it. Then remove the bar, unscrew the two bolts under it. The last bolt is also under the plug.
How to install a ski mount on mountain skis?
Installing bindings on such skis is practically the same as installing on cross-country skis. This work is done in several simple steps.
The center of gravity is found first as described above. Then you need to lay the fasteners so that its front edge exactly matches the balance line, place the boot in the clip and align it. After that, you should carefully mark the holes with a pencil or an awl, drill them. Then attach the front with screws. The back is set to the middle position and the holes are marked. Holes are drilled rear part fixed with screws. Installation ends with customization.
V Lately some models come with pre-installed platforms, on which it is easy to install the latches without fixing them with self-tapping screws. This makes it possible to reinstall under a different shoe size, as well as the possibility of displacement along the longitudinal axis.
The choice of bindings depends on the skiing style, as well as on the level of preparedness of the skier. It is recommended to buy products from proven well-known firms such as Salomon, Fisher, Atomic. The products of these manufacturers are distinguished by their reliability and high quality.