
Learning to draw a horse is enough difficult task, since it is required to accurately display the proportions of this most beautiful and graceful animal in the drawing. But, if you draw a horse in stages, then it is quite possible to draw it correctly even for children. In this lesson, we will learn how to draw standing horse, step by step, drawing its outlines. Drawing a picture of a running horse is difficult even for an artist, so first make a drawing of a horse standing still, and after this lesson you can try to draw other drawings of horses, including a running horse. The most complex elements of a horse drawing are the hind legs and the head of the horse, pay attention to these details. Special attention. The site has a lesson on how to draw a horse's head in stages with a simple pencil. Check it out too, it will help you right draw a horse.
1. How to draw a horse, the first drawing step

All the drawing lessons of my site are built on the use of geometric shapes as the initial contours of any animal drawing. horse drawing done in the same way. With the help of three circles draw the main parts of the torso and connect them with lines, as in my drawing. Drawing these outlines is not difficult, but it is important to accurately position them on a sheet of paper in relation to each other. Try to make this horse drawing step as accurate as possible.
2. Add the contours of the legs in the drawing

In this step, you need to draw the contours of the legs, neck and head. Start with the line of the horse's neck. To do this, you just need to add another upper neck line to the already drawn one. With a small circle, mark in the picture where the horse's head will end. After that, you can start drawing the contours of the legs. Start drawing the front legs first. To do this, draw two pairs of small circles and connect them with straight lines. Instead of hooves, draw triangles. The hind legs are more difficult, perhaps because they do not bend forward, but backward. And pay attention, the lines of the legs do not start from the center of the circle, but are slightly shifted to the left.
3. General contour of the horse

Check carefully if all the proportions of the horse are respected. Is the head too big and the legs too short? Are the hind legs bent back? Check the distance between the hooves, the front legs are almost closed, and the hind legs are standing as if the horse is preparing to run. If you are sure that everything is drawn accurately, then move on to the next step.
4. The drawing of the horse is almost finished

At this step, we will not draw anything, just remove the extra contours from the drawing now. Touch up the lines you accidentally deleted and see how easy it turns out draw a horse. Already at the third step of drawing you got a real a beautiful horse, it remains only to draw the tail and draw the head in detail.
5. It remains to draw a few more details

The first drawing steps are very simple, but require attention to ensure that the initial outlines are accurately positioned in relation to each other. The proportions of the horse depend on their location. The next steps require attention to small details. You need to carefully draw the eyes, nostrils, ears of the horse. To draw small details, the pencil must be sharp. Don't forget to draw the tail.
Horse head drawing video.
6. The finishing touches of the drawing

You now know how to draw a horse, but you still need to learn how to apply shadows. This is complex technique, but use a simple object lighting rule. The light falls on the right, which means that the areas on the left will be darker. Try to create shadows on the horse by copying them from my drawing. You can try to draw a horse with colored pencils and even paints.
In this lesson, we used the techniques of drawing a horse that stands still. If you want to draw a running horse, or even several running horses, you can use photographs of horses for this, using this lesson as a base material for other drawings of horses.
7. Running horse. oil painting

I painted this picture of a running horse with a rider in oil. Please do not criticize too much, I was only 11 years old.
To draw a horse, even in stages, you need experience and a good eye. But if you need to draw drawings of horses, this lesson will help you figure out how to draw a horse's head. The main thing is to keep the proportions exactly so that the horse's head is graceful and beautiful. For beginners to draw, I advise you to periodically compare your drawing with a real photo or a good drawing of a horse.
Giraffe drawing will not be for you hard lesson if you have tried to draw a horse before. Almost the same body structure, only the legs of a giraffe are slightly longer than those of a horse, and of course very Long neck. But if you draw in stages, first with a simple pencil, and then color it with colored pencils, the picture of a giraffe will be like a real one.
If you draw wolves chasing a horse in the distance, you get a good plot for a picture of a running horse. In fact, wolves will not be able to catch up with a healthy and strong horse, and even if they catch up, they will regret it. The horse has a very dangerous weapon for them - hooves.
The deer looks very similar to a horse, so if you know how to draw a horse, then drawing a deer will be easier. The same structure of the body and legs, only the head is decorated with horns and the tail is very small, it is not even visible in the picture.
If you failed to draw a horse beautifully, try to draw a camel in stages. This lesson is made so that any child can draw a camel correctly.
This lesson will describe in detail how to draw a horse in stages with a pencil. Simple steps will allow you to draw a horse beautifully even if you have never drawn before. Prepare the materials necessary for drawing and we can start! As a result, we will get such a drawn horse.
The easiest way to draw a horse is to learn how it works. After that, it will be easy to draw the base, as in the picture below. We have marked the chest, thigh, base of the head and legs of the horse.

Next, focusing on the base, we begin to draw the shape of the body of our horse. First of all, draw the shape of the neck. Notice how the horse's neck widens closer to the body, and it's worth taking the time to study the curves. If you are drawing from a photo, then it will not be difficult for you to observe the position of the horse's neck.

Now let's add auxiliary lines to our base. I draw two lines near the head, they will indicate the location of the eyes and nostrils of the horse. We break the legs into rectangular sections, so that later it will be easier to draw.

Focusing on the lines indicated earlier, we begin to draw the horse's head. From above, we need to draw her ears, then we will need to outline the general shape of the head.

Now that the head is ready, we begin to carefully draw out the shape of the belly and hips of the horse. Thanks to the base drawn in advance, drawing is much easier.


Horses look amazing with their chic tails and manes, so don't forget to draw this important detail. I also add some folds and strokes to the horse's body.

Have you decided to teach your child to draw a horse with a pencil? Do you want to get creative, have you been drawn to paper and pencil for a long time? Have you heard that drawing helps to get rid of stress, relieve fatigue and emotional stress?
Now you can draw a horse with a pencil without any problems! Horses with riders, horses in a jump, beautiful running animals - everything can be depicted with ease, if you remember a few useful tips, get acquainted with the algorithms and diagrams. Start drawing today!
How to draw a horse with a pencil
403 Forbidden403 Forbidden
openrestyDo you want to draw a horse in stages, to delve into all the subtleties of the image of this animal? Try to remember the algorithm, carefully look at the diagrams. When you reproduce all the given schemes on your piece of paper, you will quickly get a spectacular horse.
- First of all, mark the boundaries of your drawing. Of course, it is better to immediately determine the rectangle in which the animal will be located. This makes drawing much easier.
- Now you need to draw the basis of the future horse's head. To do this, draw a medium-sized triangle in the upper left corner of the picture. The corners of your triangle should be rounded. Do exactly as shown in the picture.

- Now you need to draw two ovals, placing them at an angle relative to each other. They will later become the basis of cereals and chest horses.

- Connect your two ovals to make the horse's belly. Make the lines smooth, avoid sharp transitions, kinks.

- Now you need to work on the image of the horse's legs. First, mark the points of their bends with dots, and then connect your points with straight lines. Try to make the proportions of the horse's body harmonious, pay attention to the drawing. Remember that the horse's knees are high enough.

- Now you have to finish the legs, make them quite muscular, full, draw the hooves. The heels are slightly raised, the hooves should be depicted in the form of a trapezoid, the knees of the animal protrude slightly forward. For now, take care of your front legs.

- You can begin to finish drawing the hind legs of the animal. Remember that the horse's hind legs are much fuller than the front legs above the knee. If the front and back legs are the same in your drawing, the proportions will be violated.

- Draw the horse's neck. Here you have to remember the golden mean in order to draw the horse correctly. The fact is that a neck that is too thin will look bad in the picture, but an excessively thick, massive neck will also spoil the impression of your horse. The neck should be powerful enough, but it is important to convey the gracefulness of the horse. To do this, you need to draw with smooth lines, be sure to indicate the transition from the torso to the head, making the neck gradually thinner. Let it be slightly curved.

- Once again draw the torso, legs, neck and head of your horse.

- Take an eraser and delete all the lines you don't need left from building the horse. Don't let them distract you. Erase the lines carefully, leaving no streaks or marks.
- Now comes the most interesting stage. You have to draw the horse's head. In this picture, the animal is facing the audience in profile. Try to make the muzzle more expressive. Draw ears, designate large nostrils. Be sure to make the horse's eyes big.

- It's time to draw your horse's tail. Sometimes the tails are sheared, someone braids them into pigtails, intercepts with rubber bands. In our drawing, the magnificent long tail of the horse flutters freely in the wind, which gives the drawing dynamism. You can immediately see that your horse is moving.

- Update your drawing again, removing all unnecessary lines, unnecessary strokes.
- Draw the muscles of the horse. Mark them with strokes in the neck, back and front legs. If in doubt, completely repeat the lines drawn in the picture. A horse with such muscles will look more realistic and powerful.

- Now decorate your horse with a fluffy mane that is lifted by the wind. Remember that trying to draw every hair, curl is not worth it. Just mark the line of the mane, give it volume, with a few strokes you can divide the mane into curls.

- Add a few more neat strokes to indicate the folds of the joints on the horse's legs.

- Now you can make your drawing more voluminous. Use pencils, blend them. Pay attention to where the horse is darker and where it is given lighter shades on the sample. Do the same.

Everything! Your horse is completely ready. You can color it, make a background.
How to draw a horse head
403 Forbidden403 Forbidden
openrestyOf course, in order to learn how to draw a horse correctly, it is important not only to remember the basic principles of depicting an animal, but also to understand the details.
It is important to draw the horse's face in such a way that it really looks as realistic as possible, immediately attracts attention. In addition, you will be able to create real portraits of horses in different styles and directions if you master the basic principles of drawing muzzles. Remember all the subtleties and act according to the algorithm.

Your horse head is ready! You can colorize it.
403 Forbidden403 Forbidden
openrestyNow you will be able to draw a horse step by step, make its face especially beautiful. But this is not the limit of your possibilities! Create beautiful running, jumping horses, pegasus. For example, in this section you will learn how to draw a horse with wings. 
- The fabulous Pegasus looks great, captivates with spectacularity.
- It can become an emblem of courage and love, a flight of creative imagination or a passion for travel.
Remember exactly how to portray a beautiful Pegasus.

Your Pegasus is already drawn! You can give it color.
403 Forbidden403 Forbidden
openrestyAn animal with a rider looks especially impressive. You can learn how to draw a man on a horse right now. It is important to correctly calculate the proportions so that the rider looks realistic. Of course, the proportions of the horse's body should not be forgotten either.
If you look carefully at the sample, redraw the rider on the horse sequentially using the algorithm, you will definitely not have problems. 
- Try drawing a horse and rider using ovals or rectangles. Draw one large rectangle to form the base of your horse's torso, and draw a smaller rectangle above it. Make sure that the top rectangle is at an angle, as an animal with a slightly bowed head looks more natural.
- Now draw the horse's neck. To do this, you will need to connect the top and bottom rectangles.
- Take hold of the horse's legs. Look closely at the drawing to depict the horse's legs as realistically as possible. Keep in mind that the legs are not perfectly straight, have different thicknesses above and below the knee. It is better to draw the hind legs slightly apart, depict one front leg bent, raised. Don't forget to draw the horse's tail.
- Now you need to draw a fairly large rectangle over the middle of your horse's torso. Make the rectangle vertical. This will be the basis for drawing the rider.
- You need to draw a small oval above the vertical rectangle. It will then turn into the head of a helmeted rider.
- picture right hand person. One should be pulled out to the left. It is better to draw the other hand half-bent. Let the clenched fist be approximately between the neck and the body of the horse.
- Now draw the rider's leg. From our angle, only one leg is visible. It should be slightly curved.
- Now it's time to paint the details. First draw the rider's face. Make the eyes oval, make short eyebrows above them. Mark the nose with a wavy line, draw a mustache under it, it is enough to mark the mouth with a small arc. Draw a beard.
- Draw a helmet, armor, chain mail of your rider. The helmet will resemble a triangle, the continuation of the cap will cover the face from the side. Draw the armor, creating clear lines and geometric shapes, depict chain mail, large gloves covering the hands. Draw the armor on the legs with steps.
- Draw the horse's face. Depict the nostrils, the eye, clearly mark all the lines. Be sure to draw the ears, mane and tail.
- Now it remains to draw stirrups and reins, a saddle, a sword in the hands of a rider.
Your man on the horse is ready! You can leave the drawing in pencil, paint it with colored felt-tip pens.
403 Forbidden403 Forbidden
openrestyDecided to draw a harnessed carriage?
- To begin with, it is better to learn how to depict a carriage with one horse. The main thing is that you learn the very principle of drawing.
- Then you can draw a carriage with two or three horses again, or simply add one to an existing one. For example, o will be partially visible in the background: the front and hind legs behind the legs of the main horse, the head raised up, the tail, part of the back. And everything else will be hidden behind your main horse.
While we draw the simplest option.

- Draw a large square, and next to it is a horizontal rectangle. These are the basics of a carriage and a horse.
- You need to draw a small rectangle to the square, on which the coachman will sit.
- Now take care of your horse. Draw a small oval and then connect it to a rectangle. This will give you the horse's head. It is better to make the head slightly lowered.
- Draw the legs of the horse. They should not be very thick, medium length. Make the back ones slightly bent, and the front ones straight. Draw the tail, mane of the horse.
- Draw the details of the horse's muzzle. Depict the ears, eyes can be closed with overlays, outline the harness. One line should diagonally cross the horse's body, go to the carriage. This is a shaft. Be sure to draw the hooves.
- Now we need to pay more attention to the carriage. Ahead, it has a straight wall, but back better round. See exactly how the carriage is shown in the picture.
- Complete the carriage with a window. Don't forget to draw big beautiful wheels. Make the rear circles large, the front wheels noticeably smaller. Designate the axles of the wheels.
- It is important to draw a coachman to give the drawing realism and dynamism. Depict a person sitting in front. We see him in profile. You just need to draw an oval, a small circle above it and a small rectangle on top. On the oval, mark the coachman's hand with two lines. Draw the details of the upper rectangle so that it looks more like a cylinder. Between the coachman's torso and the hat, you just have to finish the hair, outline one eye with a small stroke.
- Carefully draw the profile of your coachman. It is enough to outline the nose, carefully round the chin.
- Now complete your drawing with the necessary details, strokes, be sure to completely erase all unnecessary lines.
It remains only to color your harnessed carriage!
403 Forbidden403 Forbidden
openrestyDecided to depict an animal in motion, do you want to make the drawing really realistic, dynamic? Then you should draw a horse on its hind legs! Such a pattern looks spectacular, conveys the strength and power of the animal.

- Start your work by determining the location and boundaries of the drawing. It is better to turn a sheet of paper vertically. The animal will stand on its hind legs, stretched out in length. If the drawing is vertical, the rearing horse looks more spectacular.
- Draw one large vertical oval. Above it, you need a smaller oval, located on the side. So you will have the basics of the torso and head of the animal.
- Draw the horse's neck. It shouldn't be too thin. Let the horse look powerful, muscular.
- Pay attention to the horse's hips. The hips and upper parts of the legs are extended down. Carefully study the drawing to understand the principle of drawing lines.
- The lower parts of the legs are positioned differently. The horse stands on its hind legs, they are almost straight, elongated. The front legs should be depicted raised up. From the knee they go almost vertically, the hooves are slightly lowered. So your rearing horse will become as realistic as possible.
- Engage in transitions. Carefully round all the lines, outline the torso and legs. Lines in the area of the knees, hooves should be clearer.
- Draw the details of the horse's head. Draw a large nostril, eye, one ear. The muzzle of the horse is in profile towards us.
- Do not forget to draw a mane, tail, carefully draw the hooves.
- With strokes, outline the muscles, the muscles of the horse. Paint over it a little, outline the folds of the skin on the stomach.
- Now erase all extra lines.
403 Forbidden
openrestyDo you want to draw her beautifully right now? You can easily create an original drawing if you remember the rules for depicting a horse in a jump.
- Draw step by step, constantly refer to the pictures. First, you will draw two shapes that will be the main ones in the drawing. Here they are grey.

- Then start drawing the head of the horse. It is lowered down, located vertically. Immediately draw the neck, complete the head with a graceful ear.
- Draw the horse's face more carefully. You will need to depict the cheek, nostril and eye of the animal, designate the jaws, convex lines around the eyes.
- Now it's time to draw the torso of the horse in a jump. Remember that all lines must be smooth. First draw the front legs. They are thinner, bent. The hooves and lower parts of the legs are practically pressed against the horse's stomach. The animal is grouped in a jump, which must be emphasized in your drawing. The hind legs are extended. note that top part the hind leg is noticeably thicker than the lower leg.

- Now we need to detail the body. Mark the horse's muscles with symbolic lines, draw the hooves.

- Be sure to depict the tail, mane of your horse. Let the tail be slightly tilted back.
- Erase all unnecessary lines, eliminate pencil marks.

Now you can color or shade your jumping horse!
403 Forbidden403 Forbidden
openrestyDrawing a running horse is also not as difficult as it might seem. Remember the algorithm, carefully study the figure. You will be able to draw everything in stages with a pencil. 
- Start your drawing with two ovals. Let them be horizontal. One will be approximately in the center of the sheet, draw the other on top, closer to the left edge of the paper.
- Connect your ovals to make the horse's neck. It should be strong, but not too thick. Watch for proportions.
- Start drawing legs. You can generally limit yourself to the image of two legs - front and back, since from our angle the animal can be seen that way. The hind leg is more powerful, it is noticeably thicker above the knee. The front leg is thinner. Draw the back leg stretched back, the front should be stretched forward.
- Now you need to detail the animal's head, because for now it's just an oval. Round off the line of the cheeks, draw a graceful ear, make the muzzle narrowed down. Draw a large oblong eye, you can add a large nostril.
- Be sure to add a fluffy tail thrown back.
- Now you need to remove all unnecessary lines, make smooth transitions, outline the horse's muscles with strokes.
It's time to color your running horse!
How to draw a horse's eye
403 Forbidden403 Forbidden
openrestyIf you want to draw a horse's head in stages, it is important to pay special attention to the image of the eye. You should remember all the nuances so that your horse's eyes are as realistic as possible, reminiscent of real ones.

Consider all the nuances. If you don’t know exactly how to draw the details of the eye, you should just focus on the presented sample. With such eyes, the muzzle will be amazingly realistic!
How to draw a horse's mane
403 Forbidden403 Forbidden
openrestyThinking about how best to draw a horse's mane? It is worth paying attention to a few nuances so that your horses resemble real animals in the drawings. After all, a well-drawn mane can give the image realism, dynamism, emphasize the movement, power of the horse!

- When you draw the mane, always try to avoid tracing the outline of your horse's "hair" with a pencil. Draw curls, outline the mane with lines. Everything should be natural.
- The mane will look great if you apply more strokes with a simple pencil, blend them, and then outline the direction of hair growth, the location of the curls with a few lines.
It is with the help of the mane that you can easily emphasize the movements of your horse, make the drawing dynamic. When the horse is standing, the mane will hang freely. If the horse runs, jumps, stands on its hind legs, its mane is raised up, it is blown by the wind, it looks thicker.
Use algorithms, remember helpful tips. You will draw horses with pleasure, create real pictures!
Look, how to draw a horse - video tutorial:
Artistic creativity can become your favorite hobby when you learn how to draw horses with a pencil in stages. We wish you success!
Running horses are beautiful and graceful creatures. However, they are one of the most difficult animals to draw. I'll show you how to draw these majestic creatures, providing you with the knowledge of their basic anatomy so you can create a natural pose. You will also learn about horse gait and be able to draw realistic and dynamic poses.
You can look at the photo on Envato Market.
1 Horse Skeleton
Step 1
The skeleton is the foundation for the entire body, so it must be studied to understand the movements and postures of the animal. But don't worry - you won't need to count the edges. Just take a close look at this picture.

Step 2
Use the skeleton to see the basic structure of each pose. Memorize all the joints (circles) and bones (lines), their location and proportions between them, and you will be able to draw any horse!

Step 3
It is important to remember that hooves are not feet, but toes. Real feet start at joints that look like knees and elbows. Therefore, horses do not have knees on their front legs - they are wrists!

Step 4
A pony is also a horse. Remember that she has a shorter neck and legs - the rest is the same.

Step 5
A foal is the opposite of a pony - just look at these disproportionate long legs!

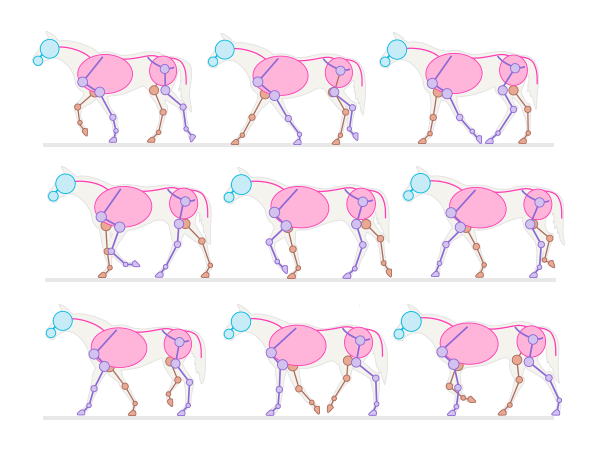
2. Overview of horse postures
Now you know how to draw a stationary horse, but let's face it - it's boring. To bring a pose to life, you need to understand how horses move, and more importantly, how they don't move. By guessing the pose, you can suddenly confuse a trot with a canter, making the drawing unrealistic, no matter how much time you spend drawing muscles and light reflexes.
Step 1
"Step" is the first and slowest movement of the horse. In this position, the horse stands on the ground on three legs while one leg is raised. This is a four-fold gait (four knocks can be heard).

 Step
Step Step 2
The trot is a type of gait that the horse uses for long distances. In this posture, the horse moves its legs diagonally in pairs, in a double rhythm.

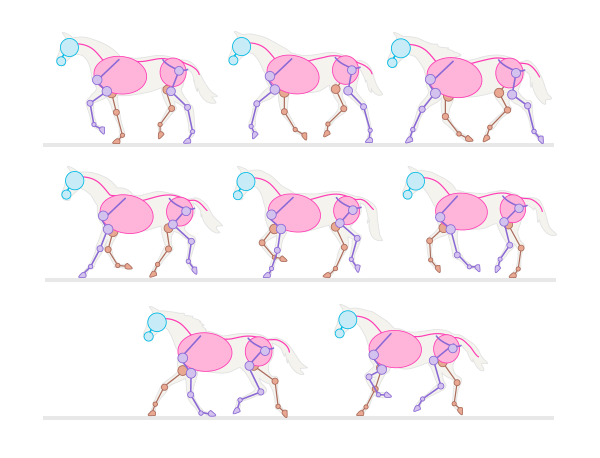 Lynx
Lynx Step 3
The canter is faster than the trot, but slower than the canter. This is a triple gait in which the horse uses one of its hind legs to propel the others forward.

 Kenter
 Step 4
The gallop is very similar to the canter, but faster and its rhythm is four times. Masters of painting made one mistake. Do you remember the painted horses running at a gallop with all their legs stretched in the air? It doesn't work that way. When a horse stretches its legs, at least one of them remains on the ground. The "suspended" stage occurs when all legs are bent under the body.

 Gallop
 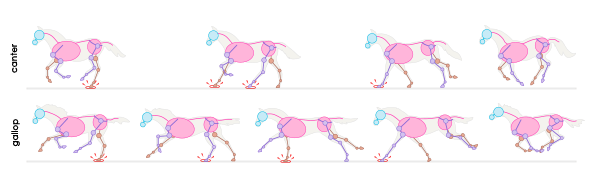 Difference Between Canter and Canter
  Never don't draw like that
 Step 5
A very effective, but not entirely comfortable pose for a horse is rearing. This posture is difficult to maintain for long periods of time and the horse makes this jump when he is excited. To draw it natural, you need to place the hind legs at the right angle.

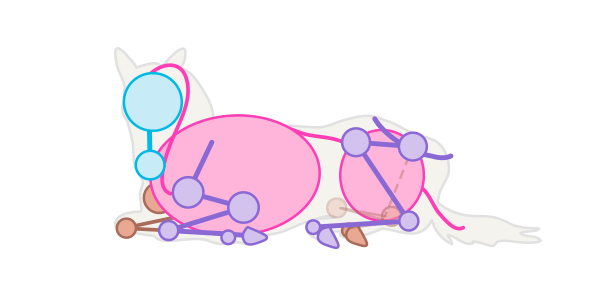
Step 6
Horses can sleep standing up, but that doesn't mean they can't lie down. In fact, they sometimes need to lie down to really rest. They usually lie on the same side as bent legs, but they can also lie "flat", relaxing the whole body.

Step 7
Horses look very graceful when they jump. Also, when the horse is hovering in the air, this pose is ideal for drawing a flying Pegasus.

Step 8
That's all I wanted to say about poses. Now you can choose any of them for your drawing.

3. Horse muscles
Step 1
Muscles give shape to the body, so they also need to be studied. Unfortunately, the horse's muscular frame is very visible under the skin, so if you want to skip this step, your horses will never look realistic.
If you want to quickly draw a horse, here is a simplified diagram. It will allow you to draw a good body shape without going into details.

Step 2
Here is a more complex structure. That's all you need to know to build a believable body. You may think that this will never come in handy, but without muscles, the skin will look flat.


Step 3
Add muscles to the chosen pose.

Step 4
The next step is the skin. It covers the muscles, hiding the sharp boundaries between them. The bulges of the muscles under the skin reflect light in different ways, making its surface uneven and full of depth.

Step 5
Horse breeds are divided into hot-blooded, cold-blooded and warm-blooded. Hot-blooded horses are lean, long-legged and noble-looking (like Arabian horses), fast and intelligent. Coldblooded are typical draft horses (like from Skyrim), large and muscular, but slow-witted and quiet. Warmbloods are a mix of both breeds.

Step 6
Erase the lines of muscles that touch each other.

4. Draw horse hooves
Step 1
Actually, hooves are horse nails. Horses are odd-toed, which means that their hooves are not cloven. Drawing cloven hooves is only acceptable if you are going to draw a unicorn.
To draw the hoof from the side, draw a line along the length of the leg. Then draw a diamond touching the line at one corner.

Step 2
Cover the diamond with something like a cap.

Step 3
Outline these shapes.

Step 4
Add some hair and draw in the rough texture of the nail.

Step 5
To draw the hoof from the front, draw a rounded, slightly tapered shape at the bottom.

Step 6
Cover it with a cap.

Step 7
Also cover with a contour.

Step 8
Add hair and textures. Ready!

Step 9
Draw a hoof with back side simple too. Start with the same rounded shape, but this time make the "cap" big and falling.

Step 10
Create an outline.

Step 11
And again add hair and texture.

Step 12
My horse now has hooves.

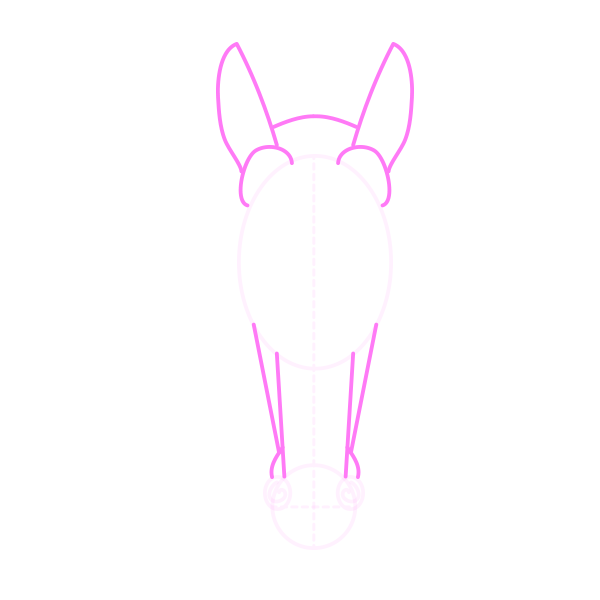
5. How to Draw a Horse's Head
Step 1
To draw the head in profile, start with three circles - one for the main part of the skull, one for the muzzle, and one for the nostrils.

Step 2
Connect the circles and add an ear.

Step 3
Divide the muzzle circle into three parts to create the lips.

Step 4
Draw the nostril in a "nostril" circle and two lines from the nostril to the ear.

Step 5
Draw a line across the two circles for the muzzle, then divide the main circle into halves and a line parallel to them.

Step 6
Divide the top half into two more halves again. Use these guide lines to place the eye. If you are drawing a foal, make the eye bigger.

Step 7
You can now sketch in the details, including the muscles under the skin. Remember that the cheeks are not actually round, but flat.

Step 8
To draw the head from the front, start with an oval and a circle.

Step 9
Add the nostrils using guide lines across the circle.

Step 10
Connect the oval and the circle, add the ears and forehead.
Step 11
Add eyes using guide lines dividing the oval into four parts.

Step 12
Add details according to the anatomy of the head for a more realistic look.

6. How to Draw Horse Eyes
Step 1
Draw a circle and divide it into four sections. Divide it in half with a line, then add another line above the previous one.

Step 2
Draw the shape of the lemon using guide lines.

Step 3
Draw the eyelids.

Step 4
Draw eyelashes. They should be straight and thick.

Step 5
The pupil should be horizontal, but most likely it will not be visible from a distance, because. horses have rather dark brown eyes. If you are drawing the whole horse and the eye is just a detail, draw it completely black. You need to draw the pupil only if the eye is blue.

Step 6
Draw and shade the area around the eye. This is very important for the overall shape. To highlight the eyelashes, add shine to them.

Step 7
To draw the eye from the front, start with a vertical ellipse and suitable guide lines.

Step 8
Add eyelids.

Step 9
Draw an eyeball covered upper eyelid.

Step 10
Add eyelashes.

Step 11
Draw the pupil.

Step 12
Polish your eyes.

7. How to Draw Horse Ears
Step 1
To draw a horse's ear, start with a circle (or half of it if it's a front view), then divide it into four parts and use them as guide lines.


8. Draw a horse face
Step 1
Horse nostrils are large enough that they can open even wider when more oxygen is needed. The easiest way to remember their shape: they look like the number 6 or an inverted comma. So always start with an oval and put a "6" (or an inverted "9") inside, adjusting its roundness to the correct size.

Step 2
When drawing the muzzle, emphasize only the lower lip, the corner is omitted. Also don't forget vibris - horses have a lot of them!

Step 3
Here is my horse with the head drawn.

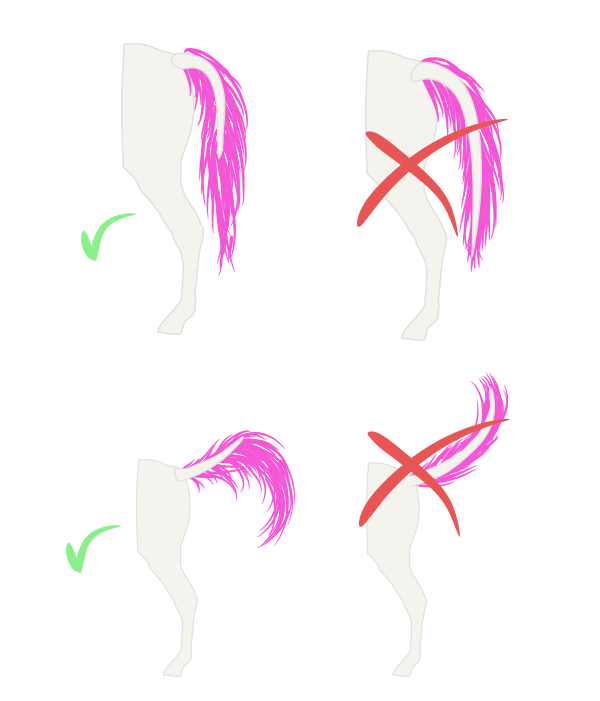
9. Horse mane
Step 1
The horse's mane grows straight. The strands are usually consistent in length and are thick enough to cover one side of the neck.

Step 2
The horse tail is much shorter than it looks. Long strands of hair grow from it, and they are set in motion by the tail.
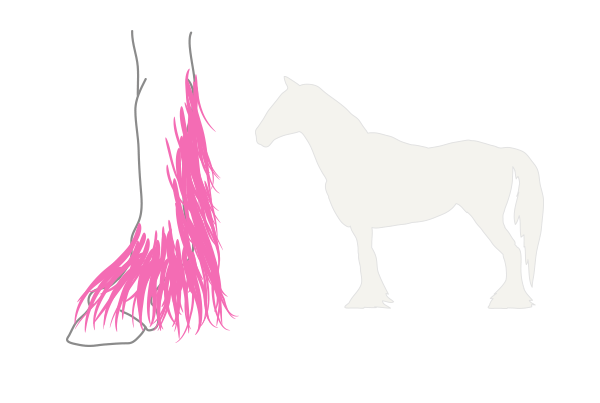
Step 3
The very long hairs that cover the hooves are called brushes. They are characteristic of draft horses.
Step 4
The wind makes the mane incredible!

Ready!
The guide turned out to be great, but now I am sure that you are an expert in horses!
Even entire books are devoted to how to draw a horse. After all, drawing these magnificent and noble animals is really quite difficult. But, of course, if you practice a little, you can still learn how to draw horses.
So, before you draw a horse in stages, you should prepare:
one). Eraser;
2). A pen with gel and black ink;
3). Pencil - both the most ordinary and mechanical are well suited;
4). sheet of paper;
5). Pencils of various colors.
Now you can move on to learning how to draw a horse:
1. Making light strokes, outline the horse's head and neck;

2. Draw the horse's body, which is similar in shape to a bean;

3. With simple strokes, mark the front and back leg;

4. Draw the muzzle of the horse, marking the eyes and nostrils on it. And then add the ears to the horse;

5. Draw a long developing mane for the horse;

6. Draw the front of the horse's torso and its front legs;

7. Also draw in more detail the back leg of the horse;

8. Next to the back leg, draw another one;

9. Draw a voluminous tail;

10. Outline the sketch with a pen, because it is not enough to understand how to draw a horse with a pencil, you also need to learn how to color it;

11. Erase the pencil drawing of the horse with an eraser;

12. Color the hooves with brown shades of pencils;

13. With a skin tone pencil, shade inner part ears. Color the eyes with purple and black. And with a black pencil in places shade the head, neck, body and legs of the horse;

14. With a gray pencil, paint over the horse in some places;

15. Lightly paint over the tail and mane with a dark yellow color;

16. With a yellow tint, completely tint both the tail and the horse's mane;

17. Using a red-brown pencil, lightly darken some parts of the tail and mane;

18. Draw grass with green pencils.

Now you know how to draw a horse. Horses quite often became the heroes of all kinds of stories and fairy tales, for example, one can recall the magical Sivka-burka. Therefore, before drawing a horse, it is recommended to familiarize yourself with the works of famous artists on this topic. In addition, looking at photographs of these magnificent creatures can help.
