Fine motor skills are called the ability to reproduce precise movements with the hand and fingers. This is important not only for working out, it must also be remembered that the phalanges of the fingers are the main tools in work for representatives of many professions. The development of fine motor skills of hands in children 6-7 years old is facilitated by drawing, playing musical instruments, working with plasticine and a small designer. But the greatest effect is obtained as a result of special classes.
Exercises that are offered to children contribute to the development of accuracy and speed of movement. As a result of their implementation, the hands and fingers will become stronger, flexible and mobile. There are three types of such tasks:
- exercises with small objects;
- graphic tasks;
- finger games.
In the light of preparing for school, the most attention should be paid to the implementation of graphic tasks. Children must learn to hatch, draw lines of different thicknesses and shapes. At the same time, it is necessary to ensure that they draw lines without taking the pen off the paper, do not go beyond the marked contours, do not leave spaces, perform the movements correctly (from top to bottom, left to right), do not turn the notebook, sit correctly at the table.
Classes for the development of fine motor skills of the hands should be carried out regularly, doing 10 to 20 minutes a day. Monotony and monotony should not be allowed; during the lesson, children should be offered several different exercises with exciting game content. For this, the educator and parents are invited to use a file of exercises for the development of fine motor skills of hands in children 6-7 years old.
Graphic tasks
Most of these tasks are performed on prepared cards. You can buy special notebooks, copybooks, coloring books.
contours
The card contains the contours of objects and a pattern of hatching (vertical, horizontal, oblique). The direction of the lines is indicated.
Children need to shade the drawings, trying not to go beyond their contours and make even indents between the lines.
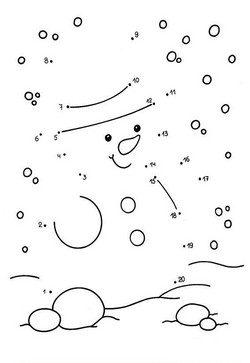
Rain
Clouds are drawn in the picture, and flowers below. Children are asked to water the flowers so that they do not wither. To do this, they need to draw lines. Such a task can be performed several times, each time offering a picture with different types of lines.


Waves
You need to circle the boat and draw waves on the water. It should be noted that the lines are of different types (straight and curved).

Rybka
It is necessary to finish the lines of the fins, bring the scales.

pattern hatching
The card contains examples of curly lines. Children should put the pencil on the dot and draw a line to complete the patterns. The main thing is to try not to tear the pen from the paper until the line is completed to the end.


Finish the drawing
Children will love doing tasks to complete the pictures:
- draw a cage for a tiger cub;
- draw a pyramid, shade every second ring;
- draw a butterfly, etc.

connect the dots
It is necessary not only to draw lines in the right direction, but to draw grass near the house by connecting the dots in pairs. In a more complex version, it is proposed to connect all the points with one line.

Develop an eye
In such tasks, you need to try to independently draw lines between objects. At first, children are given easier tasks when it is necessary to draw arcuate curved lines. It is much more difficult for children to draw straight lines in such a way that they hit the target as accurately as possible.
- help the bunny jump over the bumps;
- hit the ball into the basket;
- help restore the volleyball net;
- hit the target in the dash.


- Draw with pressure
- In this task, you need to hatch, making the right pressure:
- shade the clouds so that one is darker and the other lighter;
- shade the glasses - one with water (it is almost transparent), the other with juice (much darker);
- shade the leaves, making them different in color intensity.
Repetition of the pattern in the cells
For such a task, cards lined in a cage are prepared. At the beginning of the line, the “rhythm” of the pattern is set, which must be repeated independently until the end of the line.

Graphic dictations

Games with objects
Usually young children are protected from playing with small objects. After all, they can take them in their mouths or put them in their ears. However, after 5 years, such classes are simply necessary.
Games with sand and loose materials
Children can be offered the following tasks:
- pour sand from one container to another;
- pour sand with a measuring spoon;
- sift sand through a sieve;
- drawing with fingers on the sand;
- wet sand molding;
- search for buried small objects in the sand.
The most exciting activity in this series is the creation of colored salt crafts.

Games with cereals and seeds
Grains have a larger texture than sand. Therefore, they can be used for sorting. To do this, take a handful of cereals or seeds of three different types and pour them into one pile. The child is given three small containers where he must spread the grains. You can do this with your fingers or use tweezers.
In another game, children are invited to determine where which cereal is by touch. To do this, they are scattered in small fabric bags, which are tightly tied. You need to take a bag and, having crushed it in your hands, name the cereal.
From cereals and seeds, you can lay out pictures, create applications on plasticine.

Button games
Buttons are larger. They are also suitable for sorting (by size, shape, color). In addition, you can lay out an ornament, paths, lines according to a given pattern, pictures from buttons.
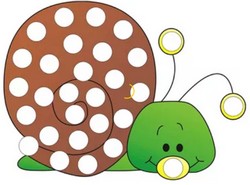
take on vector
A very interesting task is to fill in the circles in the picture with buttons, selecting them by color.
Rope games
Great for developing fine motor skills in children, games with ropes and shoelaces. They can be used for tying and untying knots, braiding or macrame.
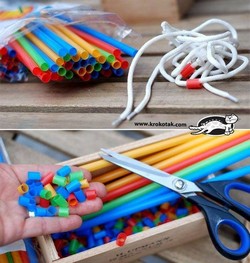
A very useful task related to stringing beads. It is better to make such “beads” yourself by cutting cocktail tubes. You can indicate the exact number of beads that need to be strung or ask them to create a beautiful pattern from them, alternating them in color.

Many games are connected with lacing. Such tasks can often be found on the pages of developing felt books.
Paper games
When working with paper, offer children the following tasks:
- creasing and smoothing a sheet of paper;
- folding origami.
A very addicting game of creating a planned mess. First, children are invited to tear colored paper into small pieces, and then make colorful rain out of them, throwing them into the air. After the active phase of the game, you need to ask the kids to help collect all the scraps, which is also very useful for the development of fine motor skills. These pieces can be used for torn appliqué. During this game, invite children to tear paper of different thicknesses (from newspapers to cardboard).
Clothespin games
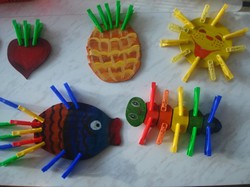
The set should contain clothespins of different colors. Also for such games it is necessary to prepare different templates. You can offer the following tasks:
- attach needles to a hedgehog;
- add rays of the sun;
- do the boy's hair.
Clothespin games are very popular in math and reading classes, so you can combine these types of activities and ask children to use clothespins to:
- count examples;
- attach the corresponding number of clothespins to the number template;
- enter the correct letter.


Match games
Although matches are not a toy for children, they can be used to develop fine motor skills by giving such tasks:
- shifting from stack to stack;
- laying out the figures from the matches, which is drawn in the picture;
- folding into a box.
Children like to collect matches in a cube with a small hole made in the center of one of the faces. You can use cotton swabs instead of matches.
In modern pedagogy, much attention is paid to the development of fine motor skills. Systematic fine motor skills lessons have a positive effect on the overall development of the child. In addition, today children especially need such games, as they are less and less faced with the opportunity to train the dexterity of their fingers in everyday life. For the same reason, experts advise parents to give children the opportunity to dress themselves and fasten various fasteners, help their mothers with cleaning, start holding a spoon on their own as early as possible and develop self-care skills.
A few tips for parents to make fine motor skills more effective:
- to interest the baby, turn classes into a fun game, involve fairy-tale characters in your game, come up with stories, a plot for games;
- start with simple, gradually moving to more complex tasks;
- but remember: if the child easily copes with the exercise, do not dwell on it, move on to the next games;
- it is also worth paying attention to those tasks that the child does not succeed in, and then move on to new games;
- all that a child can do about housework and self-care are the best exercises for developing fine motor skills;
- the exercises themselves do not develop the speech and thinking of the child if the parent is not involved in the process and does not communicate with the child. Try to select for the child new and interesting tasks for him, something new and unusual for him, which he has not yet encountered;
- games should be short, but regular.
Ideas for activities and games to develop fine motor skills
Stringing rings on a rod. It can be a classic pyramid, or maybe just such an impromptu game. You can use a box with old discs.
Such exercises train well the tweezer grip and the grip of an object with three fingers.
Sorting of any small items. First, it is better with fingers, then with tweezers.
You can take an ordinary medical pear or a plastic bottle. A jet of air can blow off cotton pads, leaves, paper snowflakes, etc.
Oversleeping and transfusions perfectly train manual dexterity and coordination of movements.
Paper games: tear into small pieces, stripes, just crumple. You can lay out various shapes or letters and numbers.
Frames with various fasteners.
 etsy.com
Work with plasticine or dough: knead with hands, sculpt figures, press objects into plasticine. You can see more details here “?”
Cutting lines, shapes and embroidery.

Fine motor skills are a physical process based on a combination of actions of the musculoskeletal system of the body and psychological control. The nervous system is responsible for the implementation of this work, connecting the limbs with the brain center. The use of fine motor skills of the hands sometimes occurs inconspicuously, at the level of the use of gestures during verbal communication. The development of motor skills is directly related to the development of speech, these sectors are in contact in the cerebral cortex.
The development of fine motor skills in children
With the birth of a child, the development of the surrounding world, of one's own organism, begins. To stimulate the development of crumbs, special toys are used. Hanging, floor attributes can be touched, tested for strength. By this, the child unconsciously trains his motor skills. Tactile sensations of roughness, softness of surfaces help to improve the perception of the environment.
From the age of one year for a small motorboat, you can use:
- Grains are poured onto the table, sorting out peas, shifting small objects from one vessel to another will improve coordination.
- Plasticine, dough in the process of modeling, all the nerve endings of the fingertips are involved.
- Parents perform hand and palm massages on their own, telling poems about the magpie-crow, finger games.

Working on motor skills in adulthood
In adulthood, the apparatus of motor functions must continue to develop, the stagnation of this activity leads to atrophy of brain cells. Ordinary actions bring a beneficial effect, among them: writing with a pen, pen, drawing. Work at the computer, this load does not apply. Good memory, delivered speech is also trained by hand massage.
On the palm there are points used to influence the organs of the human body, stimulation of the surface of the hands activates the impulses of the cerebral cortex. The saying of the German thinker “The hand is the brain that leaked out” accurately conveys the importance of practicing the development of motor skills of the limbs.
Activities that promote stimulation, development of motor skills:
- Various types of handicrafts simultaneously stimulate both limbs and brain activity, focusing on small details. In the old days, all women were engaged in fabric business, knitting, which helped to maintain the clarity of movements in old age. Beadwork, weaving stimulates the development of memory.
- To activate the necessary zones, men can turn to the modeling of technical objects (ships, cars, aircraft).
- A universal subject of a massage nature is clay. The flexible structure acts on the whole arm, involving the muscles of the wrist and hand.
- During the working day, you can conduct a series of exercises that strengthen motor skills by drawing in a notebook, notebooks. The main rule for drawing exercises is orderliness. A series of repeating loops, oblique lines, will remind you of writing in primary grades, will have a huge positive effect on fine motor skills of the hands.
- Finger gymnastics. A set of exercises for the phalanx of the fingers consists of flexion, extension. You can do this activity even in public transport. It is not necessary to select a specific sequence. To stretch your fingers, you can click your thumb on the middle one, cross one after the other, just clench your fist.
- Universal tool for warming up carpal expander. This device has a round shape, fits easily in the palm of your hand. To use, it is enough to periodically strain your fingers so that the ring shrinks.
Restoration of motor skills of hands after a stroke
Any injuries, not only of a local nature, but also of the brain area, harm the entire body. The same effect has an attack of stroke. The nerve connections of the human body stop working smoothly, the impulse is lost and does not always get to the appointed place. People who have suffered similar diseases suffer from difficulty in perceiving and recreating information, impaired motor skills of the body, including hands.
Rehabilitation centers help people with limited mobility recover. To perform a set of exercises, it is not necessary to resort to the help of specialists, among them:
- Gymnastic exercises. Unlike a normal workout in the recovery process, the main thing is control. The limbs cease to obey, may not respond to brain signals. Therefore, the main principle of training is to closely monitor the manipulations performed, controlling them.
- Creative activities. As in the classical versions of drawing, repetitive lines, stucco work is very productive for the development of motor skills. In addition to this, for a stroke survivor, the psychological aspect becomes important. Immersion in inner nature. Expressing oneself through art.
- ball exercise. This technique is used in kindergartens and special institutions. Balls of different shapes help to train dexterity by fixing the object with your hands. The ball is transferred from hand to hand, rolled on the table. There is self-massage with a sword, which will allow you to use several parts of the cerebral cortex responsible for perception and performance of actions at once. Balls should be used from different materials: fabric, rubber, pimples.
- improvised means. For gymnastic exercises, take a few nuts and touch them in the palm of your hand. Household activities stimulate motor skills well and bring the brain to working capacity. A lamp, a TV remote control, an elevator button require concentration of thoughts.
- High concentration will be required for sorting out, collecting such small details as puzzles, mosaics. Working with them constantly improve dexterity, memory, fine motor skills of hands.
Every modern mom understands the importance of developing fine motor skills for her baby. But not everyone knows how to properly develop fine motor skills in their children, what exercises need to be performed for this and what improvised means to use. Before we talk about exercises and activities that stimulate motor skills in children, let's look at the very essence of this concept and the tools for its influence on the development of the baby.
The main thing in the article
Fine motor skills of a child up to 3 years
Fine motor skills are the ability to perform various rather small manipulations, using the hands and fingers for this. In other words, it is an improved concept of "dexterity". The accuracy of the movements of the hands and fingers of the child is explained by the coordination and purposefulness of the important systems of his body, both muscular and nervous.
The fine motor skills of a child up to 3 years old consist of a large number of very different actions: first, the baby learns to grab a toy, a little later he already knows how to feel its components, and at 2-3 years old he acquires the first drawing skills, diligently holding a pencil or pen.
A newborn baby first examines his little hands, and then, through his first toys, learns to control his movements. The first "captures" of objects are performed with the help of the whole palm, and by six months he can take a toy with only two fingers.
Parents should promptly teach the child to hold a spoon, pencil or brush for drawing correctly: all these are necessary, basic exercises for improving his fine motor skills.
It has been proven that fine motor skills are directly related to the central nervous system of the child. Its influence on vision, hearing, memory, reaction speed, perception, speech development is very great.
In the child's brain, the centers responsible for motor skills and speech "adjacent" to each other. By stimulating the motor skills of the fingertips, we activate the speech center.
 In an effort to develop fine motor skills in children, parents use many different ways. We will focus on the most interesting and original.
Groats for fine motor skills
For the development of fine motor skills in children, various cereals have long been used. Not too small are most suitable: buckwheat, rice, pearl barley, oatmeal, as well as seeds. The youngest researchers are allowed to play with beans, peas, corn, different types of pasta (horns, pasta, shells).
 Grains are poured into a deep bowl and given to the child. The kid will touch such “material” for the game, spill the cereal through his fingers, strive to take a separate grain and examine it in more detail. This will not only stimulate the development of his motor skills, but also improve tactile sensations.
Important: during classes, do not leave the baby alone, in order to avoid an accident: the baby can swallow a grain or choke on it.
If you are still afraid to let your child play with cereals in their pure form, we suggest that you take several linen bags and, having filled them with different types of cereals, let the child feel them. This technique is also an excellent exercise for developing finger dexterity.
When the child reaches 2-3 years old, it will be possible to conduct more complex and interesting activities with him, involving various cereals, for example:
- mother draws an image on a piece of paper (it is better that it be a funny animal: a cat, a dog, a bear, so that the baby is interested);
- the child is invited to cover the drawing with a thin layer of glue using a brush;
- then you need to "color" the picture using cereals. For example, we apply buckwheat on the ears, barley on the abdomen, cover the paws with millet.
 Over time, the grains will stick to the image, and such a masterpiece of a small artist can be framed and admired for a long time.
 Drawing for fine motor skills
Drawing is not only a great way to diversify a child's leisure time, but also a great way to improve his fine motor skills. To begin with, it is important to teach your child how to properly hold a pen, pencil and watercolor brush. Be patient: not every child succeeds the first time. But when the baby is already confidently holding the “tool” in her fingers, you can start simple exercises.

You can draw not only with pencils, paints or hands: use other “tools” for art, such as cotton swabs or foam rubber sponges.
Connecting objects for motor skills
Disassembling and putting together various objects is an excellent training for a child's fine motor skills. We offer you some interesting exercises that will captivate even the most restless baby for a long time:

 Today, labyrinth toys for kids are very popular, in which wooden parts of various shapes and colors “roll” along a twisted wire. Tactile contact with natural wood in itself is very useful for the baby, and the connection of small parts in such a labyrinth will be an excellent exercise for his fingers.
Exercises for fine motor skills of hands in a child
 Elementary and simple exercises are the best way to develop fine motor skills of the crumbs. The smallest peanuts can be massaged with palms, stroking, lightly pressing and massaging the pads of each finger.
Then, when the baby is already watching your actions with interest, drive along his palm, saying various nursery rhymes and sayings, for example, the “Magpie Crow” known to everyone from infancy. Play "Ladushki" with your baby - so your child will learn to clap, bend and straighten his fingers.
When the baby is 6-7 months old, you can let him play with paper. Give him some sheets of colored paper, preferably soft. He will begin to examine it, and then begin to tear it into small pieces: at his age, this is an extremely useful and exciting activity that will make him squeal with delight.
For older children, modeling from plasticine or salt dough, as well as the lacing mentioned above, can be offered as an exercise for motor skills.
 You can use a variety of objects that differ in texture and size to improve motor skills.
 And the most elementary finger exercises are the following:
- fingers are compressed into a fist, then the child rotates the brush to the left, then to the right. Repeat the exercise 5 times;
- fingers with force are compressed into a cam and smoothly unclenched;
- straighten the fingers, and then bend and straighten the first 2 phalanges; repeat 5-7 times;
- game "fan": divorced straight fingers, starting with the little finger, are bent in a fan-shaped movement. When all fingers are gathered into a cam, carry out the exercise, starting with the thumb.
Finger games for hand motility
Finger games are necessary not only for the child: they are a good help for the mother who is raising him. After all, this is not only an excellent technique for developing the baby's motor skills, but also a great way to distract him and cheer him up: each such game is usually accompanied by a cheerful rhyme or nursery rhyme.
Children who regularly and with pleasure perform finger gymnastics begin to speak faster than their peers, comprehend the basics of writing, have a good memory and motor coordination. They are more collected and resistant to stress. Finger games are necessary for the child as often as possible: it is best to play them every day.
It is very important to verbally entertain the child in the process of such a game. A huge arsenal of finger games, tasks and trainings with funny, funny sayings is presented. Choose a game to your liking, have fun and develop!
Finger development for preschool children

For preschool children, the main attributes and assistants of finger development are crafts, which, in addition to motor skills, also develop imagination, creative skills, the ability and desire to make crafts.
Buy your child safety scissors, colorful cardboard and paper. It is necessary to teach him how to cut, use glue, create bright applications and make crafts.
 Collect dry, colorful leaves from the street and create a bright autumn panel out of them.
 These activities are necessary not only for finger development, they will also develop the child's creative thinking, perseverance and attentiveness. The skills acquired in the process of such games will definitely come in handy in kindergarten and school.
Music games for hand motor skills
If you expect your child to achieve musical achievement, introduce him to a variety of musical instruments from infancy. Pressing buttons and keys perfectly develops the motor skills of children's fingers, and the accompanying sound helps the little man to understand the connection between his actions and the music being played.
 For such activities, children's pianos, tambourines, drums, accordions, maracas, xylophones and balalaikas are well suited. In the process of musical games, not only fine motor skills develop and the work of the fingers as a whole is activated, but visual-motor coordination, sensory and mental sphere are also improved, the efforts of the fingers and hands of the child are regulated.
Fine motor disorders
In early childhood, a violation of the development of motor functions is especially noticeable, and entails tangible consequences. After all, the speech development of the baby is directly related to his motor skills and depends on the degree of development of the movements of the hands and fingers. You can talk about violations of fine motor skills when a child:
- constrained, has poor coordination;
- slow and clumsy;
- often drops objects;
- rarely participates in outdoor games, it is difficult for him to serve and catch the ball;
- at the age of 3-4 years, cannot hold a pencil correctly and draw a straight line;
- noticeable inconsistency in the actions of the hands of the child.
Statistics: about 5% of all preschool children suffer from fine motor skills and motor coordination disorders, the vast majority of them are boys.
However, the diagnosis of “motor disorder” itself should be made by the doctor, and if you suspect that your baby has some lag in the development of motor skills, take preventive measures with him: perform finger massage and gymnastics for fine motor skills of the hands.
Gymnastics for fine motor skills of hands
We offer you to get acquainted with some gymnastics techniques for improving the motor skills of the child's hands from the video.
Regularly doing the various exercises presented in our article is sure to give tangible results, not only in terms of improving fine motor skills: it will also help your baby learn the correct speech.
Introduction
My little friend, memorize the moves!
And with us
Learn to move without tension.
Our fingers need training
Everything will turn out so well!
Of course you have to work hard.
It will be easier to learn later.
Any job will be controversial.
You say: "Thank you for your concern!"
At present, a significant part of children have a weakness in the development of visual-motor and auditory connections, insufficient development of fine motor skills, and graphic skills. The study of the level of development of fine differentiated movements of the fingers and hands in children studying in the first grade shows that in many of them the movements of the hands are not purposeful enough and poorly obey the tasks of the activity. Complexly coordinated movements of the leading hand are especially poorly developed, the ability to use a pen or pencil as a working tool is poorly formed. As a consequence of this, the development of subject actions causes great difficulties. The timely development of fine motor skills, precise coordination in children, the formation of a synthesis of visual, auditory and kinesthetic information in them ensure the rapid and correct development of reading and writing skills.
This book is devoted to the development of fine motor skills, dexterity, coordination and the development of objective activities. It offers both developing and corrective-developing exercises and tasks that help prepare the hand as a direct tool for graphic activity to perform precise and complex movements. The implementation of these exercises allows you to develop and improve the precise movements of all parts of the arm: shoulder, forearm, hands and fingers, and also improves overall coordination and dexterity of movements.
In addition, the book describes outdoor games that promote the development of motor dexterity and activity, which are the basis for the full-fledged physical development of the child.
Section 1. Preparing the hand for writing. Development of fine motor skills

The accuracy of graphic actions is ensured by muscular control over fine (fine) motor skills of the hands. This is the dexterity of the fingers and hands, the coordination of their movements. The development of fine finger movements can be judged by observing how the child draws or paints over the details of the picture. If he constantly turns the sheet, cannot change the direction of the lines with the help of subtle movements of the fingers and hand, then the level of development of fine motor skills is insufficient.
Graphic Skill Development Test
The child is given a piece of paper in a box, on which a previously adult (teacher or parent) writes on the left side a sequence of the same type of graphic elements: two large - two small - two large - two small and offer to continue this "pattern" to the end of the line. The assessment of the test results is carried out according to 6 parameters, for each of which 1 or 0 points are set, then the points are added up.
Evaluation of test results
Points
1. The nature of the lines is even, straight, the pressure is even - 1, uneven, trembling, double, curved - 0.
2. The size of the elements corresponds to the standard - 1, does not correspond to the standard - 0.
3. The shape of the elements corresponds to the standard - 1, does not correspond to the standard - 0.
4. The slope corresponds to the standard - 1, does not correspond to the standard - 0.
5. Deviation from the line is insignificant: (no more than Z0) - 1, significant - 0.
6. The sequence of elements: the sequence of large and small elements is correctly reproduced - 1, the sequence of elements is incorrectly reproduced - 0.
Result 6–5 points indicates that the child's graphic skill is well formed.
Result 4–3 points- the child has some difficulties in performing graphic movements, it is necessary to select exercises to correct those components of the graphic skill that are poorly developed.
Result 2–0 points- the graphic skill is very poorly developed, there may be serious difficulties in teaching writing at school.
The low level of development of the graphic skill is the cause of a number of difficulties in learning to write:
1) low rate of writing;
2) rapid fatigue when writing;
3) uneven, "trembling" line;
4) "angular" letter, difficulties in writing ovals;
5) too much pressure;
6) difficulties in reproducing the form of graphic elements;
7) non-compliance with the size of graphic elements;
8) non-observance of the inclination of the letter;
9) a large number of blots and corrections, a "dirty" letter;
10) unwillingness to perform written exercises.
To form a graphic skill in a child, it is necessary to teach him with the help of a system of special exercises. The main content of the training in preparing the hand for writing should be the development of small muscles and differentiation of the movements of the hands and fingers, that is, the formation of functional (physiological) readiness for the graphic activity of writing.
To develop a graphic skill, you should use:
Graphic dictation;
Line drawing: straight paths, curly paths;
Drawing: by dots, by contours, by cells;
Fulfillment of hatching: with different direction of movement of the hand, silhouette hatching.
For the development of fine motor skills of the hands, you should use:
Finger gymnastics;
Exercises for the development of subject actions. Performing various types of tasks, the child acquires the experience of graphic movements. At the same time, it is necessary to immediately teach the child the correct methods of action: draw a line from top to bottom and from left to right, be able to draw lines of various thicknesses and shapes, hatch evenly and without gaps, without leaving the contour. At 6-7 years old, the child should learn to perform the following types of hatching: straight vertical strokes (from top to bottom), horizontal (from left to right), oblique, glomeruli (circular hand movements that imitate winding and unwinding of the thread), semicircles (fish scales, roof tiles etc.), large loops. Particular attention should be paid to the implementation of lines of complex shape with one movement of the hand (ovals, circles, wavy and broken lines). The lines must be drawn without taking your hand off the paper; when completing a task, you cannot change the position of the sheet or notebook. Pay attention to the correct seating at the table. You need to start with simple tasks and gradually increase their complexity, increasing the lesson time from 10 to 15-20 minutes. After this, you should definitely take a break, during which you can perform finger gymnastics or exercises for the development of objective actions with the child.
Regular activities with the child will ensure correct and beautiful writing.
In addition, there is a close relationship between the coordination of fine finger movements and speech. Studies show that the development of fine motor skills of the hands is a necessary condition for the development of speech and thinking of the child.
Graphic dictations
Performed on paper in a box under the dictation of an adult. The child is asked to draw a line as follows:
1. Two cells left, two cells up, two cells right, two cells down, two cells right, two cells up, two cells left.
2. One cell right, one cell up, one cell right, one cell up, one cell right, one cell up, one cell right, one cell up, one cell right, one cell down, one cell right, one cell down, one cell to the right, one cell down, one cell to the right, one cell down, one cell to the right.
3. One cell left, four cells up, three cells right, four cells down, one cell left, three cells up, one cell left, three cells down.
4. One cell left, three cells up, two cells left, one cell up, five cells right, one cell down, two cells left, three cells down.
5. One cell down, five cells to the right, one cell up, five cells to the left, three cells up, five cells to the right, three cells down.
6. Four cells up, two cells to the right, one cell up, one cell to the right, one cell down, two cells to the right, four cells down, two cells to the left, one cell up, one cell to the left, one cell down, two cells to the left.
7. One cell up, four cells to the right, four cells up, one cell to the right, four cells down, four cells to the right, one cell down, nine cells to the left.
8. One cell to the right, seven cells up, one cell to the right, five cells down, three cells to the right, five cells up, one cell to the right, seven cells down, one cell to the right.
9. Four cells up, one cell to the right, three cells down, five cells to the right, three cells up, one cell to the right, four cells down, seven cells to the left.
10. Five cells up, three cells to the right, two cells down, five cells to the right, one cell down, five cells to the left, two cells down, three cells to the left.
line drawing
straight tracks
The child is asked to draw a line in the middle of a straight path, without leaving it and without lifting the pencil from the paper.

Curly tracks
- The child is asked to draw a curly path, connecting the hatching line. When passing the track, the child should try to follow as closely as possible all the bends and turns of the lines.
As in the previous task, the pencil should not come off the paper, and the sheet should not turn over during the task.

- The child is asked to draw a line in the middle of the curly track. When completing the task, special attention should be paid to the fact that you can not touch the walls (especially in labyrinths), the line should go in the middle of the track. The pencil does not come off the paper, and the sheet of paper does not turn over.

Painting
By points
The child is asked to connect the dots according to the instructions below the picture. The tasks should be performed as follows: the pencil or pen does not come off the sheet of paper, the sheet is fixed, and its position does not change.

Draw a figure point by point, as in the sample.
By contours
The child is asked

Connect the dots to complete the drawing.

Connect the dots to complete the drawing.

Connect the dots to complete the drawing.

Connect the dots to complete the drawing.

Connect the dots to complete the drawing.

By cells
On checkered paper, the child is asked to continue the pattern according to a given pattern.


The child is asked to complete the drawing by cells.

The child is asked to complete the drawing by cells.

The child is asked to draw a pattern on a piece of paper in a box according to a given pattern.

Filling hatches
Hatching with different direction of hand movement
The child is asked to perform various types of shading according to the patterns: vertical (top to bottom), horizontal (left to right), oblique, “balls” (circular hand movements), semicircles. Lines of complex shape should be performed with one movement of the hand. Hatching at first should be large, as the child acquires the skill of performing, their size decreases. In this case, attention should be paid to a decrease in the amplitude of movements of the hand.

Silhouette hatching
The child is asked to copy the drawing, hatching according to a given pattern.

Copying patterns
Children are invited to carefully analyze and copy patterns of patterns of beautiful “carpets” (an individual sample lies on the table in front of each child) and copy them as accurately as possible. After copying the patterns is completed, you can arrange a collective analysis and choose the most accurate copies closest to the original.

Finger gymnastics for the development of fine motor skills of the hands
Games and exercises with fingers are presented in literary sources in different versions: folk with speech accompaniment, author's based on poetry and without them. The advantages of such games include their simplicity and versatility, the absence of any special attributes for playing, and safety. Usually they are all simple in technique, but at the same time, when used regularly in working with children, they provide good finger training and prepare the muscles of the hand for writing. The use of finger games and exercises has a non-specific tonic effect on the functional state of the brain and the development of children's speech, causing them an emotional upsurge and a discharge of neuropsychic stress. Particular attention should be paid to the fact that children practice different actions (squeezing, relaxing, stretching the muscles of the hands), and also train in performing isolated movements with each finger of both hands.
Finger gymnastics is performed by a child as a repetition of what an adult is doing, so you should first master these exercises without a child.
1. Palms alternately hit the edge of the table.
2. Hands are pulled forward, clenched and unclenched fists.

3. Alternately, the fingers are bent first on the left, and then on the right hand. At the end of the exercise, the fingers should be clenched into fists.

4. Both palms are on the table. One of the palms is clenched into a fist, while the other remains motionless. Further, the palm that remained lying on the table is clenched into a fist. At the same time, the palm that was clenched into a fist straightens. After that, the task is played 5-6 times in a row at a fast pace. Make sure that when performing this exercise, the fingers do not spread out, but remain tightly pressed against each other.

5. Palms turned down. With both hands, a wave-like movement uphill (up) and downhill (down) is simultaneously imitated.

6. Both palms are clenched into a fist, thumbs are raised up, circular movements are performed with the thumbs.

7. The fingers are woven into the castle. The ends of the fingers of the left hand press on the upper part of the back of the palm of the right hand, bending it so that the fingers of the right hand stand up like a cockscomb. Then the fingers of the right hand are pressed on the back of the left hand, and the fingers of the left hand turn into a cockscomb.

8. The arms are stretched forward, the fingers spread out, tense as much as possible, and then relax, lower the hands and shake them slightly.

9. For one - the fingertips are pressed to the top of the palm, for two - the fingers quickly straighten and spread out.

10. The forearm is vertical, the palm is at a right angle, all fingers are pressed. Rotation of brushes away from you and towards you.
11. Hands are clenched into fists, thumbs are pulled up, bent and unbent. The same exercise is done with all the other fingers: index, middle, ring, little finger.

12. Hands are placed on the edge of the table and turn into five-fingered animals. On a signal, the animals rush to the edge of the table, moving their fingers like legs.

13. Both palms are on the table. Right - down, left - up. On command, the palms change places: right - up, left - down.

14. Hands are clenched at the elbows, holding the hands in front of the face. They bend and unbend the fingers at the same time, without squeezing them into fists.

15. The fingers are intertwined, the palms are joined and clenched as tightly as possible. Then they lower their hands and shake them slightly.

16. The palms are placed vertically to each other and closed. Then the palms open.

17. Alternately, the fingers are pressed against the thumb, forming a ring with it.

18. The hands are clenched into a fist, the thumb is pulled up and they begin to rotate it first in one direction, then in the other direction. The same is done with other fingers: index, middle, ring, little finger.

19. The fingers of both palms are intertwined and pressed into the castle. Then the fingers are straightened and again compressed into the castle.

20. Hands are clenched into fists, index and middle fingers are extended, as if forming two pairs of scissors. Then they begin to cut imaginary paper with them.

21. Hands are connected to the lock and pulled in different directions.
22. They interlock their thumbs and pull their hands in different directions. The same is done for other fingers: index, middle, ring, little fingers.

23. The fingers of both hands are folded together with the tips. Clap with the tips of the thumbs. The same - for the index, middle, ring, little fingers.

24. Left palm - vertically up, a fist is attached to its lower part. Then the position of the hands changes.

25. Alternately bend the fingers to the palm, starting with the thumb. Then alternately unbend the fingers, starting with the thumb.

26. The fingers are clenched into a fist, the index finger and little finger are extended. Moving forward, you should slowly move your fingers.

Formation of the ability to switch from one motor mode to another.
Mastering objective actions
For the development of fine motor skills of the hands, you can use exercises using sports equipment. In children with insufficient formation of fine motor skills of hands, mastering object actions causes significant difficulties. Depending on the individual capabilities of the child and the stage of work on mastering movements, one can vary the nature of manipulations with objects, use techniques such as shifting, tossing, catching; change the pace of work and the degree of its complexity, the number of items simultaneously involved in the work.
If it is difficult to perform exercises with the ball, you can temporarily replace the ball with a small bag of weight (sand, grain, etc.). After the child has mastered the listed exercises with the bag, you can repeat them using the ball.
Formation of the ability to switch from one motor mode to another.
Developing the ability to properly hold a pencil or pen, put it in a box, open and close the box, etc.
Developing the ability to put books, notebooks, a pencil case, rulers, paints, albums into a portfolio.
Playing games consisting of a series of actions, for example, catching a ball, throwing it to a friend, running into a circle drawn on the floor.

Section 2. Development of interhemispheric interaction
The formation and development of the functional asymmetry of the hemispheres begins to occur from an early age under the influence of a complex of biological and sociocultural factors. At the same time, the innate prerequisites for the development of one or another type of asymmetry are only prerequisites, and the asymmetry itself is largely formed in the process of individual development under the influence of social contacts. The functional asymmetry of the hemispheres is expressed in the difference in the distribution of neuropsychic functions between the right and left hemispheres.
The functional asymmetry of the hemispheres is one of the reasons for the existence of a certain structure of the psyche. It is associated with such psychological oppositions as concrete-figurative and abstract-logical thinking, flexibility and rigidity, etc. The different degree of expression of these mental properties, already largely represented in a child of six years old, forms a tendency to predominantly rely on the "left-hemispheric ”, “right hemisphere” or “equal hemisphere” types of thinking.
Left hemispheric type. The left hemisphere operates with words, conventional signs, symbols; responsible for the bill, letter; provides the ability to analyze, abstract, conceptual and two-dimensional thinking. Information received in the left hemisphere is processed sequentially, linearly, slowly. The dominance of the left hemisphere determines the tendency to abstract and generalize, the verbal-logical nature of cognitive processes, verbal, theoretical intelligence.
For successful learning activities, the following conditions must be met: an abstract linear style of presenting information, analysis of details, repeated repetition of material, silence in the classroom, the ability to work alone, closed-type questions, timeless tasks. Such children are characterized by a high need for mental activity.
Right hemispheric type. The right hemisphere operates with images of real objects, is responsible for orientation in space and perception of spatial relationships. Provides synthetic brain activity; visual-figurative, three-dimensional thinking associated with a holistic view of the situation and those changes in it that are desirable to obtain. Information received in the right hemisphere is processed quickly. The dominance of the right hemisphere determines the presence of non-verbal, practical intelligence, the ability to draw and perceive the harmony of shapes and colors, ear for music, artistry, success in sports.
The conditions necessary for successful learning activities: creative tasks tied to the context, the opportunity to experiment, speech rhythm, group work, synthesis of new material, open-ended questions, social significance of the activity.
Equivalent type. There is no pronounced dominance of one of the hemispheres. This ensures their synchronous activity in choosing a thinking strategy.
School teaching methods are focused mainly on the development of the left hemisphere and do not take into account the presence of various types of development of the functional asymmetry of the hemispheres, as well as the difference between boys and girls in the rate of development of the left hemisphere. Therefore, left-hemispheric and equal-hemispheric girls are in the best conditions, and right-hemispheric boys are in the most disadvantageous position.
Currently, the number of children with reduced activity of the left hemisphere is growing. Such children have an inability to learn new material, an inability to adequately read and write, a rearrangement of words, signs, signs, and phenomena. Sometimes they are "blind" to whole phrases. The described condition is called "dyslexia", which in Greek means "denial of the word." With dyslexia, the ability to verbalize spatial representations suffers, the immaturity of visual and graphic skills, and the weakness of verbal and logical thinking are revealed. The tasks most difficult for children with damage to the right hemisphere (constructive, orientation in a schematic representation of spatial relationships, stereognosis) are performed by the majority of children with dyslexia at the level of healthy peers. Left hemispheric insufficiency, both at the functional and morphological levels, may be due to hyperfunction of the right hemisphere, which suppresses the maturation and functional activity of the left hemisphere.
Thus, difficulties in mastering reading in children are associated with a violation of the optimal interhemispheric interaction. At the beginning of the year, the functional superiority of the right hemisphere over the left is noted in older preschoolers and first graders. At the end of the first year of training, the left hemisphere becomes the leading hemisphere. In this case, the assimilation of reading occurs without complications. Children who start school with a left hemisphere dominant in terms of activity develop dyslexia. At the same time, the pace of reading is sharply slowed down, but few errors are allowed. The same thing happens with those students who start learning with the right hemisphere active, but there is no change in the activity of the hemispheres by the end of the year (P-type dyslexia). In this case, the reading rate is relatively high, but there are many errors. Normally, the change of the hemisphere leading in activity should occur from the right to the left during the year. The need for such a reversion of the interhemispheric balance is due to the fact that at the initial stage of mastering literacy and graphic symbols, the greatest functional load falls on the brain systems responsible for perceptual processing of visual-spatial information (grapheme assimilation).
Attempts to exert psychological or disciplinary influence on a student with dyslexia lead to negative consequences. Attempts to speed up the pace of mastering reading have an unfavorable effect: this almost always aggravates reading disorders. Often dyslexia is accompanied by dysgraphia.
In the vast majority of children, dyslexia could be prevented by choosing the optimal method for them (analytico-synthetic or visual) and the pace of learning.
To ensure the harmonization of the child's mental activity, a differentiated system for selecting corrective methods in accordance with the type of asymmetry of the hemispheres is necessary. For the development of interhemispheric connections, as well as for the development of the right and left hemispheres, complexes of kinesiology exercises can be used.
Diagnosis of indicators of interhemispheric interaction
Sample N.I. Ozeretsky on the dynamic praxis "Fist-rib-palm"
The child is shown three positions of the hand on the plane of the table, successively replacing each other:
palm on the plane,
clenched hand,
Palm edge on the plane of the table,
Again straightened palm on the plane of the table.

The child performs the first test together with an adult, then repeats it from memory 8-10 times. The test is performed first with the right hand, then with the left, then with both hands together.
The task is available to children 6 years and older. This test is sensitive to two types of errors. In the first case, switching from one movement to the next in an automated mode suffers: the child repeats or makes long pauses between movements. In the second case, children confuse the sequence of movements or skip some of them.
Developing the accuracy of finger movements and the ability to switch from one movement to another
The child is invited, without looking at his hand, following the adult to reproduce various postures of the fingers:
All fingers are straightened and closed, the palm is turned forward;
The 1st finger is raised up, the rest are gathered into a fist;
The index finger is straightened, the rest are gathered into a fist;
2nd and 3rd fingers are arranged in the form of the letter V;
The 2nd and 5th fingers are straightened, the rest are gathered into a fist;
The 2nd and 3rd fingers are crossed, the rest are gathered into a fist;
The 2nd and 3rd fingers are straightened and arranged in the form of the letter Y, and the 1st, 4th and 5th fingers are gathered into a fist (“bunny”);
The 1st and 2nd fingers are connected by a ring, the rest are straightened.

Development of arbitrary skills of the organs of speech
The child learns to pronounce various sounds due to good mobility and differentiated work of the organs of the speech apparatus. Accuracy, strength, range of motion develop gradually in a child. Adults can help him with this by conducting articulatory gymnastics.
Articulatory gymnastics contributes to the development of movements of the speech organs necessary for the correct pronunciation of sounds and for combining simple movements into complex articulation patterns of various phonemes.
The child is invited to imitate to perform 11 actions:
1) Smile -

2) Puff out cheeks -

3) Make lips with a tube "U" -

4) Make lips, as when pronouncing the sound "O" -

5) "Roll the nuts on the cheek" -

6) Stick out the tongue with a spatula -

7) Raise the tip of the tongue up and put it on the upper lip -

8) Put the tongue on the lower lip -

9) Place the tip of the tongue in the right corner of the mouth -

10) Place the tongue in the left corner of the mouth -

11) Stick out the tongue and make the tongue narrow -

Development of the skill of orientation in the body scheme
1. The child is invited to reproduce the movements performed by the adult sitting opposite him: touch the right ear with the left hand, the left eye with the right hand, the right eye with the right hand, etc. The task can be used for children 9 years old and older. Its execution requires a mental spatial reorientation to overcome the tendency to mirror reproduction.
2. Simple orientation. Instruction: "Raise your left hand (you need to start only with the left hand), show the right eye, left leg." If the task is completed, then go to the next one, if not, stop.
3. Instruction: "Take hold of the right ear with your left hand, with your right hand - with your right ear, with your right hand - with your left ear, show your right eye with your left hand."
Exercises for the development of interhemispheric interaction
The proposed exercises improve mental activity, synchronize the work of the hemispheres, improve memorization, increase the stability of attention, and facilitate the process of writing.
The duration of classes depends on age and can range from 5-10 to 20-35 minutes. in a day. You need to do it daily. The duration of classes for one set of exercises is 45–60 days. It is advisable to take a break (two weeks) between the complexes.
COMPLEX № 1
Ringlet. Alternately and as quickly as possible, it is necessary to sort out the fingers, connecting the index, middle, etc. into a ring with the thumb.

The exercise is performed in the forward (from the index finger to the little finger) and in the reverse (from the little finger to the index finger) order. At first, the exercise is performed with each hand separately, then together.
Fist-rib-palm. Three positions of the hand on the plane of the table successively replace each other. Palm on the plane, palm clenched into a fist, palm edge on the plane of the table, straightened palm on the plane of the table; performed first with the right hand, then with the left, then with both hands together. The number of repetitions is 8-10 times. When mastering the program or in case of difficulties in performing, the child helps himself with commands (“fist-rib-palm”), saying them aloud or to himself.

Mirror painting. Put a blank sheet of paper on the table. Ask the child to hold a pencil or marker in both hands. Ask him to draw simultaneously with both hands mirror-symmetrical drawings, letters (according to the proposed model).
Ear-nose. Grasp the tip of the nose with your left hand, and the opposite ear with your right hand. Simultaneously release the ear and nose, clap your hands and change the position of the hands "exactly the opposite."
COMPLEX № 2
Instruction:“Knock on the table with a relaxed right hand, and then with your left hand.”
Instruction:“Leaning on the table with your palms, half-bend your arms at the elbows. Shake your brushes in turn.
Instruction:“Connect the terminal phalanges of the straightened fingers. With the fingers of the right hand, press firmly on the fingers of the left, then vice versa. Practice these movements for each pair of fingers separately.
Instruction:“Tap with each finger of your right hand on the table counting “1, 1-2, 1-2-3, etc.”
Instruction:“Lock the forearm of the right hand on the table. With your index and middle fingers, take the pencil from the table, lift and lower it. Do the same with your left hand."
Instruction:“Roll out a small lump of plasticine on the board in turn with the fingers of your right hand, then your left.”
Instruction:“Rotate the pencil first between the fingers of the right hand, then the left (between thumb and index; index and middle; middle and ring; ring and little finger; then in the opposite direction).”
Instruction:“At the command“ Ear! ”grab the ear, at the command“ Nose ! An adult not only gives these commands, but also performs movements together with the child, sometimes making deliberate mistakes and provoking him to wrong movements.

COMPLEX № 3
Instruction:“Standing lower your hands, take a quick breath, pulling your hands to your armpits, palms up. Then, exhaling slowly, lower your arms along the body with your palms down.

Instruction:“Standing, make a few strong swings with your hands, spreading them to the sides. Close your eyes, imagine that you are flying, flapping your wings.

Instruction:“Run around the room, wave your arms and shout loudly. On command, stop and relax. The exercise can be performed while sitting or lying on the floor, waving your arms and legs.
Instruction:“Press your palm to the surface of the table. First in order, and then randomly raise your fingers one at a time and call them.
Instruction:“Get on all fours and crawl without touching the placed objects on the floor. Put your hands crosswise.
Instruction:“Sitting on the floor, stretch your legs out in front of you. Make movements with the toes of both feet, slowly bending and straightening them, first together, then alternately.
For classes with a group of children, group gymnastics can be offered.
group gymnastics
The children go to the middle of the room. The host tells them: “Today we are doing unusual gymnastics. Each of you can manage your body well. Started!”
1. Warm up in a circle. Children perform movements while standing in a circle:
Instruction:"You are awakened kittens - stretch your paws, release your claws, raise your muzzles."

Instruction:"And now you are tigers stalking the jungle - we walk on our toes silently, carefully."
Instruction:

Instruction:“The wind blew and tore off the leaves - they flew easily, smoothly: running on toes in a circle and lightly swaying the hands spread apart with the hands.”

Instruction:"Let's take a deep breath and turn into balloons - we jump up and softly, smoothly take off, stretch up to the sun: hands rise through the sides up, rise on toes."

Instruction:"Let's jump like hares to become dexterous and strong: light jumps are performed, arms are bent at the elbows, hands are freely lowered."

Instruction:"Now we are pendulums - heavy, bulky - we will sway from side to side: legs shoulder-width apart, hands on the belt, tilts are performed with the heel off the floor."
Instruction:“Now we are pilots - we will start the engine of the aircraft, spread our wings and fly: running in a circle, arms spread out to the sides.”

Instruction:“Clear water flows - softly, smoothly: “waves” are performed alternately with right and left hands, wave your hands to the center of the circle, “waves” are in front of you.”

Instruction:“We go through the thicket sharply, clearly” - the children march with a high raising of the knees and sweeping movements of the hands.
Instruction:“Turn into a rag doll” - the children raise their hands through the sides up. Consistently relax the hands, bend the arms at the elbows, freely lower the arms along the body, lower the head. Then tilt the body, knees slightly bent.
Instruction:"We fly like butterflies - easily, gracefully: spinning on our toes."
Instruction:"Rest" - the children stand motionless, holding hands, eyes closed.
Instruction:“Let's drip like a fine and frequent rain” - running on toes is fast, easy.

Instruction:“We fly like a mischievous sparrow” - small and frequent waves of hands, light running on toes.

Instruction:“Now let’s fly like eagles – slowly, the head is raised, the back is straightened, unhurried swings are performed with arms spread apart, running in a circle at a moderate pace.”
Instruction:“We look like an old grandmother: the back is bent, one hand is on the lower back, the other rests on an imaginary stick, a leisurely gait.”

Instruction:“Let's jump like a cheerful clown, fervently, joyfully” - the children, moving in a circle, perform jumps.

Instruction:"Let's carefully sneak up like a cat to a bird: we walk on tiptoes silently, insinuatingly, softly."
Instruction:"Let's feel the bumps in the swamp - carefully, carefully: hands on the belt, an additional step is being performed."
Instruction:“We fly like Baba Yaga on a broom, famously, quickly” - the children run around the room, holding on to an imaginary broom.
Instruction:“Joyfully run towards our mother” - the children quickly run up to the leader.
2. Small seed. The host invites the children to turn into a small seed.
Children shrink into a ball on the floor, remove their heads and cover them with their hands.
The "gardener" treats the seeds very carefully, waters them - strokes the children's heads.
With a warm spring sun, the seed begins to grow slowly, the stalk grows: the children, at the sign of the host, raise their heads and straighten up.
Branches with buds appear: the children spread their arms to the sides, their fingers are clenched into fists.

A joyful moment comes - the buds open: the children open their fists, and the sprout turns into a beautiful flower, then the flower becomes prettier, smiles at the neighbor flowers - following the example of the leader, the children smile at each other.

The flower bows to its neighbors, lightly touches them with its petals: the host invites the children to touch their comrades with their fingertips.
But then the wind blew, autumn comes. The flower sways in different directions, struggling with bad weather: children perform tilts to the right and left, legs shoulder-width apart, arms spread apart, hands freely lowered.
The wind rips off the petals and leaves: the children bend their arms at the elbows, then freely lower them along the body, lower their heads. The flower bends, leans towards the ground: tilt down, arms freely lowered.
The winter snow has gone. The flower again turned into a small seed: the children again squat, cover their heads with their hands. The snow wrapped the seed, it is warm and calm. Soon spring will come again, and it will come to life.

3. Planes

"Motor". Starting position - legs parallel, arms down. Raise your arms forward, rotate your arms bent at the elbows one around the other, return to the starting position.
"Pump". Starting position - feet shoulder-width apart, arms down. Lean forward, alternately raise and lower your arms, bent at the elbows, return to the starting position.
Wheel repair. Starting position - legs parallel, arms down. Raise your right knee, slap it with both hands, lower it. Perform the same movement, but raise the left knee.
"Planes are taking off." The starting position is the same. Sit down, stretch your arms to the sides, stand up.
"Planes are flying." The starting position is the same. Raise your arms to the sides. Lower.
4. Heron

"The heron takes the frog out of the swamp." Starting position: feet shoulder-width apart, left hand on the belt, right below. On 1-2 - bend over, touch the toe of the left leg with your right hand, do not bend your knees, on 3-4 - return to the starting position. The same for the other leg.
"The heron stands on one leg." Starting position: hands on the belt, on 1-2 - spread your arms to the sides, raise your right leg, on 3-4 - return to the starting position. The same for the other leg.
"The heron swallows the frog." Starting position: sit on your knees or on your heels. On 1 - raise your hands up and clap above your head, at the same time rise on your knees, on 2 - return to the starting position.
"The heron stands in the reeds." Starting position: hands on the belt. On 1-2 - lean to the right, on 3-4 - return to the starting position. The same to the left.
"The heron is jumping." Starting position: hands on the belt. On 1 - jump right foot forward, left back. On 2 - return to the starting position. On 3 - jump left foot forward, right back. On 4 - return to the starting position. For 4 counts - walking in place.
5. Replays. The leader performs simple movements, for example, clapping his hands, clapping his knees, stamping his foot, nodding his head, etc. The children repeat all the movements after the leader, trying to respond to the change of movements as soon as possible. The one who did not notice the change of movement in time is out of the game.

Final part. Breathing exercises: for 4 counts - a deep breath, for 4 counts - a slow exhalation ("deflated ball"); for 2 counts - a sharp deep breath, for 4 counts - a slow deep exhalation; on 4 counts - a deep breath ("with the whole chest"), on 2 counts - a sharp exhalation ("belly").
Section 3. Landing while writing
In older preschoolers, the large muscles of the trunk and limbs are already quite well developed. The small muscles of the back, which ensure that the correct posture is maintained when writing and reading, are not yet sufficiently developed. In addition, many children do not know how to sit properly at the table. Forced long sitting in the classroom, incorrect posture lead to severe physical fatigue. contribute to the violation of posture, the development of scoliosis, chest deformity, disorders of the cardiovascular and respiratory systems. For successful schooling, it is necessary that the child knows how to sit at the table correctly and hold the pen (pencil) correctly.
Correct fit
With the correct fit, the student should sit straight, the chest does not touch the table (the distance between the body and the edge of the table is 3-5 cm), both shoulders should be at the same height. The legs, bent at a right angle at the knees, rest with the entire foot on the floor or on the footrest. When writing, the hands lie so that the elbows protrude slightly beyond the edge of the table and are at a distance of about 10 cm from the body. The head is tilted slightly to the left in children writing with the right hand (Fig. a), or slightly to the right in children writing with the left hand (Fig. b). The notebook is placed obliquely to the left (for right-handers) or to the right (for left-handers) so that the bottom corner is opposite the chest. With his free hand, the student holds the notebook (Fig. a, b, c) and, as the page is filled, moves it up with this hand, while the bottom corner of the page is still directed to the middle of the child’s chest. If a child does not sit properly at the table when doing written exercises, this leads to a significant increase in the static load on the muscles of the back and shoulder girdle, which is one of the reasons for the increased fatigue of novice students. Improper seating at the table can also lead to serious health problems: curvature of the spine, decreased vision, diseases of internal organs, etc.

Correct fit when writing a child writing with his right (a) and left (b) hand.

The correct position of the notebook (a) and the hands of a right-handed (b) or left-handed (c) child when writing.
How to hold a pen (pencil)
When writing, a ballpoint pen or pencil should be held at an angle of 50–60 degrees (the opposite end of the pen is directed towards the shoulder) with three fingers: thumb, index and middle: the thumb and middle hold the pen, and the index holds it from above. The handle must be held loosely, without clamping it too tightly and without bending the index finger too much. The distance from the writing ball to the index finger should be about 2 cm. The support of the brush when writing is the nail phalanx of the slightly bent little finger and the lower part of the palm. The hand with most of its palm should be facing the surface of the table.

Formation of skills of correct landing and writing in left-handed children
Forming the skills of proper fit and writing, special attention should be paid to left-handed children. There are several ways to write with the left hand.
First way(Fig. a): a mirror image of the "right-handed" position of the hand when writing. They are mostly used by children. It is believed that such a position of the hand seriously complicates the learning process: since all the samples in notebooks (copybooks) are located on the left, when writing, the child closes them with the hand and cannot navigate them when performing graphic exercises. Therefore, with this method of writing, left-handed children very often experience a decrease or increase in the size of letters, and incorrect spelling of graphic elements.
Second way(fig. b): the left hand with the handle is located above the line. This method gives the child the opportunity to focus on a sample or previously written and reduces the number of graphic errors when writing. Left-handed children most often come to this way of writing themselves.
Third way(fig. c): the left hand with the handle is under the line. At the same time, the fulcrum of the writing hand is only the nail phalanx of the left little finger, the hand is almost completely on weight. With this method of writing, the child sees the sample well, he does not have to twist his hand, the previously written is not smeared. True, with this method there is a violation of the generally accepted requirements for tilting the letter to the right.

Section 4. Development of correct coordination of movements, speed of reaction and agility
To fully prepare a child for school, it is necessary to develop not only those parts of the musculoskeletal system that provide a full-fledged letter, but it is important to ensure the development of coordination of movements, motor dexterity and activity, which are the basis of the full physical development of the child. Sedentary, motorally awkward children get tired faster, cope with school loads worse than their mobile, active peers.
Test to determine the level of dexterity formation
On the treadmill (10 m), 8 pins are placed at a distance of 100 cm. Moreover, the distance between the start and the first pin, as well as between the last pin and the finish line is 150 cm.
The instructor gives the children a task - to run as quickly as possible between the pins and not hit them. On command, the child runs to the finish line. At this time, the instructor, being at the finish line, fixes quantitative indicators. 2 attempts are made.
Quantitative indicator: the time in seconds it took to complete the task.
Qualitative indicators:
1. Straightness, rhythm of running.
2. Accuracy of movement (running without touching the pins).
Movement Coordination Test
Balls with a diameter of 20 cm are being prepared. The instructor invites the children to hit the ball without leaving the spot.
Quantitative indicator: number of throws and strikes: 35–40.
Quality indicator: the ability to catch the ball with arms bent at the elbows at the chest.
The development of proper coordination, speed of reaction, motor dexterity and mobility is possible through the use of outdoor games.
The proposed outdoor games are intended for children of different ages (from 4.5–5 years old), both groups of children and members of the same family can participate in them, for example, children together with their parents. Parents can also act as facilitators. The proposed games are convenient because the range of their use is also quite wide - from family celebrations to organized activities. Including they can be used in group classes in kindergarten and in physical education classes in elementary grades of the school. You can use the proposed games both when exercising with children in the fresh air, and indoors.
Outdoor games
turnip
A pre-prepared requisite can act as a turnip - an inverted basin, a basket, etc. The “turnip” is covered with a piece of white or yellow fabric, a vessel with a bunch of leaves, a flower pot or some other attribute that depicts tops from turnips. The vessel is draped in such a way that only greenery is visible.
Having prepared the turnip, the game begins.
Children stand in front of the turnip. Previously, they can count the number of steps to the turnip. Then the children are blindfolded and they go to the turnip. The essence of the game is that blindfolded children, as a rule, do not find a turnip, their wrong searches are very fun for everyone present - both players and spectators.
The one who finds the turnip first wins. If this does not happen, then after a while the bandage is removed and new participants are included in the game.
If, in addition to children, parents are included in the game, this creates an even more fun atmosphere.
We are fun guys
Participants of the game stand on one side of the site or against the wall of the room. A line is drawn in front of them. The same line is drawn on the opposite side of the site. To the side of the players, approximately in the middle between the two lines, is the catcher.
Participants say in unison:
We are funny guys
We love to run and play.
Well, try to catch up with us!
One, two, three - catch!
After the word “catch”, the participants run to the other side of the site, and the catcher catches up with the runners. The one whom he catches (touches) before the runner crosses the line at the opposite side of the site is considered caught and sits down near the catcher. After two or three runs, they count those caught and choose a new catcher.
Sly Fox
The players stand in a circle at a distance of one step from each other. Outside the circle, the "fox's house" is outlined. The participants close their eyes, and the leader goes around the circle behind the backs of the participants and touches one of the players, who becomes the “fox”. Then the facilitator invites the players to open their eyes and look carefully, which of them is the "sly fox"? Will she give herself away somehow?
The players who play three times (at short intervals) ask first quietly and then louder: “Cunning fox, where are you?” While everyone is looking at each other.
When all the players (including the “sly fox”) ask for the third time: “Sly fox, where are you?” - the "fox" quickly jumps out to the middle of the circle, raises his hand and says: "I'm here!" All the players scatter around the site, and the fox catches them. Caught, that is, the one whom the “fox” touched, she takes to her “house”. A player who runs out of the area (circle) is considered to be caught.
After the “fox” has caught two or three participants, the host commands: “In the circle!” The players again form a circle, and the game resumes.
"Fox" begins to catch players only after the third time playing in unison ask:
"Cunning fox, where are you?" - and the "fox" will answer: "I'm here!" If the "fox" gave himself away earlier, then it is considered the loser, and in this case, the leader chooses a new "fox".
Sonya
The players stand in a circle. By drawing lots (or counting rhymes) they choose "sleepyhead". "Sonya" becomes the center of the circle. He is blindfolded. All the other players one by one try to quietly approach him, touch him with his hand and say: “Wake up, sleepyhead!”
If the "dormouse" feels that someone is approaching him, and touches him with his hand first, then the caught one takes the place of the "dormouse".
If the player managed to quietly approach the "drowsy", then he gets one point. The one with the most points wins.
Hen and chickens
Players line up in two lines - these are "chickens". A “chicken” stands in front of each chain. The chain is lined up opposite the other chain. At the sign of the leader, the “hens” try to touch the “chickens” from the other chain and, at the same time, protect the “chickens” of their side. The “chicken” touched by the “chicken” of another chain passes into its chain. The “chicken” with the most “chickens” at the end of the game wins.
Magic word
Participants become in a circle. The facilitator asks if everyone remembers the magic word "please". The game starts. At the command of the leader, the players follow him to repeat various movements. Before each command, the host repeats the magic word “please”: “Please sit down”, “Please put your hands on your waist”, etc. Players follow all these commands.
In the event that the host did not say the magic word, you do not need to execute the command. The player who made a mistake must enter the circle and complete some task - tell a rhyme, sing, jump, etc.
At the bear in the forest
In the "lair" (under a bush, in the corner of the room, etc.) there is a "bear". Participants with baskets in their hands “gather mushrooms and berries” and say: “I take mushrooms and berries from a bear in the forest”, repeating this several times. The host after a while says: “And in the den the bear sits and growls at us, growls ...” The “bear” begins to growl and crawls out of the “den”. At the sight of him, the players scatter. "Bear" is chasing them and trying to catch someone. Caught becomes a "bear".
Where is the clock?
The number of players is not more than four. The players line up near the wall. All participants in the game, except the leader, are blindfolded. The host hides an alarm clock somewhere. Players begin to listen to the ticking of the clock and carefully walk to the place where the clock is currently located. The host quietly and silently changes the place where the clock is hidden 2-3 times per game. The first player to get within a meter of the clock gets a point. The one who scores the most points wins.
cat and mouse
Two children are blindfolded. One of them is a "cat", the other is a "mouse". Children stand at the table, holding the edge with one hand. The “cat” is looking for the “mouse”, that is, on command, they begin to move around the table - the “mouse” seeks to run away, the “cat” seeks to catch up. It is impossible to let go of the hand with which the players hold the edge of the table. The leader keeps time. If in three minutes the "cat" caught the "mouse" - she won, if not - then the "mouse" won.
Answer fast
Participants line up in a circle or line. The leader throws a ball to one of them and names some color: for example, green. The one to whom the ball was thrown must name an object of this color: for example, grass or a cucumber. And so the game is repeated. The participants to whom the host throws the ball are randomly selected from among the players.
The game can be diversified by choosing as a basis not a color, but the quality or shape of an object: round, square, wooden, hot, etc.
Pirate Island
A circle is drawn. This is a pirate island. All players stand outside the circle. Participants are not allowed to move more than two steps away from the circle. At the leader's command, all participants try to push each other into the circle. Whoever stands inside the circle with both feet must remain there, but he can also draw other participants into the circle. The game ends when most of the participants are inside the circle. Those who remain outside the circle win.
Peretag
1 option
All participants are divided into two teams of equal size and strength. The players of each team, clinging with their elbows, form two chains. The strongest and most dexterous players are placed in front of the chain. Having stood opposite each other, the leaders of both teams also grapple with their arms bent at the elbows and pull each in their own direction, trying to break the enemy’s chain or tighten it beyond the determined line. The team that succeeds wins.
Option 2
Before the start of the game, all participants are divided into pairs so that each pair has players approximately equal in strength and weight. Each pair receives a strong stick about a meter long. The participants of each pair sit down opposite each other, and each takes the end of the stick. At the signal of the leader, each player pulls the opponent towards himself. The winner is the one who manages to knock down an opponent or at least make him get off the ground. The game requires both strength and dexterity.
Wolves in the ditch
Denoted "ditch" - the space between two parallel lines about a meter wide. "Wolves" are chosen - two or three players, the rest of the players - "sheep". "Wolves" climb into the "moat", and "sheep" graze on both sides of the moat. From time to time the "sheep" must jump from one side of the moat to the other. The task of the "wolves" is to catch the "sheep" (to touch). If the "wolf" touched the "sheep", then he gets a point. But after that, the “sheep” continue the game. After some time, new "wolves" are appointed. At the end of the game, the winner is determined by counting the points scored.
horses
Players are divided into two equal teams in terms of the number of players. A line is drawn on the ground. Teams stand on opposite sides of the line. By drawing lots, it is determined which of the teams will be "horses" and which will be "coachmen".
The "horses" firmly hold hands, approach the line and say in chorus: "Ta-ra-ra, ta-ra-ra, the coachmen left the yard."
After that, the "horses" scatter, and the "coachmen" catch them. In order for the “coachmen” to know who to catch, the “horses”, until they are caught, must all the time loudly click their tongues: “Tsok-tsok-tsok!”
After the “coachmen” have caught all the “horses”, the players change roles.
Bell
The players take turns playing this game. The player is given a bell on a long string. It is necessary to go through a certain segment of the path or approach the designated place so that the bell does not ring.
Running with potatoes
Each player is given a spoon containing a potato. The task is to run to the line and back as soon as possible without dropping the potatoes. If a potato falls while running, the player can pick it up and put it back in the spoon and continue running. The player who runs first wins. To complicate the task, you can choose not a direct path, but running along a winding path or with small obstacles.
Outlanders
Players will be divided into two teams and stand opposite each other at a distance of 5-6 meters. At a distance of 10–11 meters, another line is drawn - the “country” from where the “foreigners” arrived. The team of "foreigners" starts. Taking a step towards the opponents, they say: "We have arrived." The opposing team asks, "Where did they come from?" "From Japan (Hungary, Italy, America, etc.)". Opponent team: "What is your profession?" In response to this question, the team of "foreigners" must, without words, only with facial expressions and gestures, show what they are doing. The meaning of the game is that the participants are trying to convey those characteristic gestures and situations that exist in each profession. The opposing team is trying to guess the profession of "foreigners". As soon as the profession is guessed, the "foreigners" start running to their "country", and their opponents pursue them. The one who is caught before he has time to reach his line becomes a "prisoner". Then the roles change. The game is repeated several times. The team with the most captives wins.
Bird Market
6-7 people play. One is the "seller", the other is the "buyer", the rest are the "chickens". "Chickens" squat down and wrap their arms around their knees.
The “buyer” approaches the “seller” and asks: “Are there any chickens for sale?” - "There is". - "Can I see?" - "Can". The "customer" comes in behind the "chickens", touches them one by one and says: "I don't like this one, this one is too skinny, this one is too small... But I'll take this one."
The “seller” and “buyer” raise the selected “chicken” by both elbows into the air, swinging, saying: “Good chicken, does not unhook his hands, does not laugh.”
The task of the “chicken” is to remain serious and not to disengage hands. If he starts smiling, laughing, unhooks his hands, he is out of the game.
Father Frost
Santa Claus is chosen according to a counting rhyme or lottery. The participants scatter around the site, Santa Claus is chasing them and trying to touch them, that is, "freeze". "Frozen" must stop in the position in which he was "frozen". The game ends when a certain number of players are "frozen" (by agreement). Then a new Santa Claus is chosen and the game is repeated.
Shuttle
All participants in the game stand in pairs facing each other and hold hands. This is the "gate". Starting from the last pair, all participants take turns running or passing under the “gate”, holding hands, and stand in front. You need to run so as not to hit the "gate". A pair that hits the "gate" is eliminated from the competition, but continues to participate in the game as a "gate".
The game is repeated several times. Each time the height of the gate changes. At the beginning of the game, the participants hold their hands at shoulder level, and at the end - at waist level. The lower the “gate”, the more difficult it is to pass under them. The game ends when all couples pass under the lowest "gate".
The game can be complicated in this way: participants, running under the “gates”, must carry various objects - a bucket of water, a ball in a spoon, etc.
Tracks
On the ground, "paths" are drawn - lines of different shapes containing complex turns. The length of the track must be at least three meters. Participants run along the tracks, making difficult turns while maintaining balance. You need to run, exactly stepping on the line and not bumping into the runner ahead.
The game can be played like a competition. To do this, draw several tracks of the same shape, parallel to each other, as in a stadium, and the participants, at the command of the leader, run along the tracks in a race. The one who runs first wins.
Petushki
Participants are divided into pairs and stand at a distance of 3-5 steps from each other. Couples depict fighting cockerels - jumping on one leg, they try to push each other with their shoulders. Hand pushing is prohibited. The one who lost his balance and stood on the ground with both feet is out of the game. Winners from different pairs unite and continue the game. Before the start of the game, the participants agree on how they will hold their hands - behind their backs, on their belts, support the knee of a bent leg, or they should cross their arms over their chest.
The "fight of cockerels" can also be done in a squat, while the hands are on their knees.
Coachmen and horses
The participants in the game are divided into threes - two "horses" and one "coachman", who leads them from behind by the "reins" - ribbons. The leader in the course of the game gives various commands, and the “coachman” makes sure that the “horses” perform them correctly. The leader, in turn, makes sure that the “coachman” does not miss the mistake of the “horses”. For this, the “coachman” receives penalty points (or gives a phantom, which at the end of the game must redeem - read a poem, sing, etc.). During the game, the “horses” walk, trot, gallop, turn right, left, stand still, etc. At the command of the host, “Horses, in different directions!” The "coachman" releases the "reins", and the "horses" quickly scatter in different directions. At the command "Horses, find your coachman!" The "horses" return to their "coachman" as quickly as possible. At the command "Coachman, find your horses!" "coachman" gathers together his pair of "horses". When the game is repeated in each triple, the “coachman” changes.
Section 5. Developing a sense of rhythm
Speech therapy rhythm involves the correction of coordination of movements and speech. The connection of movements and speech normalizes the state of muscle tone, helps to get rid of emotional and motor tightness, coordination of breathing processes, voice leading, articulation. It helps to regulate the rhythm of speech, prevent and overcome such speech disorders as a violation of the pace of speech, mainly its acceleration, blurring, blurred sound pronunciation, stuttering.
Logo-rhythmic exercises contribute to the development of the tempo and rhythm of speech breathing, the development of articulatory motor skills, the strengthening of facial muscles, the formation of a phonemic system, the development of tempo-rhythmic and melodic-intonational characteristics of speech, the development of the ability to combine movements and speech, coordinate them, subordinate them to a single rhythm, have a beneficial effect on the formation of spatial representations.
The syllable-by-syllable speech rhythm is uniformly repetitive; in terms of its mechanisms, it is related to walking, breathing, and heartbeat.
All exercises are easy to perform, aimed at coordinating speech with movement. The child in conjunction with the adult for each syllable synchronously makes movements with his arms, legs, palms.
For example, a child reads a well-known poem by A. Barto, clapping each syllable with his palms:
U-RO-NI-LI-MI-SHKU-NA POL O-TOR-WA-LI-MI-SHKE-LA-PU
Or walking in place, chanting:
NO, - ON-RIGHT-WE-RE-SHI-LI PRO-KA-TIT-KO-TA-VMA-SHI-NE
Or by smoothly conducting with one or two hands:
AND-CHILD-WOULD-CHOK, - KA-CHA-ET-SHEETS-HA-ET - ON- HO-DO
The child can be invited to imagine himself as an artist who reads poetry on stage in a children's theater and is listened attentively by small children. Thanks to this, speech will become more expressive and loud, and the lesson will turn into an interesting game.

The formation of spatial representations is associated with the use of different systems of orientation in space. The most ancient system of orientation is the body scheme.
The formation of spatial representations in a child is one of the most important conditions for a successful educational activity of a child.
The first step should be to mark the child's left hand. You can wear a watch or a bracelet on it. Thus, the child acquires a “reference point”, receives support for further manipulations with external space. The child knows that on the left is where the bracelet is. The top is the head, the ceiling, the sky, the sun. Bottom - legs, floor, earth.
The basic exercise for the formation of spatial representations is that each exercise is “fixed” with a certain movement. For example, up, forward, back, right and left - a simple step or jump on two legs, a step or jump with a turn in the appropriate direction, down - sit down. The concepts of “further”, “closer”, “between”, “about”, etc. are fixed similarly.
Additionally, you can offer the child external landmarks, for example, if you stand facing the window, then there will be a door on the right, and a wall on the left.
The warm-up complex may include exercises for the formation of spatial representations.
Jumping in place
- jumping on two legs with a turn of 180 degrees in both directions;
- jumping over a small object lying on the floor;
- jumping to the right and left on two legs or on one leg;
- jumping forward or backward on one leg or on two legs;
If jumping is difficult, the child can be offered to step over objects, move forward, backward, right, left.
Repetition of the movements of the teacher or parents
Instruction: "What I will do with my right hand, you must also do with your right hand."
An adult and a child stand opposite each other.
- show the left eye with the right hand;
- show the left ear with the left hand;
- show the left knee with the right hand, etc.
Motor dictation
- take one step forward two steps to the right;
- one step back two steps to the left;
- turn 180 degrees to the right, then to the left, etc.
Making plans
- drawing up a diagram of the room;
- drawing up a class diagram;
- drawing up a route plan;
- search for an object in the room according to the plan-scheme proposed by adults.
Awareness of motor abilities
- the plot "Desert" - an imitation of movement on hot sand on a hot day;
- the plot "Snake" - movements on the floor without the help of hands (on the stomach, on the back);
- the plot "Frog" - jumping on all fours;
- the plot "Roll over the field" - rolling and somersaults in different directions;
- plot "Hare" - jumps and transitions;
- plot "Bear" - slow, heavy, strong movements;
- the plot "Fox" - smooth, flexible, fast movements;
- plot "Horse" - emphasis on the movements of the body and legs;
- plot "Titmouse" - small, short jumps, hand movements;
- the plot "Swan" - smooth, graceful, wide movements;
- the plot "Bird Yard" - children create images of poultry.
The instructor alternates both commands several times, arbitrarily changing the execution time of one and the other.
Section 7. Normalization of muscle tone and relaxation training
Normalization of muscle tone is one of the most important tasks in the formation of a child's motor skills. Deviation from the normal tone can be the cause of violations of the child's motor activity and affects the course of his general development.
Reduced muscle tone leads to a decrease in mental and motor activity of the child. An increase in tone, on the contrary, manifests itself in motor restlessness, emotional instability, and sleep disturbance.
Therefore, the child must be taught to control his own muscle tone and teach him relaxation techniques, that is, relaxation.
To learn how to control muscle tone and master relaxation skills, the following types of exercises can be offered.
"Fire and Ice" - alternating tension and relaxation of the whole body. Instruction:"Fire!" - children begin intensive movements with the whole body. The smoothness and degree of intensity of movements each child chooses arbitrarily. Instruction:"Ice!" - the children freeze in the position in which the team caught them, straining the whole body to the limit.
"Rag doll" - children are invited to imagine that they are puppet dolls, which, after the performance, hang on carnations in the closet. Instruction:“Imagine being hung up by your arm, your finger, your shoulder, etc.” The exercise is performed at an arbitrary pace.

“We wash clothes” - children perform intensive movements with their hands, imitating the process of washing trousers. Instruction: children make smooth, wide movements with their hands, depicting rinsing trousers in running water. After that, the trousers must be squeezed out, shaken and hung up.

"Beach" - children are invited to imagine that they are lying on warm sand and sunbathing. The sun is shining gently, a gentle breeze is blowing. Instruction:“You relax, listen to the sound of the surf, watch the waves play and the seagulls dance over the wave. Listen to your body. Are you comfortable? Try to relax as much as possible."

"Magic carpet". Instruction:“We lie down on the magic carpet. The carpet gently and slowly rises, carries us across the sky, sways, lulls. The tired body is relaxed, resting. Far below float fields, meadows, rivers, lakes. Gradually, the flying carpet descends and lands in your room. We stretch, take a deep breath, open our eyes, slowly sit down and gently stand up.

Exercises to redistribute muscle tone
Instruction:“Pass around: a glass of hot tea, a bowl of soup, a bowl of wet laundry, a fluff, a hedgehog, a weight, a kitten.”

Instruction:“Come out and in: like Pierrot, like Pinocchio, like Malvina, like a soldier, like Karabas Barabas, like Carlson, like Barmaley, etc.”

Instruction:“Depict movement in weightlessness - direct and backward; moving on hot sand in the scorching sun; tug of war; movement on a rocky path; through the marshy swamp; by moss; on snowdrifts through a blizzard; portray rest in high meadow grass, experience the pleasure of a light breath of wind.
Instruction:“Depict the movements of animals. Imagine yourself as some kind of animal or bird and reproduce the movements.
Instruction:“Picture the chef; photographer artist, hairdresser, etc.”
Anishchenkova E.S. Finger gymnastics for the development of speech in preschoolers. - M., 2006.
Anischenkova E.S. Logopedic rhythm. - M., 2006.
Belova T.V., Solntseva V.A. Getting ready for school. M., 2007.
Zaikin M.S., Sinitsina E.I. 250 developmental exercises to prepare for school. - M., 2001.
Karelina I.O. Emotional development of children 5-10 years old. - Yaroslavl. 2006.
Nizhegorodtseva N.V., Shadrikov V.D. Psychological and pedagogical readiness of the child for school. - M., 2001.
Semenovich A.V. Complex technique of psychomotor correction. - M., 1998.
Sirotyuk A.L. Correction of training and development of schoolchildren. - M., 2002.
Stepanova O.A. Prevention of school difficulties in children. - M., 2003.
Uzorova O.V. Finger gymnastics. - M., 2003.
Notes
1
2
M.S. Zaikin, E.I. Sinitsina. 250 developmental exercises to prepare for school. - M., 2001.
3
AND ABOUT. Karelina. Emotional development of children 5-10 years old. - Yaroslavl 2006.
4
N.V. Nizhegorodtsev, V.D. Shadrikov. Psychological and pedagogical readiness of the child for school. - M., 2001.
5
A.V. Semenovich. Complex technique of psychomotor correction. - M., 1998.